Aller au contenu principal

VTech Little Apps Tablet Battery Internal Wiring Replacement

Ce dont vous avez besoin

  1. VTech Little Apps Tablet Battery Internal Wiring Replacement, Battery: étape 1, image 1 de 1
    • Remove the 9.9 mm screw covering the batteries with a PH1 driver head.

  2. VTech Little Apps Tablet Battery Internal Wiring Replacement: étape 2, image 1 de 1
    • Use a plastic opening tool to pry the batteries out of their holding.

    • If replacing your batteries with new ones, be careful to insert them as indicated on the device.

  3. VTech Little Apps Tablet Battery Internal Wiring Replacement, Back Cover: étape 3, image 1 de 2 VTech Little Apps Tablet Battery Internal Wiring Replacement, Back Cover: étape 3, image 2 de 2
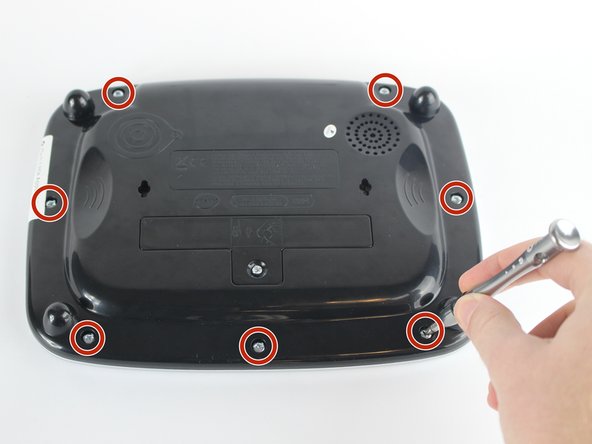
    • Position the VTech Little Apps Tablet face-down on a flat surface so that you can clearly see the back of the device.

    • Remove all seven 9.6 mm screws located around the perimeter of the back cover with a PH1 driver head.

  4. VTech Little Apps Tablet Battery Internal Wiring Replacement: étape 4, image 1 de 2 VTech Little Apps Tablet Battery Internal Wiring Replacement: étape 4, image 2 de 2
    • Gently remove the back cover then flip it 180 degrees so that the back cover of the device is now face-down.

    • Proceed with caution as there are wires attaching the back cover to the front cover of the device that could be easily detached.

  5. VTech Little Apps Tablet Battery Internal Wiring Replacement, Battery Internal Wiring: étape 5, image 1 de 1
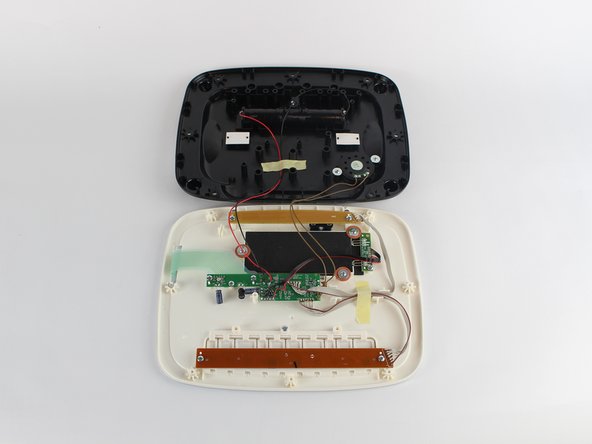
    • Visually inspect the wires connecting the motherboard to the batteries, looking for damage.

    • Possible damage includes: lead disconnections, wire fraying, and complete wire disconnections.

  6. VTech Little Apps Tablet Battery Internal Wiring Replacement: étape 6, image 1 de 1
    • Desolder the internal wire leads connected to the batteries, making sure to remove the positive (red) wire first, and the negative (black) wire second.

    • For assistance with soldering, see this Guide.

  7. VTech Little Apps Tablet Battery Internal Wiring Replacement: étape 7, image 1 de 1
    • Next desolder the same black and red internal wire leads connected to the motherboard.

    • The order does not matter for this step.

Conclusion

To reassemble your device, follow these instructions in reverse order.

Johnnie Cairns

Membre depuis le 02/10/16

495 Réputation

4 tutoriels rédigés

Équipe

USF Tampa, Team 2-6, Sullivan Spring 2016 Membre de l'équipe USF Tampa, Team 2-6, Sullivan Spring 2016

USFT-SULLIVAN-S16S2G6

3 membres

12 tutoriels rédigés

0 commentaires

Ajouter un commentaire

Nombre de vues :

Dernières 24 heures : 0

7 derniers jours : 8

30 derniers jours : 15

Total : 948