Aller au contenu principal

VTech Record and Learn KidiStudio Whammy Bar Replacement

Ce dont vous avez besoin

  1. VTech Record and Learn KidiStudio Whammy Bar Replacement, Whammy Bar: étape 1, image 1 de 2 VTech Record and Learn KidiStudio Whammy Bar Replacement, Whammy Bar: étape 1, image 2 de 2
    • Unscrew 11 PH2 screws (7 mm).

    • Remove black plastic backing.

    • Remove the batteries from the toy before beginning replacement of the whammy bar.

  2. VTech Record and Learn KidiStudio Whammy Bar Replacement: étape 2, image 1 de 2 VTech Record and Learn KidiStudio Whammy Bar Replacement: étape 2, image 2 de 2
    • Remove PH2 screw (5 mm) from yellow/gold colored circuit board and pull back to access the whammy component.

  3. VTech Record and Learn KidiStudio Whammy Bar Replacement: étape 3, image 1 de 2 VTech Record and Learn KidiStudio Whammy Bar Replacement: étape 3, image 2 de 2
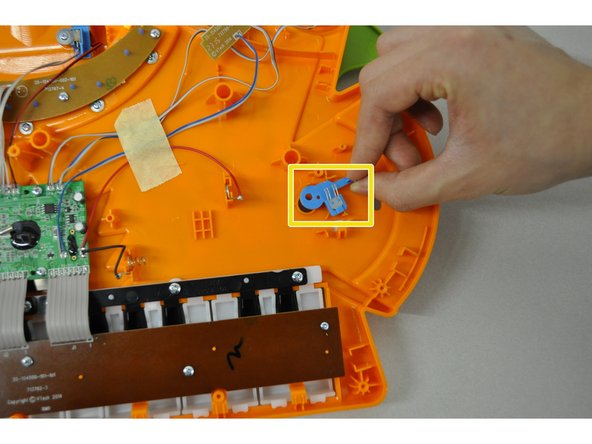
    • Remove 3 PH2 (5 mm) screws connected to the whammy bar component.

    • Remove blue piece from back of the device. This will free the whammy bar. Replace the whammy bar with new part.

Conclusion

To reassemble your device, follow these instructions in reverse order.

Shaina Carbonel

Membre depuis le 02/01/16

537 Réputation

5 tutoriels rédigés

Équipe

UW Tacoma, Team 1-1, Rose Winter 2016 Membre de l'équipe UW Tacoma, Team 1-1, Rose Winter 2016

UWT-ROSE-W16S1G1

5 membres

10 tutoriels rédigés

0 commentaires

Ajouter un commentaire

Nombre de vues :

Dernières 24 heures : 0

7 derniers jours : 0

30 derniers jours : 7

Total : 202