Cette version peut contenir des modifications incorrectes. Passez au dernier aperçu vérifié.
Ce dont vous avez besoin
-
Cette étape n’est pas traduite. Aidez à la traduire
-
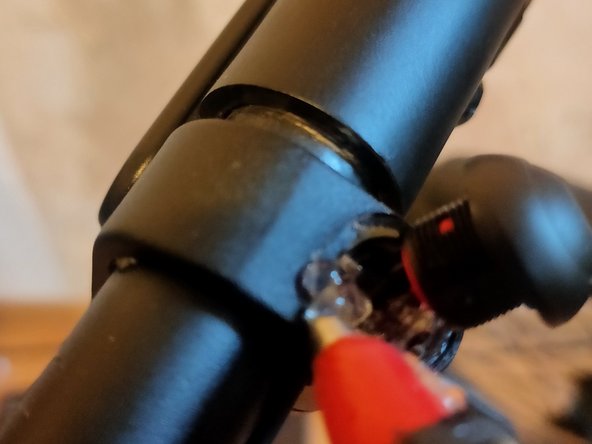
In my case the button was glued additionally. Cut around it to make it loose.
-
Use the 2mm hex screwdriver and remove the tiny screw on the side of the bell housing.
-
Use the pliers to unscrew the button. Screw to the left.
-
-
Cette étape n’est pas traduite. Aidez à la traduire
-
Loosen the 5mm screw located below the button.
-
This screw holds the break/button part on the wheel. Later, you will need to pull it off. As you can see, the cable goes through the rubber grips.
-
-
Cette étape n’est pas traduite. Aidez à la traduire
-
Use the wrench and the cloth to remove the handle grips. The cable goes through it - then through the handlebar.
-
-
-
Cette étape n’est pas traduite. Aidez à la traduire
-
Clean the handlebar of the goo. In my case it was wet inside.
-
-
Cette étape n’est pas traduite. Aidez à la traduire
-
Tie the old cable and the end of the new one together.
-
-
Cette étape n’est pas traduite. Aidez à la traduire
-
Unscrew the handlebar with the 5mm hex wrench.
-
Remove the rubber cap located underside the handlebar. Remember where you put it.
-
In my case the bell button was the unmarked cable. Start to pull it to get the new one through. Good luck!
-
-
Cette étape n’est pas traduite. Aidez à la traduire
-
If you are unlucky and loose the cable inside. Try to fix it to a wire.
-
You can also try to use the wire, to block the path through that hole in the wheel, and push just the cable. It should than bend and appear in the hole.
-
Use the hole and the tweezers to get the cable halfway through.
-
Connect the cables. And try the bell.
-
-
Cette étape n’est pas traduite. Aidez à la traduire
-
Put everything back together. Use some proper electrical tape to get the cable in place.
-
I removed the old glue with the tweezers and applied some fresh hot glue.
-
-
Cette étape n’est pas traduite. Aidez à la traduire
-
Link to Ebay NO if will not upload this to Thingiverse.
-


Annulation : je n'ai pas terminé ce tutoriel.
Une autre personne a terminé cette réparation.
7 commentaires
https://www.ebay.de/itm/115776735689 i was sold out.
Vielen Dank für diese ausführliche Anleitung. Das hat mir wirklich sehr geholfen beim E41!
Moin hätte eine Frage welche Größe hat die Mini Schraube an der Seite vom Knopf hab sie verloren Weis jetzt nicht ob m2 oder 2.5 würde mich über eine Antwort freuen