Aller au contenu principal

Visual Land Prestige Pro 7D Camera Replacement

Ce dont vous avez besoin

  1. Visual Land Prestige Pro 7D Camera Replacement, Back Panel: étape 1, image 1 de 1
    • Unscrew the two 4.0mm Phillips head screws found near the ports at the bottom of the device using a PH #00 screwdriver.

  2. Visual Land Prestige Pro 7D Camera Replacement: étape 2, image 1 de 1
    • Be careful when taking the back panel off. The speaker is connected to both the front and back panels, and may get pulled out if you are not gentle when lifting the back panel away.

    • Slide the plastic prying tool in between the front and back panel and pry them apart on all 4 sides.

    • It may be easiest to start on one of the sides, and work your way around the device. The bottom, with the ports, is the most difficult side and can be saved for last.

    • There are small latches that make this difficult. Moderate force may be required to separate the two panels.

  3. Visual Land Prestige Pro 7D Camera Replacement, Front-Facing Camera: étape 3, image 1 de 2 Visual Land Prestige Pro 7D Camera Replacement, Front-Facing Camera: étape 3, image 2 de 2
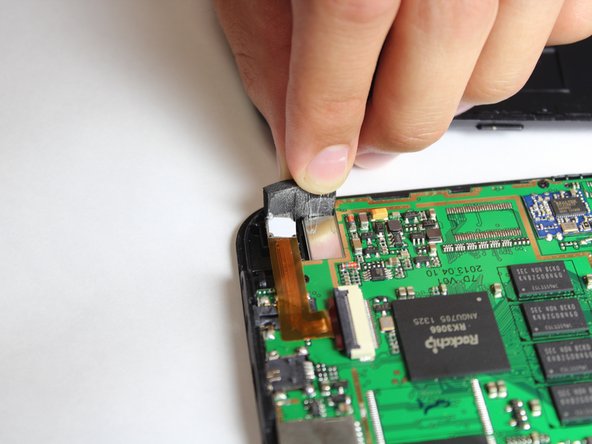
    • Remove the black pad on the back of the camera by peeling it off.

  4. Visual Land Prestige Pro 7D Camera Replacement: étape 4, image 1 de 1
    • With the bottom of the device facing away from you, pull the camera out of its black housing.

    • The camera will come right out when you lift with your fingers.

  5. Visual Land Prestige Pro 7D Camera Replacement: étape 5, image 1 de 1
    • Use the tweezers to lift the grey connector, connecting the camera ribbon to the circuit board, up from the beige housing. It should rotate up, and allow you to slide the ribbon out from under the connector.

Conclusion

To reassemble your device, follow these instructions in reverse order.

Brandon Kodama

Membre depuis le 10/17/14

229 Réputation

1 tutoriel rédigé

Équipe

Cal Poly, Team 10-41, Amido Fall 2014 Membre de l'équipe Cal Poly, Team 10-41, Amido Fall 2014

CPSU-AMIDO-F14S10G41

4 membres

12 tutoriels rédigés

0 commentaires

Ajouter un commentaire

Nombre de vues :

Dernières 24 heures : 0

7 derniers jours : 0

30 derniers jours : 0

Total : 444