Aller au contenu principal

Vtech Kidizoom Smart Watch DX Buttons Replacement

Ce dont vous avez besoin

  1. Vtech Kidizoom Smart Watch DX Buttons Replacement, Master Switch: étape 1, image 1 de 1
    • Make sure the master switch is "OFF" before disassembly, to avoid an electric shock.

    • Flip the watch over with the back facing up.

  2. Vtech Kidizoom Smart Watch DX Buttons Replacement: étape 2, image 1 de 1
    • Remove the four 6.0 mm screws on the back plate with the Phillips #00 screwdriver.

  3. Vtech Kidizoom Smart Watch DX Buttons Replacement: étape 3, image 1 de 1
    • Gently pull the back plate from the watch casing.

  4. Vtech Kidizoom Smart Watch DX Buttons Replacement: étape 4, image 1 de 2 Vtech Kidizoom Smart Watch DX Buttons Replacement: étape 4, image 2 de 2
    • Lift the master switch from the circuit board.

  5. Vtech Kidizoom Smart Watch DX Buttons Replacement, Circuit Board: étape 5, image 1 de 2 Vtech Kidizoom Smart Watch DX Buttons Replacement, Circuit Board: étape 5, image 2 de 2
    • The speaker wires are fragile. They may break if excessive force is used to remove the circuit board.

    • Removal of the circuit board requires soldering.

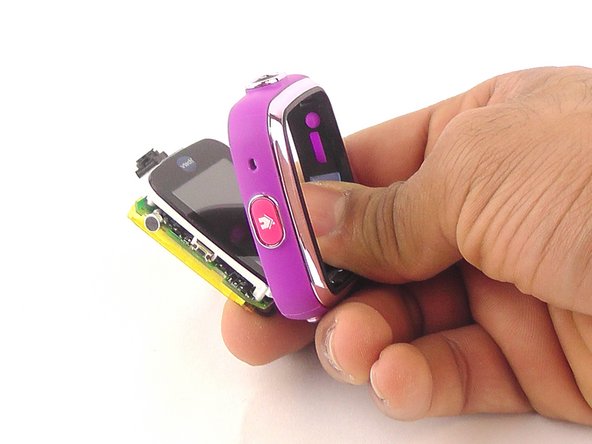
    • Gently push on the display from the front, near the camera. The circuit board and display will pop out through the back.

  6. Vtech Kidizoom Smart Watch DX Buttons Replacement: étape 6, image 1 de 1
    • Lift the circuit board carefully from the casing, without breaking or detaching the speaker wires at the bottom of the circuit board.

  7. Vtech Kidizoom Smart Watch DX Buttons Replacement: étape 7, image 1 de 1
    • Note which wire is connected to which lead before continuing. There are no markers on the circuit board to indicate where each wire belongs.

    • De-solder the black speaker wire from the circuit board.

  8. Vtech Kidizoom Smart Watch DX Buttons Replacement: étape 8, image 1 de 1
    • De-solder the red speaker wire, as in the previous step.

  9. Vtech Kidizoom Smart Watch DX Buttons Replacement: étape 9, image 1 de 1
    • Wait for the solder to cool down and solidify, then remove the circuit board from the casing.

  10. Vtech Kidizoom Smart Watch DX Buttons Replacement, Buttons: étape 10, image 1 de 1
    • Use the the tweezers to pull off the blue rubber cover behind the button.

    • The blue cover is adhesive, so you can stick it back onto the back of the buttons after replacement.

  11. Vtech Kidizoom Smart Watch DX Buttons Replacement: étape 11, image 1 de 1
    • Use tweezers to separate the backside tab from the front side of the button.

  12. Vtech Kidizoom Smart Watch DX Buttons Replacement: étape 12, image 1 de 1
    • Push the other half of the button out of the casing.

    • Repeat steps 11 and 12 for all buttons.

Conclusion

To reassemble your device, follow these instructions in reverse order.

2 autres ont terminé cette réparation.

Mohammed Alyaarubi

Membre depuis le 01/20/16

365 Réputation

1 tutoriel rédigé

Équipe

USF Tampa, Team 10-6, Remmell Spring 2016 Membre de l'équipe USF Tampa, Team 10-6, Remmell Spring 2016

USFT-REMMELL-S16S10G6

4 membres

12 tutoriels rédigés

Un commentaire

Where can you buy the replacement cover?

Katrina Nullatamby - Réponse

Ajouter un commentaire

Nombre de vues :

Dernières 24 heures : 2

7 derniers jours : 14

30 derniers jours : 21

Total : 5,563