Introduction
Après l'avoir ignoré pendant des années, Apple a finalement mis à jour le très apprécié MacBook Air. Ce nouveau poids léger arrive-t-il à tenir la cadence face aux ultraportables du cru 2018 ? Ou bien est-ce juste du vent ? Ouvrons-le pour en savoir plus.
Suivez-nous sur Facebook, Instagram et Twitter pour rester au courant des derniers démontages. Inscrivez-vous à notre newsletter pour recevoir les vues éclatées dans votre boîte mail.
Ce dont vous avez besoin
Vidéo d'introduction
-
-
Voyons un peu quelles spécifications sont dans l'air :
-
Écran Retina IPS rétro-éclairé par LED ; résolution de 2560 sur 1600 pixels (227 ppp)
-
Processeur dual-core cadencé à 1,86 GHz Intel Core i5 (Turbo Boost jusqu'à 3,6 GHz) avec carte graphique intégrée Intel UHD Graphics 617
-
Coprocesseur/puce de sécurité sur mesure T2 Apple
-
8 Go de SDRAM LPDDR3 à 2133 MHz
-
SSD PCIe de 128 Go
-
802.11ac Wi-Fi et Bluetooth 4.2
-
Deux ports Thunderbolt 3 (USB-C) compatibles avec la recharge, DisplayPort, Thunderbolt et USB 3.1 Gen 2
-
-
-
Avant de nous aventurer à l'intérieur, nous contrôlons rapidement quelques unes des caractéristiques extérieures du nouvel Air.
-
Son bas-ventre est orné de fines inscriptions et de quelques vis Pentalobe ton sur ton.
-
En l'ouvrant, nous découvrons le familier clavier "papillon" 3ème génération, ce qui fait immédiatement ressurgir les souvenirs du MacBook Pro.
-
L'Air ressemble de façon troublante au MacBook Pro 13" non Touch Bar. Seules l'épaisseur et Touch ID permet de les distinguer.
-
L'Air ne fait pas le moine … le MacBook 12" fait vraiment gringalet à côté.
-
-
-
Un dernier détour avant de plonger dans la bête : impossible de résister à l'envie de décapuchonner notre touche de commande favorite pour jeter un coup d'œil à la membrane
insonorisanteprotectrice. -
Adulé ou détesté, le papillon n'est pas prêt de s'en aller.
-
Quelques tours de notre fidèle tournevis Pentalobe, une manœuvre de main ferme pour détacher les deux clips du boîtier inférieur et nous voilà dans la place.
-
Nous inspectons l'intérieur : une petite carte mère, un ventilateur esseulé, une paire de haut-parleurs allongés et un dissipateur thermique aux allures intrigantes de radiateur.
Louis Rossmann expresses concern that the fan on the redesigned MacBook Air would not be particularly effective at cooling. Looking at the photos in this teardown, I would concur. Can anyone explain how the fan actually cools the computer, and how effective is it? Rossmann posted a video of this on YouTube in response to a dead CPU caused by overheating.
Hi Anthony,
The first string of comments at the bottom of this teardown goes into the cooling setup in more detail.
-
-
-
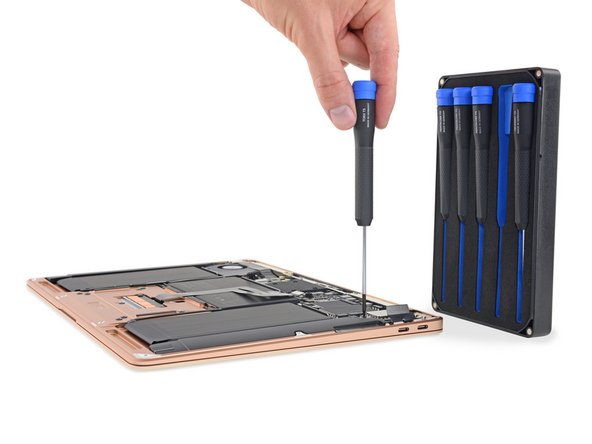
Seules six vis Torx et quelques connecteurs de nappe nous barrent la route vers la carte mère, pas mal ! Notre set de tournevis Marlin n'en fait qu'une bouchée.
-
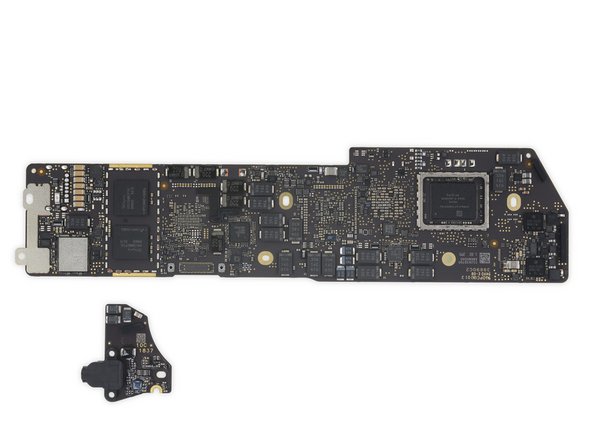
Et voilà ! La carte mère de l'Air ne porte pas la moustache comme celle du Pro, mais n'est pas aussi minuscule que celle du MacBook.
-
Puis nous mettons la main sur la carte fille qui abrite une prise jack (espèce en voie de disparition) et quelques connecteurs pour le haut-parleur et le capteur Touch ID.
-
Un autre habitant : un codec audio Cirrus Logic CS42L83A.
-
-
-
Cette carte a beau être de petite taille, son bagage est impressionnant :
-
Processeur SREKQ Core i5-8210Y Intel
-
Coprocesseur T2 APL1027 339S00535 Apple
-
Stockage flash SDSGFBF12 043G SanDisk (128 Go au total)
-
Contrôleur Thunderbolt 3 JHL7540 Intel
-
338S00267-A0 (probablement un CI de gestion d'alimentation Apple)
The Apple T2 Chip is already almost as large as the Intel i5 Chip. Imagine what will happen in a few years when ARM is replacing x86-64 on MacBook.
Who knows? Apple may announce for macOS 10.16 an ARM version of the OS that can run on existing T2 devices.
Haha
where can I buy this board, I want to upgrade my ram and also my storage. Actually I have 8gb of Ram and 128gb of storage
-
-
-
-
Nous retournons la carte et trouvons encore plus de silicium :
-
2 RAM LPDDR3 H9CCNNNCPTAL SKhynix (pour un total de 8 Go)
-
Murata 339S00446 1ZE SS8915047 (probablement un module Wi-Fi)
-
Intersil 95828A HRTZ X829PMJ
-
Module NFC sécurisé 80V18 NXP
-
Mémoire flash serial multi I/O MX25U3235F Macronix
-
Contrôleur d'alimentation CD32-15C00 Texas Instruments
-
Convertisseur buck synchrone TPS51980A Texas Instrument
I believe that TI’s CD3215C00 is a USB 3.1 redriver.
-
-
-
Du côté opposé de la prise jack, nous tombons sur des ports Thunderbolt super modulaires !
-
Ce MacBook se présente sous de bons augures : tous les ports ont leur propre carte et se remplacent facilement.
-
Finalement nous rencontrons la pièce responsable d'insuffler de l'air dans cet … Air.
How does this fan cool the CPU? They seem separate.
It doesn’t https://youtu.be/iiCBYAP_Sgg
I think the fan creates a slight vacuum/negative space in the chassis, pulling fresh air from vents across the board and expelling it out the back.
I heard you can’t swap out the SSD in the 2018’s?? I wanted to put a 256GB in, can I do it? I was told no.
You heard correctly! The flash storage is integrated into the logic board and and paired to the T2 chip so it cannot be swapped out, unfortunately. You can see it in step 6.
if you will put a fan, at least put in the cpu, not as a chasis fan, that’s stupid.
I want to replace the Ports for my MacBook Pro (13-inch, 2018, Four Thunderbolt 3 Ports). Can you tell me the tools and the parts I need, and how much they will cost?
Bouna
-
-
-
La mode de la conception réparable (ou du moins plus réparable) a laissé d'autres traces : voilà des bandes adhésives d'extraction sous les haut-parleurs allongés !
-
Nous n'aimons pas la colle et préférons de loin les vis réutilisables. Mais bon, le truc étirable façon iPhone, c'est bien mieux que manipuler du dissolvant et faire levier à l'aveuglette.
-
En plus, la simple présence de telles bandes adhésives signifie qu'aux yeux d'au moins une personne, il n'est pas exclu de réparer et démonter.
-
-
-
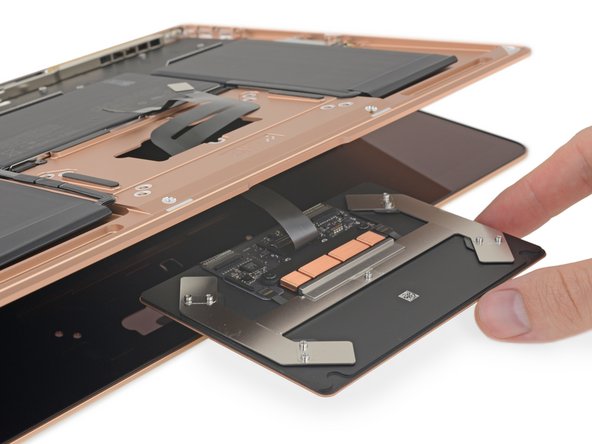
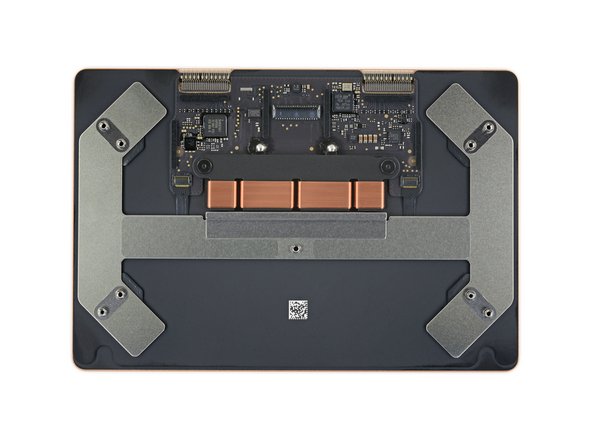
Nous posons à présent notre attention sur le trackpad.
-
Contrairement aux derniers MacBook Pro où le trackpad était la première pièce remplaçable, ici le pavé partage avec le clavier une nappe fixée en dessous de la carte mère.
-
Ce trackpad nous rappelle un certain vaisseau TIE …
Are you certain that the split in that trackpad cable over the center battery wouldn’t allow a bit of “service loop”, just enough to disengage the cable connector from the socket on the trackpad with a spudger without needing to remove the logic board? Seems a rather conspicuous cable design to not provide some benefit. If anything, I’d bet that flexing that cable split does yield some length, yet also leaves permanent (no warranty for you!) evidence it was done.
No guarantees, but it didn’t look like it could be done safely. The end of the cable is also pretty firmly glued to the trackpad near its socket, so getting it off would be tricky, and there’s not really any slack to speak of. The photograph that has been circulating from Apple’s internal service manual for replacing the battery also appears to show the logic board removed.
These are so much shittier to work on than the older macbook airs
-
-
-
Grâce à nos amis de chez MacRumors, notre petit doigt nous dit que retirer la batterie sera un peu moins cauchemardesque que pour certains Retina de notre connaissance.
-
Effectivement, quatre vis et six sympathiques bandes adhésives étirables d'extraction fixent le paquet énergétique de l'Air.
-
Un châssis robuste, avec un vague air de déjà vu, donne du maintien aux cellules de la batterie et fait du retrait un jeu d'enfants.
-
Et voilà la centrale électrique de 49,9 Wh. Au cas où surveilliez les scores, elle est plus petite que celle du XPS 13, le nouveau Dell, (52 Wh), mais plus puissante que celle du Surface Laptop 2 de Microsoft (45,2 Wh) et du futur HP, le Spectre x360 (43,7 Wh).
Are the battery cells terraced / wedge shaped or the same Z-height throughout? I can’t quite make that out from the photos…
The batteries are not terraced and reside in the same plane. All three cells are laid flat on top of the metal tray.
-
-
-
L'Air et son châssis doré commencent à prendre des allures aériennes, nous sommes impatients d'atteindre la ligne d'arrivée !
-
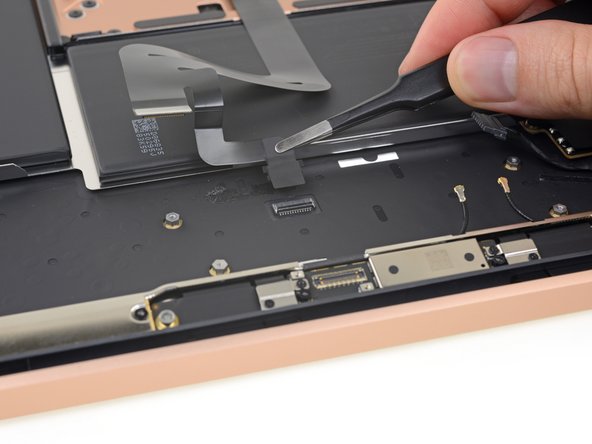
L'antre de la batterie est toujours recouverte de la fixation métallique de l'antenne et du nouveau capteur Touch ID (modulaire !), tous deux fixés par des vis Torx.
-
Pour info, le capteur Touch ID peut s'enlever tout de suite après le retrait de la petite carte audio, mais nous avons préféré le laisser sur la place.
-
Quelques vis Torx plus tard, l'écran est libéré ! Ce nouveau panneau Retina est presque le même que celui qu'on trouve sur la gamme des MacBook Pro. Il diffère surtout par son seuil de luminosité (300 nits au lieu des 500 du Pro) et par la compatibilité avec la gamme de couleurs P3.
How do you get the heat sync bar off?
I have run into an issue, I’m replacing the display and managed to get one screw from the three metal plates covering the connectors, they look to be all the same size, but I can’t get the others. Those are all I need to remove and then I can pop the new one on…..any idea which torx screwdriver is used here? I thought it was T3.
-
-
-
Admirez maintenant les particules de ce MacBook Air !
-
Avec ses ports modulaires et ses bandes adhésives d'extraction, le nouveau MacBook Air va à contre-courant de la mode actuelle anti-réparabilité des ordinateurs d'Apple.
-
Malheureusement, il faut toujours gérer les Pentalobe et il est impossible de mettre à jour le stockage et la RAM. Bien que ces changements semblent plutôt favoriser les techniciens expérimentés et non le bricoleur ordinaire, nous espérons qu'il s'agisse là d'un premier pas vers des MacBook réparables.
-
- Beaucoup de composants sont modulaires.
- Les agaçantes vis Pentalobe sont au rendez-vous, mais il est plus facile que jamais d'ouvrir cet ordinateur.
- La batterie est fixée par un ensemble de vis et de bandes adhésives étirables sympas pour la réparation – mais vous devrez retirer la carte mère et les haut-parleurs pour y accéder.
- Le clavier est intégré au boîtier supérieur, il faut donc tout démonter pour l'entretenir.
- Impossible de démonter et mettre à jour le stockage et la RAM soudés. C'est extrêmement décevant pour un ordinateur coûtant 1200 dollars.


Dernières pensées
Indice de réparabilité


(10 étant le plus facile à réparer)
Merci à ces traducteurs :
50%


Ces traducteurs nous aident réparer le monde ! Vous voulez contribuer ?
Commencez à traduire ›

61 commentaires
Am I losing my eyesight, or is that fan not directly connected to any type of heat dissipating hardware? Looks like it’s either just providing a general low-pressure-air-flow throughout the internals - OR - it pushes air back through that antenna/heatsink-bracket-type-thing and coming out the other end of it?
Could you confirm or explain this in more detail?
I think it is just an exhaust fan, that removes hot air from a laptop case outside (from the right side of the case, under the screen) and creates a negative pressure inside, which helps a laptop to “suck“ some cool air from the outside through the intake on the left side of case, under the screen. The shape of the radiator ribs also suggests some airflow from left/right side of the case to the opposite side.
Serge B. -
The only thing that fan is doing is moving a (tiny) bit of air indirectly across the logic board and the heatsink. Or at least that is what I think it does. As there is no direct heat conduction from logic board to case, the fan isn’t there to cool the case, that’s for sure.
Yeah it is just a case ventilation fan, it doesn’t blow any heatsinks directly. Although with the very low TDP of the processor, a case fan with radiator type heat sink should do the job.
Tom Chai -
Yes, as the 12” Macbook with a ~5W TDP chip manages without a fan, I’m sure a slower general airflow together with that heatsink works well for the 7W chip in the 2018 MBA.
And when looking closer - the vents on either side of the antenna bracket, that the fan exhausts through on one side - air is drawn in on the other side and then guided by the vanes in the ventilation holes, allowing it to flow easily from right to left (when viewing bottom/inside of the MBA) over the heatsink cooling fins. There doesn’t appear to be any other openings in the chassi, so Apple has probably designed the airflow pretty efficiently in this fashion.
Pretty cool! Only Mac laptop I’ve seen with a fan but without heat-pipes/sinks by the fan.
This thermal design reminds me of the old Titanium Powerbooks, especially the heatsink. That had two fans I believe, one pulling in from the side and one blowing out the back. I think this pulls air from one side of the monitor hinge vents and exhausts out the other.
Why don’t they use the aluminum body directly as a huge heatsink?
You’ll notice that they’ve sealed the mid-area under the display bezel, with only an opening on the side furthest from the fan, nothing above the CPU, and an outlet the fan blows air out of.
I’m guessing they did this to cool both the low power, yet still warm T2, as well as draw air over the CPU.
It’s not blowing directly on a heatsink connected via heatpipe to the CPU, no, but I’m guessing they weighed up the pro’s and con’s of heatpipes, and decided that sucking air through a tightly controlled path is preferable to the bulk added by heatpipes.
It’s no different than the trashcan mac pro, is it? That just sucks air up over the heatsinks if I remember correctly.
What matters is that airflow is limited to a strict path, that’s in the left side of the laptop, over the T2 and SSD’s heatspreader, over the CPU’s radiator, through the fan, and out the right side.
It’s really bad to know that neither storage nor RAM is upgradable. If I go for 128 GB SSD and 8 GB RAM then I can never upgrade them, disappointed :(
That is the main reason why you should avoid those Apple new laptops. The other one is that each of the Apple laptops has design flaws (and this has happened for many years) : check Louis Rossmann videos on youtube, this is eye opening.
Oli Wek -
When will the new iPad pro teardown be revealed plz. Deadly waiting for it
They’re still heating up the glue.
These MacBook logic boards are gonna end up in iPhones soon if they continue shrinking
lol that was a nice one :)
“These MacBook logic boards are gonna end up in iPhones soon if they continue shrinking”
I think you have that backwards.
I’m still confused about how the display data cables interact with the hinge. In the 2016 MBP teardown, I thought iFixit said they get rolled up or something. While the pictures in this teardown helped shed some light on this mechanism, I’d really like to see some detailed shots of how exactly that all works. Maybe in classic iFixit style where the position of just a few things within the frame changes seemingly magically between two pics. Thoughts/comments?
Hey iEvan! This is a teardown, which is an entertaining (and abbreviated) peek inside the device, not a step-by-step disassembly guide, hence the “magical” changes. If you want to see how MacBook Air display cables and hinges interact, check out our MacBook Air display replacement guide, in concept the process hasn’t changed.
If I am reading this correctly, there is absolutely nothing about Battery being better positioned to be easily replaceable. Merely that Apple guidelines now allow Battery to be replaced without changing the top case.
That is Apple stopping all those who had Apple Care to get a new top case with their battery replacement or people getting ( used to ) getting around their Keyboard problem with battery replacement.
Thanks for a great review. I’m really enjoyed your works. Thumbs up..
I think this review just swayed me from Surface Laptop 2 to the new Air. I can live with two cores vs having to throw away the laptop at the first hurdle. Plus the resale value of all surface devices is, well, pretty much non-exitent. And for a good reason.
Where is the hardware microphone disconnect?
Why there is a NFC chip on board? Does MacBook Air even support NFC?
Or it’s some kind of secure enclave?
Secure Enclave would be on the Apple T2; good question about that NFC if that’s its sole function
VaughnSC -
NFC chips tend to pop up on devices without NFC from time to time, the Droid Razr had one, I’ve seen them from time to time on other phones, and now this.
I’m half guessing they’re added on in production, and nearing the end NFC gets cut from the hardware for whatever reason and it gets left there.
I’m sure some schematics, or in time, Louis rossmann will work it out (when it dying ends up killing boards)
I’d say secure enclave, but that’s the T2’s job. Maybe the T2 (coughA10cough) depended on the NFC chip it expected on iPhones, so they through it on just to keep the thing happy? I wonder if the iMac Pro has one…
Still, I’d expect NFC to be a more Macbook thing, maybe a reader under the trackpad for pairing that got scrapped?
What about the hinges? Did you guys take a good look at them? Are they the same as the MBP, or did Apple use a different design? Wondering what their durability is going to be over the long term.
can this retina display be installed on old macbook air models? like early 2015 model
comes with mojave oder high sierra? Dragon Dictate discontinued :-(
It comes with MacOS Mojave installed.
So is there absolutely no way to replace the SSD in this machine?
There is no way to replace the flash storage in any current Mac (MacBook Pro, mini, iMac, iMac Pro, and the Air) with a T2 chip acting as the storage controller/encryptor.
jbgurman -
Thank you for doing this guys.
Thank you very much for doing this. I had been turning away business on this MBA 2018.
Could I add external micro SSD to USB c I mean is there any space inside the laptop to put external SSD and connect it to USB c by mini USB hub? Will be a maybe good idea to add more storage
Aren’t there three identical SanDisk chips on the logic board? The two labeled ones on one side, and one unlabeled one on the other… doesn’t this mean that this MBA contains 192 GB of NAND?
@getalmeardolis The “043G” on the package indicates a 43 GB chip. Three chips x 43 GB = 129 GB. (There’s probably some rounding to account for the extra GB.) But yeah, three identical chips!
Does it uses the same flex cables that were used in MacBook Pro 2016 onwards?
and is there a chance that MacBook Air(2018) will suffer the notorious flex gate problem?
The display cable arrangement is a bit different from the MacBook Pro, but it uses similar thin (and non-replaceable) ribbon cables. If I had to guess, I’d say it will develop similar problems over time—but that is emphatically just a guess and it’s too early to say anything for sure.
I have currently my new MacBook air 13” retina being repaired by the Apple store Parly II (France), they have to replace the logic board and the touch id. The problem was that it didn’t restart after one night in power safe mode (no display but still heating). After replacing the logic board they called me to inform that the touch id they ordered to replace is not recognized by the logic board, so they have to order once again a new one.
I noticed that it frequently (weekly) had display bugs (white screen with vertical lines and square pixels when moving mouse cursor) while waking up from safe mode, and sometime for no reason while browsing the web in safari.
The technical guy from Genius bar told me that it’s the first time they have to repair a MacBook Air retina 2018, so I’m very unlucky … I guess
components prices :
(661-09714) Logic Board i5, 1.6GHz, 16GB, 256GB : 342€
(661-11677) Touch ID board : 18€
(S1490LL/A) Hardware repair Labor : 79€
Total : 439€ (under guarantee)
(probably not including VAT)
I went to the Apple store Parly 2 to get my MacBook back (repaired) but I refused it at the genius bar because during repair they have damaged the alloy top case, there are now 2 dents (near the touch id and another one near Esc key) that have probably caused by a screwing too hard, the dents are vertically localized just above 2 of the screws which maintain the amovible lower case.
They ordered a new “Top Case with Keyboard, Space Grey, FRA” (price 225€ under warranty + 79€ repair labor).
So now I will have a MacBook Air 13 with almost all part replaced (except battery and screen) !!!
I asked them to replace the whole MacBook but they refused because their policy doesn’t allow it for Mac products (laptops/desktops).
In my opinion, the recycled alloy used in the MacBook air 13 retina manufacturing is not as much resistant as the previous models.
The repair process didn’t take into account the tenderness of this alloy, a dynamometric screwdrivers but they should be used for this models to prevent damages.
Apple CEO’S: Let’s build and design a fanless laptop!
Apple Manafacturers: Okay!
*Slips fan into main design*
Wish the guide was a bit more detailed with the nuances of removing the ZIF connectors, etc with the flip up tabs. Didn’t realize until it was too late and may have damaged something.
Hi Brian,
I’m sorry to hear that! As stated in the warning op top, this teardown is an educational first look at the device, and is not meant to be used as a guide. Our repair guides will show up here, and contain accurate details (such as tools needed, how to unlock ZIF connectors, etc.) as well as step by step instructions on how to complete the repair.
Hi,
I spilled hot chocolate on my macbook air and I want to change the keyboard and the trackpad. There is no way to only change the keyboard without demantling everything?
That is correct. The keyboard is part of the top case and is not easily replaceable. The trackpad, on the other hand, can be removed pretty easily.
Hi, thanks for all the tips in this breakdown. Question for you, I have a sticky down arrow key on my keyboard, can I somehow pop it off and clean underneath it ?? I see in step for you use a tool to pop off the apple key, so wondering/hoping this can be done on the down arrow key !
While cleaning my then-new MBA Model A1932, some specks of something came between the screen and the machine, making tiny punctures that killed the screen. I now am able to buy a screen replacement assembly for about $300 (it was over $500 before). I understand this isn’t the easiest machine to take apart, but if it’s only replacing the screen assembly, is it manageable? My dealer wanted $1000 for a total replacement, which is about the same price as buying a new one. Am I pulling a job I can do, as a seasoned Macbook Pro upgrader, or is this just too exotic?
Hi Bob,
It depends on the screen you’re buying. If it is a complete top assembly, I think it is pretty doable. Take a look at our guide and see how comfortable you would be with the procedure.
What about MBP having pull tabs?
Ciao Fedo! Purtroppo è integrata alla scheda madre quindi non è possibile sostituirla. Bisogna cambiare l'intera scheda madre.