Introduction
La saison du démontage bat son plein ! Nous en sommes au troisième round de la semaine et rien ne pourra nous stopper. Notre prochain adversaire : le nouveau MacBook Pro 13" avec écran Retina. La version de cette année a beau être un poids léger, il nous donnera sûrement du fil à retordre. Quoi qu'il en soit, nos vaillants héros du démontage n'ont rien à craindre de lui. Rejoignez-nous et aventurons-nous ensemble à l'intérieur du dernier ordinateur portable d'Apple.
Minute, ce n'est pas tout : jetez-vous sur FacebookFR, partagez nos combats sur TwitterFR et faites un crochet par Instagram pour être sûr de ne jamais manquer un match.
Ce dont vous avez besoin
Vidéo d'introduction
-
-
Nous l'avons déjà fait sept fois, mais mordre dans une pomme de pro nous met toujours l'eau à la bouche.
-
Voyons un peu les dernières spécifications techniques :
-
Écran Retina de 13,2 pouces et 2560 sur 1600 pixels (227 ppp)
-
Processeur dual-core Intel Core i5 de 2,4 ou 2,6 GHz (est également disponible en option le processeur dual-core Intel Core i7 de 2,8 GHz)
-
RAM DDR3L intégrée de 4, 8 ou 16 Go
-
Stockage SSD de 128, 256, 512 Go ou 1 To
-
Intel Iris Graphics
-
Ports Thunderbolt 2, USB 3 et HDMI E/S grand format
-
-
-
Nous détectons immédiatement quelque chose d'inhabituel : le modèle A1502 n'a encore jamais été observé dans la nature. Cette créature est-elle donc entièrement inconnue ? À nous de le découvrir.
-
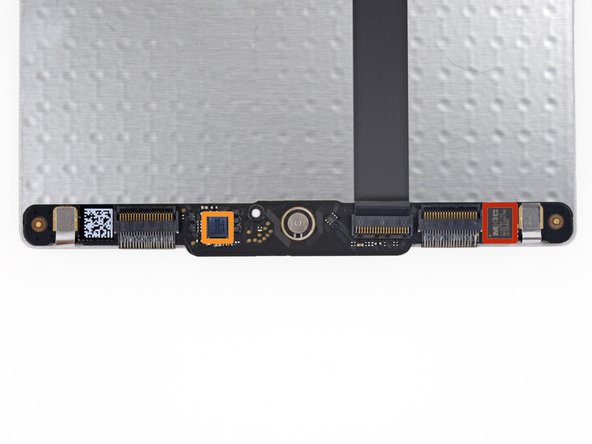
Les ports à tribord incluent :
-
Fente pour carte SDXC
-
HDMI grand format avec sortie de 1080p
-
USB 3.0
-
Et encore plus de ports à bâbord !
-
Encore un USB 3.0
-
2x Thunderbolt 2
-
-
-
Nous ne sommes même plus surpris de voir que le boîtier inférieur est fixé par des vis Pentalobe. Juste … déçus.
-
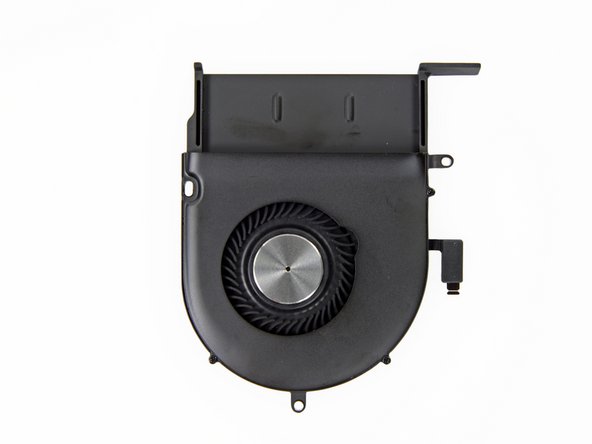
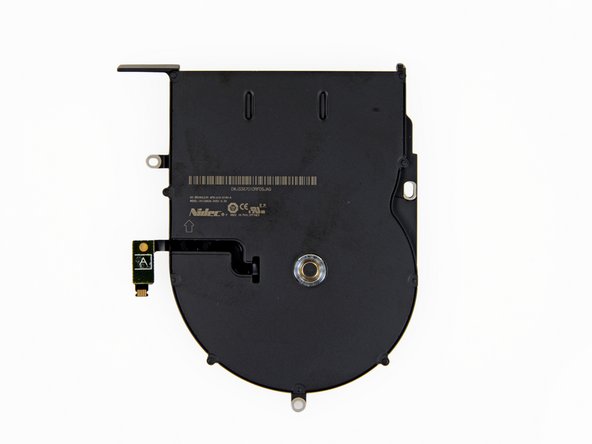
On dirait que cette nouvelle version a perdu son facteur cool – ou du moins la moitié, puisque nous ne voyons qu'un seul ventilateur.
-
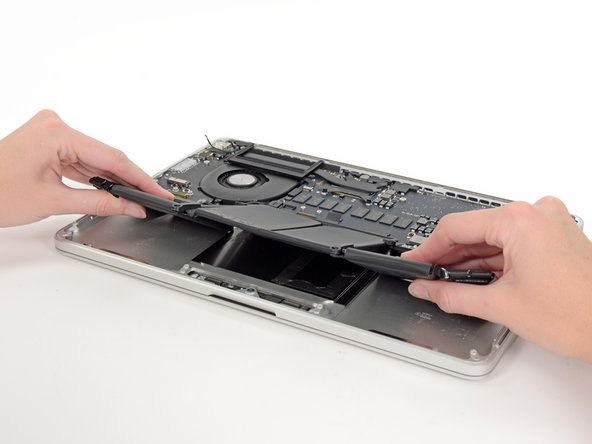
Les travaux de réagencement d'Apple cet été ne s'en sont pas arrêtés là : le câblage a changé, le SSD a été déplacé, et la batterie radicalement repensée a pris toute la place.
Does anybody notice there is a small connector sitting right above the SSD in step 3? I just noticed it after opening my own MBP. What's it for? Diagnostic? It's gone in 2015 models.
-
-
-
Fidèle à ses habitudes, Apple nous avertit des conséquences tragiques d'une mise à jour, d'un changement ou d'une conversation polie avec la batterie.
-
Votre attention s'il vous plaît : rappelez-vous tout le bien que nous pensons de ces étiquettes.
-
La première étape du démontage : déconnecter l'alimentation.
-
Nous soulevons le connecteur de la batterie, mais ce nouveau contrôleur raffiné de batterie ne se laisse pas déplacer.
-
Ces petites vis ne servent à rien ! Le circuit imprimé abrite quelques fils épineux qui sont soudés et pris dans des dispositifs. Démêler le tout va être un sérieux casse-tête.
-
-
-
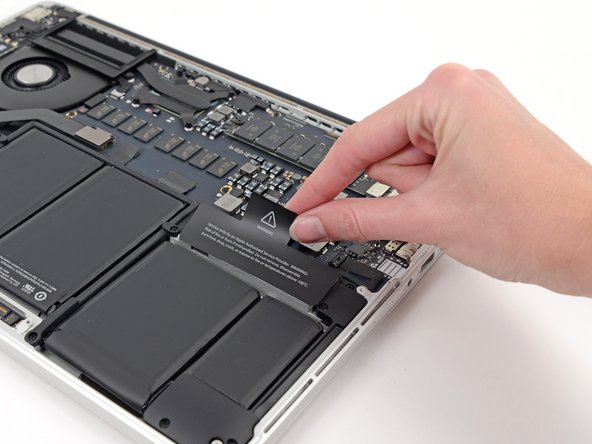
Nous nous frayons un chemin à coup de spatule (spudger) à travers les câbles d'antenne et extrayons la carte AirPort somnolente.
-
Ne vous inquiétez pas, nous vous promettons de l'y remettre avant qu'elle se réveille.
-
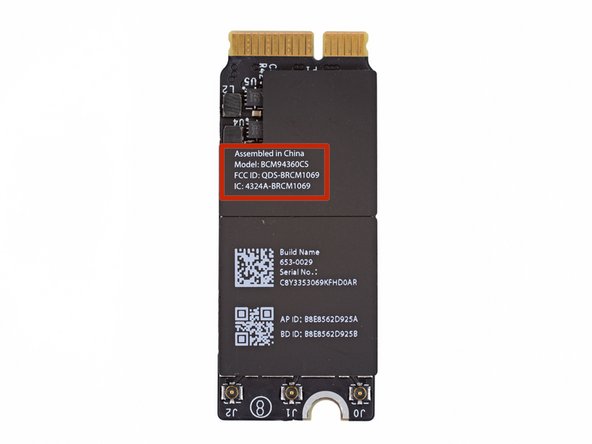
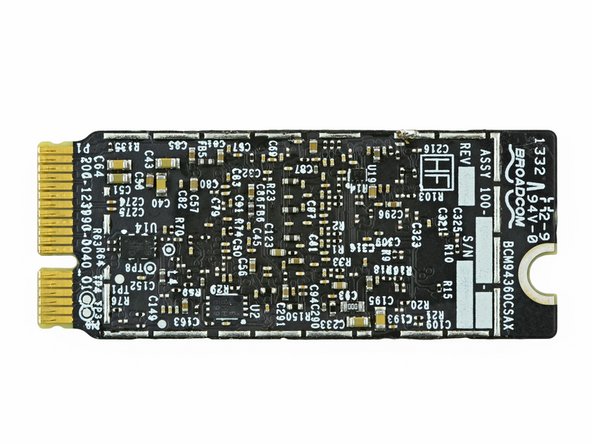
Il se peut qu'elle se trouve au même endroit que la dernière fois, mais ce Broadcom BCM94360CS est d'une autre espèce.
-
La nouvelle technologie Wi-Fi 802.11ac prétend pouvoir tripler les performances de 802.11n.
There are three antennas, I think. They can be seen on the first picture at step five.
Are these antenna's going into the plastic part underneath the screen?
-
-
-
Nous jetons un œil sous les caches de la carte AirPort revisitée et découvrons :
-
Un émetteur-récepteur Broadcom BCM4360 5G Wi-Fi 3-Stream 802.11ac Gigabit
-
Un processeur Bluetooth sur une puce Broadcom BCM20702 avec un émetteur-récepteur RF intégré de haute performance de 2,4 GHz
-
Module avant Wi-Fi double bande 802.11a/b/g/n/ac Skyworks SE5516
-
-
-
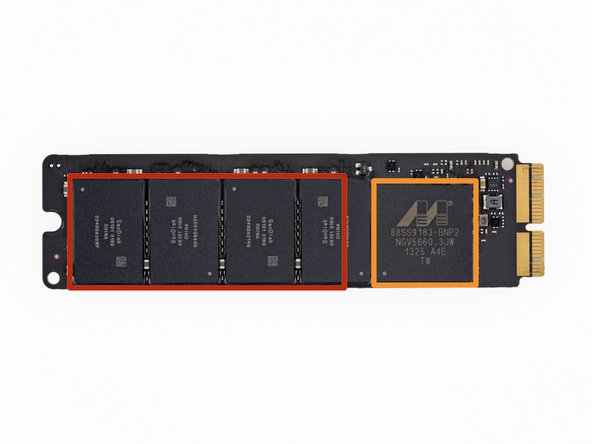
Il se peut que les SSD ne tournent pas comme les autres disques durs, mais celui du MacBook Pro 13" Retina adore sautiller !
-
Ce Pro est livré avec un stockage flash basique de 128 Go, tandis que les modèles plus performants ont 256 ou 512 Go.
-
Éléments et pièces à noter :
-
Mémoire flash NAND de 16 Go SanDisk 05131 016G (8 x 16 Go = 128 Go au total)
-
Contrôleur SSD 88SS9183 Marvell Semiconductor
-
DDR3-1600 H5TQ2G63DFR SK Hynix
Since you have torn down both the new 13" and 15" rMBPs, can you advise whether the PCIe SSD modules are cross-compatible between models (and with the mid 2013 Airs)? I.e do they use the same PCIe connector and are they the same physical size?
I would hope after much chopping and changing that Apple has finally settled on a common module design, making it easier to repair / upgrade one of the few remaining user-replaceable parts.
i just bought a MBP today, and i think the SSD size will be a problem for me in some years because i bought the 128GB model, do you think that i would can buy a new SSD in the future?
So, is the SSD in fact upgradable and can someone give example of where to get modules?
It is indeed upgradeable, Transcend is on to it. But as long as the SSD-controllers are rare it will take some time.
What's that RAM module here? I've seen the main RAM solded on de MB...
-
-
-
-
Wingardium leviosa ! La nappe de la carte E/S sort quasiment toute seule de ses prises.
-
Notre
baguette magiquetournevis Pro Tech ne fait qu'une bouchée des vis du haut-parleur. -
Un abracadabra de plus et les haut-parleurs sortent du boîtier arrière.
-
Nous sommes heureux de vous informer que ces haut-parleurs-dont-on-ne-doit-pas-prononcer-le-nom sont très faciles à retirer – pas besoin de recourir à la magie noire.
How easy is the speakers removal? But it is difficult to return back
Can you help
-
-
-
Pour empirer la situation, les châssis métalliques vissés d'antan ont disparu sous le trackpad, enterrant notre pauvre batterie vivante ...
-
Nous lançons une opération de sauvetage avec nos amis iOpener et carte en plastique. Après avoir fait le plein en patience, nous nous mettons à l'ouvrage.
-
Victoire ! Nous sommes finalement venus à bout de la batterie récalcitrante.
Hi iFixers,
Spilling half a glass of sparkling water on a MBP-13" retina (late 2013) is not best idea. Washing and drying all PCBs got it back to work for few months, but recently battery stoped charging. I noticed few pins around one SMD chip of battery charging controller were corroded. I got an iOpener kit and a new battery.
I can say iOpener is fantastic. Although I did not use much plastic card part of the tool kit as it is difficult to insert between case edges and smallest batteries on each side. Instead I used a rectangular painting palette knife (2 1/2 x 1/2 in) which is quite flexible and perfect dimension. It took me around 30 minutes to get old battery pack out, reheating iOpener 4 or 5 times, inserting palette gently under each cells (one by one) and slowly rocking palette underneath to gradually cut melted glue layer.
MBP works again as a new one, charging happily.
Thanks to iFixit guys....
Pierre d, Aug 12, 2014
Hi,
Where did you buy your new battery? My battery stopped working after I dropped water on my computer.
Thank you,
-
-
-
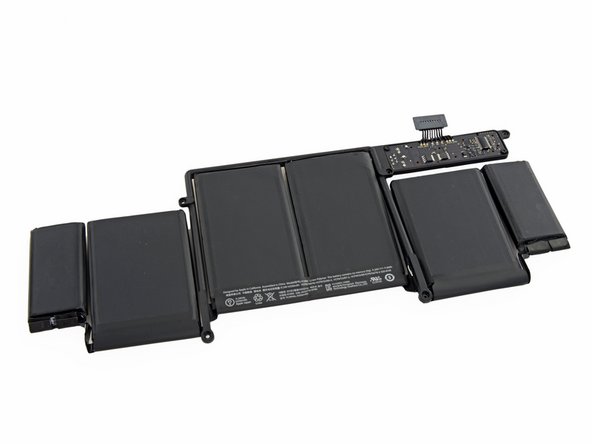
Admirez un peu le six-pack !
-
Ça, c'est du muscle : la batterie, calibrée à 7,18 Wh et 11,34 V, a un tantinet moins de fougue que celle de l'année dernière. Mais grâce à d'autres améliorations, Apple affirme que la batterie a une autonomie de 9h en usage normal.
-
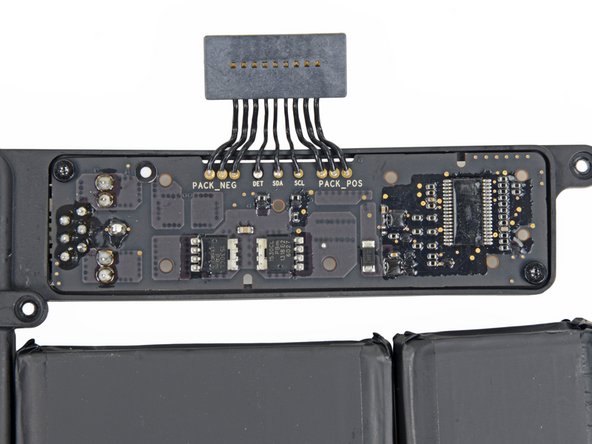
Une fois la batterie sortie, nous pouvons enfin regarder le connecteur de plus près.
-
C'est évidemment plus sympa de voir un connecteur de batterie conventionnel à la place du micmac de la carte de contact, présent sur la dernière version. Mais à quel prix, Apple ?
-
-
-
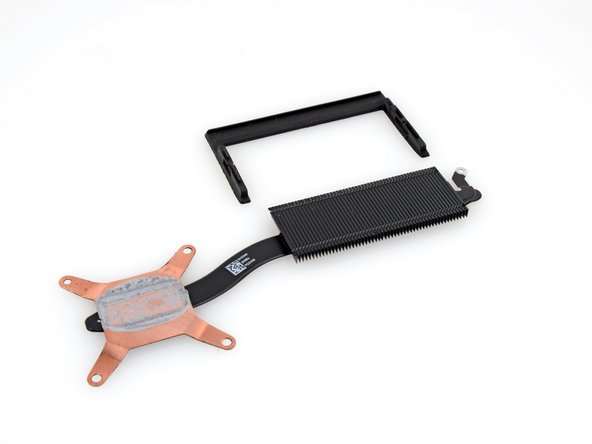
Notre spatule (spudger) se charge de décoller quelques cache-vis en mousse, et nous retirons le dissipateur thermique pour trouver … de la pâte thermique.
-
Le CPU et le GPU ont en commun la forme large sur la droite et le southbridge (platform controller hub) sur la gauche.
Occurs to me that replacing thermal paste would be 6 out of 10 repairability. Do you concur?
The GPU does not make any contact with the heat spreader. It will have a sudden death leaving the main board as a wreck. Stupid design.
Typing this on a well-worn 7 year-old Late 2013 MacBook Pro and my GPU hasn’t died yet
-
-
-
Le dissipateur thermique est enlevé, il est temps de se rafraîchir ! Bon, et de retirer enfin le ventilateur.
-
Le ventilateur Nidec sans balais ne nous impressionne pas par son innovation, mais nous apprécions ses efforts à maintenir la température au frais.
-
-
Hey hello,
Have question about the pins on the Logic Board you have 5 of it totally they are with spring like a button where are they for? 1 of mine is broken can that be the reason my mac is not booting any more?
Regards,
Base
Flexible ground contact with the rear case. Macbook should boot without them, as it can boot without the rear case.
-
-
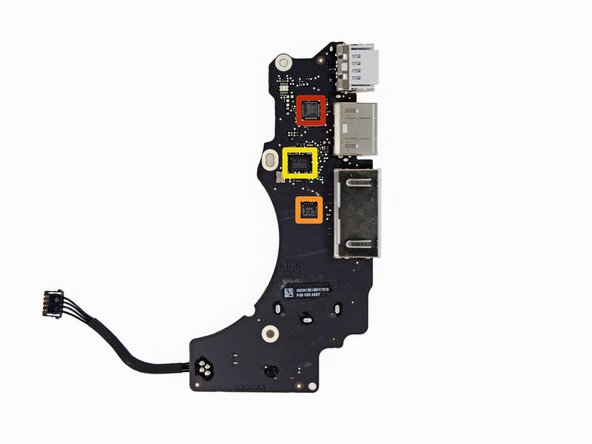
Et voilà le composant que nous attendions tous : la carte mère ! Voilà les puces que nous avons trouvées :
-
Processeur Core i5-4258U SR18A Intel
-
SDRAM DDR3L de 4 Go (512 Mo) Micron D9PXV (8 * 512 Mo = 4 Go)
-
Codec audio HD double chaîne et faible puissance 4208-CRZ Cirrus
-
Contrôleur Thunderbolt 2 DSL5520 Intel
-
Fairchild Semiconductor DD18BB 220A
-
Texas Instruments 58872D TI 37 CF61 E4
-
K03P0 2L4 62DP
-
-
-
La face arrière de la carte mère :
-
SDRAM DDR3L de 4 Go (512 Mo) D9PXV Micron
-
Serial Flash CMOS 64M-bit MX25L6406E MXIC
-
Microcontrôleur Stellaris LM4FS1EH Texas Instruments
-
Système programmable sur une puce CY8C24794-24LTXI Cypress
-
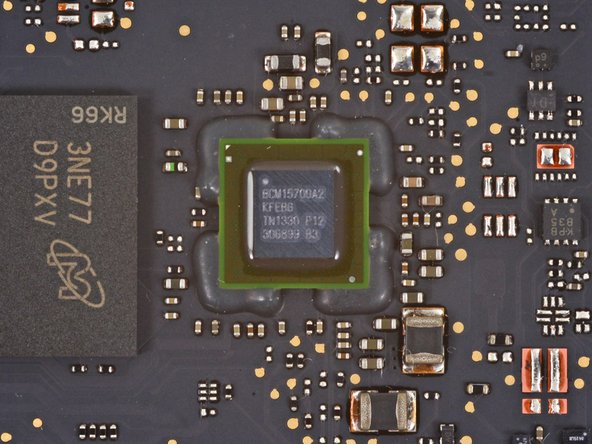
Broadcom BCM15700A2
-
P13WVR 12612NEE
-
Linear Technology LT3957 B29255
-
-
-
Le prochain à sortir est le port MagSafe 2.
-
Nous sommes heureux de voir que l'adaptateur de l'alimentation n'est constitué que de son propre connecteur, ce qui signifie que vous n'aurez besoin de changer autre chose si vous devez le remplacer.
-
Bien qu'il utilise toujours la même technologie MagSafe 2, le connecteur a légèrement changé depuis les premières versions.
-
En parcourant les composants, nous trouvons le double microphone, dissimulé sous un cache en caoutchouc. Tu peux dire adieu à l'écoute illicite, microphone, tu as été démasqué !
-
-
-
Ne vous inquiétez pas – l'acier ne résiste pas au feu – nous l'attaquons à l'iOpener, c'est radical !
-
La lourde armure métallique cache presque le même trackapd que celui de l'édition 2012.
-
CIs inclus :
-
Mémoire Serial-Flash CMOS 16 M-bit MX25L2006E Macronix
-
Contrôleur de vitre tactile BCM5976 Broadcom (déjà trouvé dans les versions précédentes et l'iPhone 5)
-
-
-
L'habituel bout de caoutchouc noir cache les vis de la charnière de l'écran et quelques nouvelles bandes d'adhésif.
-
Nous nous en tenons à un avertissement cette fois. Mais si vous mourez d'envie de voir l'intérieur, faites un saut en arrière dans le temps.
-
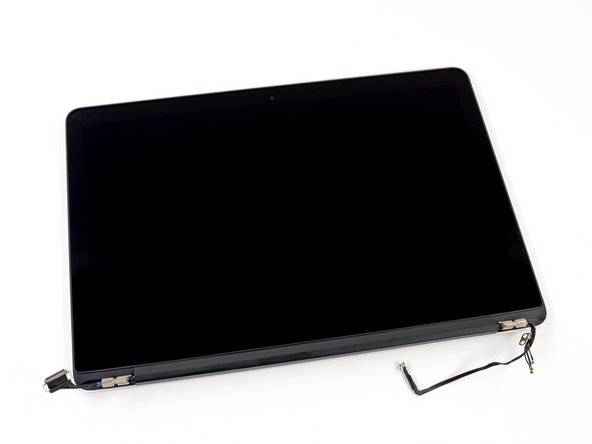
Cet écran, tout comme ses prédécesseurs, se remplace d'une pièce. Ce petit garnement ne se laisse pas démonter.
-
-
-
Score de réparabilité du MacBook Pro 13" avec écran Retina : 1 sur 10 (10 étant le plus facile à réparer)
-
Les vis propriétaires Pentalobe continuent à compliquer inutilement l'ouverture de l'appareil.
-
L'ensemble batterie est maintenant complètement, et solidement, collé au boîtier, ce qui en complique le remplacement. De plus, la batterie recouvre maintenant les vis et la nappe du trackpad. Il est impossible de remplacer le trackpad sans enlever d'abord la batterie.
-
L'écran Retina est d'un seul bloc, fusionné et sans vitre de protection. Si n'importe quelle pièce à l'intérieur tombe en panne, le tout (€€€) devra être remplacé.
-
La RAM est soudée à la carte mère, dans la suite du trend du MacBook Air. Payez maintenant pour la mise à jour ou contentez-vous à jamais des 4 Go. Aucune chance de la mettre à jour.
-
Le SSD propriétaire est maintenant de format PCIe, mais il ne s'agit toujours pas d'un disque dur standard. Croisez les doigts dans l'espoir de trouver des disques compatibles à l'avenir. Pour l'instant, vous devez vous contenter de ce que vous avez acheté.
I guess the device would have to be completely unrepairable or you'd need to damage other components to get to the defective one. Having to remove the glued-in battery (!) to get to the touchpad fringes on that...
The MacBook is not totally unrepairable; it's just very complicated.
Heng,
From the Ars Technica review of this iFixit teardown: "the CPU and GPU on one long die and the chipset in a second, smaller die". From the iFixit photo the CPU/GPU chip has the thermal goop on it to connect to the heat sink and the chip set does not. This makes sense as the CPU/GPU die is a much bigger power/thermal hog than the chip set.
I have the same model (128G). My technician says he can take out the 128G and put a 512, 8G RAM or a 256, 8G RAM. Is this true?
yes it is possible... you can do it by yourself... you have just to follow the guide until the step 7, replace your 128 gb ssd with another one...
be careful to buy the right ssd... on the very top of this page there is the bottom "PARTS", there you can find the ssd and chose the one that you prefer! when you have to reinstall the OS X, no problem because at the first start you can download it directly from the apple server!
Giorgio -
Thanks Giorgio,
I needed the assurance. This means a lot. Thanks again
-


Merci à ces traducteurs :
100%


Ces traducteurs nous aident réparer le monde ! Vous voulez contribuer ?
Commencez à traduire ›
31 commentaires
Not sure if this is something you guys at iFixit have considered as far as environmental impact is concerned (and I could be wrong here as i don't know the process myself). If something needs to be replaced on an Apple product and is returned under warranty or Apple care then the entire unit is replaced for the customer. The defective unit is then repaired, refurbished and resold to the consumer at a refurbished price. That still results in that particular piece of technology being out there in use and not on a scrap heap.
Again I'm not sure if I am missing something in the process here but this seems like a decent way to keep technology in circulation and off the scrap heap, at least if it's covered under warranty or apple care.
Hello Garreth!
I think what’s missing is the ability to fix it yourself to save some cash when it’s out of warranty.
Abdoz A -
I just had to change my 2011 macbook pro 13 inch battery as it was getting pitiful, if there is no way of easily changing the battery it will probably be the last macbook I buy
Is the CPU user replaceable or is it soldered onto the board?
Thanks Apple. Not only are Mac OS and iOS converging but you are turning your laptops into iDevices, ensuring consumers will buy new laptops when they realize that 4 gigs of RAM and/or a 128 GB SSD are not sufficient to run certain apps.
Surely it should not be so difficult to make SDRAM slots and a SSD slot accessible and your designers should be able to come up with a way that will not mess up the aestetics.
Add a 5 YO kid, a sick Lego mini-figure (from now, the patient), an ambulance to move the patient and a hospital, and it will end up in...
YES! A BROKEN SCREEN! My MBPr13 Late 2013 was the hospital, he laid the patient on top of keys 9 and 0 and "closed the chamber". A 700$ hit. Realized how it happened, because of the small circle marks left on the keyboard protector
It's possible to have two hard drives on this model?
well, at part 20, you have wrong angle at your SSD, it should be....
I've owned stores in florida and ohio. I'm old. I must say though, throughout the years mac and microsoft have earned the epithet of being nothing more than profiteering low-down capitalists that we ought to put down permanently (for a myriad of reasons). Linux is the closest thing to an answer I've yet to find out there (ironically barely a hint of being an option in this "free-trade" system of plutocracy which has us all scrambling between rocks and hard places).
As for mac, they earn a higher level of distrust. Why would the enterprising entity want to use unorthodox screw heads if not for manipulation for higher proceeds? We all know the answer but dare not break free from the mold to point our customers in a better direction. Why would an entity want to keep its own customers from accessing (changing/replacing) their own battery or upgrading their own ram or replacing their own drive?). Racketeering with a stolen op sys; Imagine buying a house only to be locked out later. Thanks ifixit
Why for there are 9 indentical DDR3L SDRAM chips if there are only 8 and 16 GB RAM models? if each chip is 512MB so it results in 8.5 GB RAM instead of 8. Is this a rescue one like the spare wheel on a car?
Do you carry the replacement display for this model, i can’t seem to find it on your site
Hi Omar, here is the product page. They’re currently out of stock, but you can be added to the notify list.
I am not going to lie, but the whole time I was reading this teardown process I was laughing out loud the whole time. The Harry Potter references were just spot on! Thank for fantastic teardown.