Introduction
Samsung est de retour, bébé ! Le plus grand constructeur de smartphones au monde démarre l'année 2017 en lançant ce qui est très proche d’être le plus grand smartphone au monde — avec son écran monstrueux de 6,2 pouces, le Galaxy S8+ est une claque visuelle. Mais quels résultats va-t-il obtenir sur la table de démontage ? Allez, au travail.
Oh, vous cherchiez notre vue éclatée du Galaxy S8 standard? N'allez pas plus loin.
Vous voulez être à la pointe de nos futurs démontages ?
Suivez nous sur Twitter, devenez nos amis sur Facebook et visitez notre compte Instagram pour les dernières actualités !
Ce dont vous avez besoin
Vidéo d'introduction
-
-
Vous avez vu le bel extérieur du S8+ dans les visuels promotionnels de Samsung, mais nous allons plus loin. Quelques-uns des passages attendus de ce démontage incluent :
-
Un écran "dual-edge" Super AMOLED de 6,2 pouces, d'une résolution de 2960 x 1440 (529 ppp)
-
Un processeur Qualcomm Snapdragon 835 (ou Samsung Exynos 8895) associé à 4 Go de RAM
-
Une caméra arrière de 12 mégapixels avec "dual pixel autofocus" et capture vidéo 4K, ainsi qu'une caméra frontale de 8 mégapixels
-
64 Go de stockage interne, extensible par carte MicroSD (jusqu'à 256 Go additionnels)
-
Une résistance à l'eau certifiée IP68
-
Android 7.0 Nougat
-
-
-
Sur le bas du téléphone, on trouve une prise jack, un connecteur USB-C, un trou pour le microphone et une grille pour les haut-parleurs.
-
L'avant est lisse et quasiment sans traits distinctifs, le bouton home est remplacé par un capteur de pression placé sous l'écran, ce qui en fait un appareil véritablement monolithique.
-
Finalement, si vous changez régulièrement de carte SIM, faites attention : il y a deux trous quasi-identiques sur le haut du S8+. L'un sert à éjecter la carte SIM, l'autre contient un microphone. Ne les confondez pas.
Samsung went with easier solution in regard of fingerprint reader because synaptic did not finish developing the on screen sensor; while they are under pressure to release a new flagship in a rather empty market for them after the Note 7 fiasco.
I would love to understand the damage (especially to the IP rating) that may have been caused by pushing the sim ejector through the top mic hole.
-
-
-
Il est temps de faire quelques comparaisons rapides avant de nous attaquer à l'essentiel.
-
Voilà nos trois compères, le S7 Edge à gauche, le S8+ au centre et le S8 à droite.
-
Grâce à ses joints plus fins et ses proportions extérieures inhabituelles de 18,5 : 9, le S8 réussit à caser un écran de 6,2" dans à peu près le même format que le S7 Edge de 5,5".
-
Comparé à l'année dernière, la seule différence notable est l'ensemble flash qui a bougé et le lecteur d'empreinte digitale qui a été installé ailleurs.
-
-
-
Assez de retard — nous sommes impatients d'être à l'intérieur. Heureusement, nous connaissons désormais la démarche à suivre.
-
Beaucoup de chaleur de notre iOpener ramollit suffisamment l'adhésif pour pouvoir soulever la vitre arrière en faisant levier et nous commençons notre bataille vers l'intérieur.
-
Et nous y sommes presque ...
-
-
-
Mais malgré tout ce que nous avons dit, le panneau arrière dispose d'une nouvelle particularité. L'emplacement du lecteur d'empreinte digitale est situé dans le panneau arrière, et une nappe très courte le relie à la carte mère.
-
Il semble que Samsung a conçu cette nappe pour être retirée en toute sécurité avec le panneau arrière. N'ayant pratiquement pas de jeu, la nappe se déconnecte immédiatement de son connecteur minuscule dès qu'on soulève le panneau arrière, ne serait-ce qu'un peu. Ceci réduit décidément le risque de l'endommager, contrairement à d'autres lecteurs d'empreinte digitale que nous avons vus.
-
Une fois la nappe déconnectée, nous passons au retrait de la vitre. Le S8+ et le S8 suivent la tendance du S6 avec un panneau arrière en verre. Pour Samsung, ce choix a réduit l'effort technique nécessaire pour intégrer des antennes dans un smartphone avec un panneau arrière métallique, au détriment de la durabilité et de la réparabilité.
-
Deux fois plus cassable et un processus d'ouverture compliqué, ceci ne sera pas favorable au score de réparabilité final.
What is the fingerprint reader made from this year? The S7 fingerprint reader in the home button was prone to scratching and peeling last year. Is the fingerprint reader covered by glass this year in the S8 and S8+? Very curious to know as I like things to last and wear well.
-
-
-
-
Puisque le châssis s'enlève en plusieurs parties, les choses ressemblent beaucoup au S7 et au S7 Edge.
-
Cette fois-ci, l'ensemble de l'antenne supérieur est joint au panneau de charge NFC/sans fil, comme pour le Note 7.
-
La bobine devrait aussi servir pour la fonctionnalité Samsung Pay, reproduisant le MST - en utilisant de toute évidence la bobine en tant qu'aimant électromagnétique pour agir comme une bande de carte de credit dans un lecteur de carte.
-
-
-
Espérons que les procédures de test améliorées de Samsung sont ce qui a manqué au Note 7, car ce design nous semble plutôt identique.
-
Et c'est toujours très dur de décoller cet adhésif. Même quand la batterie est complètement retirée, la colle résiste.
-
Le S8+ dispose d'une batterie de 13,48 Wh (3500 mAh à 3,85 V) – exactement la même capacité que le Note 7 et un peu moins que les 13,86 Wh du S7 Edge.
-
Samsung continue de battre Apple dans la guerre des capacités de batteries, l'iPhone 7+ ne disposant que de 11,1 Wh (2900 mAh à 3,82 V).
-
-
-
Nous retirons la carte mère bien chargée et commençons à enlever les caméras.
-
Dans la caméra arrière/principale, le "Hero" Sony d'avant a été remplacé par le "Dream1" Sony. À part les variations de l'étiquetage, ceci prétend être le même hardware de caméra que dans le S7/S7 Edge - Samsung a peaufiné le software, rien de plus.
-
Ensuite, nous avons la caméra frontale et une autre caméra de reconnaissance d'iris, vue auparavant dans le Note 7.
The image sensor is also different. Being an IMX333. On top of that the ISP has been upgraded. Far from just "sofware improvements, nothing more" I could tell the moment I took a RAW photo on both using 500 iso. Despite using RAW, bypassing the jpeg processing, the S8 image was noticeably less noisy with much less color blotching
-
-
-
Nous poussons les caméras sur le côté pour pouvoir étudier cette carte mère. Nos trouvailles incluent :
-
Samsung K3UH5H50MM-NGCJ 4 Go LPDDR4 RAM posé sur le MSM8998 Snapdragon 835
-
Toshiba THGAF4G9N4LBAIR 64 Go UFS (NAND flash + contrôleur)
-
Codec audio Qualcomm Aqstic WCD9341
-
Skyworks 78160-11
-
Avago AFEM-9066
-
PMIC interface Silicon Mitus SM5720
-
-
-
Nous extrayons la carte fille E/S. Bon nombre de mesures pour l'étanchéité se mettent en évidence ici, comme la bordure de la grille du haut-parleur et les petits joints sur le connecteur USB type C et la prise jack – tous partie intégrante de l'indice IP68.
-
La prise jack reste modulaire – bonne nouvelle pour la réparabilité, puisque c'est un composant à forte usure.
Is the voltage regulator on the daughter board?
My S8+ indicated moisture when I plugged in the charging cable, the next day it did not but It will not take a charge. Even wirelessly. So I think it is the voltage regulator that is fried. If it is on the daughter board I can pillage one from another Google Locked phone and fix mine.
You think this will work?
-
-
-
Après avoir jeté un coup d'œil au caloduc et aux nappes des boutons de la pastille de contact, nous extrayons encore quelques composants supplémentaires.
-
Et sortons le bon vieux moteur du vibreur.
-
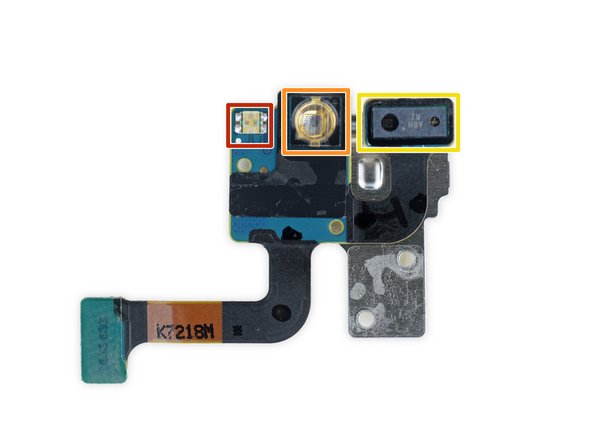
Et également le génial ensemble des capteurs (avec l'indicateur d'humidité) :
-
RGB LED (probablement)
-
Émetteur IR (peut-être pour la caméra d'authentification de l'iris ?)
-
Télémètre (probablement) pour obscurer l'écran pendant les appels.
I thought the IR camera/emitter on the front should be part of the iris scanning system and not pulse reading
Exactly. Yellow is the proximity sensor, orange an IR LED for the iris scanner and red the notification LED, as stated.
Not as stated, the description says it's for illuminating fingers for pulse reading,,,
djlobb01 -
-
-
-
à la recherche du bouton home mystérieux qui n'en est pas un, nous fouillons dans l'écran malgré les difficultés antérieures.
-
Heureusement cet écran/numériseur fusionné se décolle de son cadre non sans quelques difficultés, mais sans dégâts.
-
Espérant trouver un détail caché sous la nappe d'écran, nous la décollons et trouvons … que dalle. Ni info sur le modèle, ni capteur de pression visible. Peut-être qu'on aura plus de chance la prochaine fois.
There is a force sensor..hope everybody can see it which connects to the display/timing/touch controller board
This interests me most.... So there is no pressure sensor at all?? How does the S8 register a home button "press" without any kind of pressure pad/sensor?
A pressure sensor isn't needed, it just needs to see how big an imprint your finger is making as the harder you press, the bigger the contact area is on the screen
that seems like a conductive layer beneath with a sponge covering. this could be a force sensor.
-
-
-
C'est tout pour le S8+. Si vous êtes toujours avide de plus de démontages, allez voir notre analyse du Galaxy S8 standard.
-
En attendant, c'est l'heure d'attribuer un score à ce smartphone.
Hiya!
I was wondering if you guys could maybe do a comparison?
1) like the SD835 vs the A10 size.
2) volume of battery on S8 vs iphone7
3) size, efficency and density of the two motherboards (i think iphones is much smaller)
4) size and effectiveness of the two vibration motors (since S8 seems 1/3 the size)
4) also could you compare the two speakers (S8 and iphone7) against the and dual front speaker moto phone?
I ask because once again I am under the impression that the moto speakers are 1/3 the size of the main speakers in the two leaders and the same size as the ear speaker on the two.
5) and also maybe the effectiveness of the hydrophobic coating on the moto phones vs the two leaders?
6) and finally compare their internals density and effeicency to the Xiaomi Redmi 3s (because as far as I know, that is the smallest 5inch phone with a 4000mA battery)
I think that would be a really cool and enlightning.
love your work guys.
cheers.
-
- Beaucoup de composants sont modulaires et peuvent être remplacés indépendamment.
- La batterie peut être remplacée, mais un adhésif à forte adhérence et un panneau arrière collé rendent l'opération plus difficile que nécessaire.
- Une vitre avant et une vitre arrière doublent le risque de fissures, et les adhésifs à forte adhérence sur chacune d'elles rendent très ardu d'accéder aux pièces internes pour toute réparation.
- À cause des bords incurvés, remplacer la vitre avant sans casser l'écran reste extrêmement difficile.


Dernières pensées
Indice de réparabilité


(10 étant le plus facile à réparer)
Merci à ces traducteurs :
61%


Ces traducteurs nous aident réparer le monde ! Vous voulez contribuer ?
Commencez à traduire ›
32 commentaires
Hi: the breakdown exercise did you get a positive id on who is providing the USB-C controller chip? Thx!
I don't like glue on the battery and its not just that its the same capacity as we already see on the Samsung Galaxy S7 its kinda sad.
Man i now i will probably wait for one plus 5 or next google device because these two have big support on XDA community and they have regulari updates.
OnePlus are great with updates. My friend had Nougat on his OnePlus 3 before any of the leading phone makers (excluding Google Pixel obviously).
djlobb01 -
The S8/S8+ use a Sony IMX333 or Samsung S5K2L2 up from the IMX266 S5K2L1 found in last year's S7/S7E.
Thanks as always, guys. I seem to miss the speaker, though. Is it under the light gray grille?
Ah, ok. I see. It is the component in the lower midframe (https://d3nevzfk7ii3be.cloudfront.net/ig...).
Do you know how the home button works since there's no pressure sensor?
Does it have a separate "taptic engine" or uses the same vibration motor?
Thanks.
It likely works by measuring the surface area of the finger placed on the screen. When you press harder to activate the virtual button your finger will create a larger surface area on the screen which can be measured as more force being applied.
Leo Best -
Because samsung opted for Toshiba UFS storage if they also manufacture UFS storage
Why would you expect to find a pressure sensor behind the displyay? The screen does not deform, the digitiser just has to look for the contact patch of your finger getting bigger as you press harder on that area.
Open the Samsung Dex Dock as well!
Are the s8 and s8+ motherboards the same?
Photos [|3]
Hi, could you see a photo in high resolution, how is the earphone hooked? The frontal bone, I get curious about how it is maintained and how it is, and if it could sink without meaning to. Thank you
Do you mean the earpiece speaker? It can be seen in this photo, the last photo in step 6, at the top of the phone. It is adhered to the case and connected via spring contacts to the back of the motherboard. The speaker grille can be seen in this photo, the second image on step 13 at the top of the phone.
Can someone tell me what type the 14 Phillips screws used to hold down the NFC antenna, charging coil, and loud speaker? In addition, what are the 5 Phillips screws used to hold down the charging port PCB?
accidently I entered the ejection pin in the bottom mic.hole in S8 please advise if I already damaged the mic and/or the water resistant sealed?
I want to share my experience with you all.
We at HiGenius.nl fix smartphones all the time like Samsung S8 Plus too. unfortunately i did not see in this video that the sim tray is different than ever before. This because the tray is attached at the back of the board. So dont be surprised while you see this for the first time. Just be very cautious while removing the board. it wil follow so don’t worry.
I recently disassembled my Samsung galaxy s8 Plus the other day to replace the usb-c port as it would no longer lock in the charging cable.
However upon putting it back together and re-inserting the SIM card, it can no longer connect to my network provider. I get no mobile data or cell reception at all. However Wifi connections still work.
I was wondering if you may have an idea at what piece, board ect may play a role in connecting to the network.
The SIM works fine in another samsung phone that I previously used, so it is definitely hardware.
I’ve done network setting resets, WiFi calling is not on, and ive factory reset.
Sort of wishing I just bought a wireless charger at this point…
Thanks,
ZL
Something like that happened to me with an ASUS phone, the cause of the problem was that I did not properly connected the antenna (it was a little loose).
Hops this helps!
My galaxy s8 replaced screen isn't black what other part do i need to buy
The pictures don’t match what is received for the Galaxy S8+. It’s also not clear where to attach the perimeter adhesive. On the lip of the back cover or just inside the well area. In addition, after exposing the adhesive (after removing the clear side), no matter how weel you pre-align the position, you can’t count on the adhesive to stick to whichever method questioned above, without some of it not releasing cleanly from the colored backing. Yes. firm pressure was applied before moving a little further down. At times the adhesive stuck so strongly to the colored backing, it stretched the adhesive out of shape.
I have repaired hundreds of laptops and all in ones, so I understand there are subtleties in a repair, and I found it quite confusing replacing the battery and fingerprint sensor and other necessary parts related to doing that repair with the either inaccurate, outdated, or lack of detail provided (but much needed) in this guide.
can i buy motherboard for samsung galaxy 8plus scv35
hhera,n - Réponse