Aller au contenu principal

Weinmann VENTImotion and VENTIlogic Power Board Replacement

Matériel médical
Ni iFixit ni ce tutoriel de réparation ne sont approuvés par ou affiliés au fabricant de ce dispositif médical.
  1. Weinmann VENTImotion and VENTIlogic Power Board Replacement, Power Board: étape 1, image 1 de 2 Weinmann VENTImotion and VENTIlogic Power Board Replacement, Power Board: étape 1, image 2 de 2
    • Open the Device by following these steps:

    • Open the device only with the power supply plug disconnected.

    • Place the device on a non-slip surface with the top facing downwards.

    • Remove the filter cassette from the top part of the housing

    • Undo and remove the 6 screws (34)

    • Open the bottom part of the housing (35) away to the side.

    • Undo the connecting cables for the humidifier (42) and the alarm (43)

    • You can now put the bottom part of the housing (35) to one side.

  2. Weinmann VENTImotion and VENTIlogic Power Board Replacement: étape 2, image 1 de 1
    • Disconnect the power board connecting cable (45) from the power board (41).

  3. Weinmann VENTImotion and VENTIlogic Power Board Replacement: étape 3, image 1 de 1
    • Disconnect the Motor Cable

  4. Weinmann VENTImotion and VENTIlogic Power Board Replacement: étape 4, image 1 de 1
    • Disconnect the O2 valve/power board connecting cable (70) from the power board.

    • Disconnect all connecting cables from the control board.

    • Remove the power board from the top part of the housing.

  5. Weinmann VENTImotion and VENTIlogic Power Board Replacement: étape 7, image 1 de 1
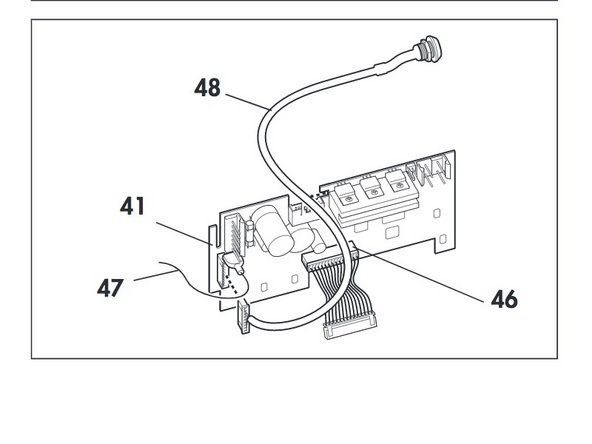
    • Take the rechargeable battery connecting cable (48) out of the groove and disconnect it from the power board (41).

  6. Weinmann VENTImotion and VENTIlogic Power Board Replacement: étape 8, image 1 de 1
    • Disconnect the cables of the old power board and plug them into the appropriate slots of the new power board 41:

    • –power board/control board connecting cable (46)

    • –rechargeable battery connecting cable (48)

    • –earth cable (47)

  7. Weinmann VENTImotion and VENTIlogic Power Board Replacement: étape 9, image 1 de 2 Weinmann VENTImotion and VENTIlogic Power Board Replacement: étape 9, image 2 de 2
    • Connect the power board/mains supply unit connecting cable (45) to the new power board.

    • Position the new power board in the top part of the housing.

  8. Weinmann VENTImotion and VENTIlogic Power Board Replacement: étape 11, image 1 de 1
    • Restore the connections to the control board.

Conclusion

To reassemble your device, follow these instructions in reverse order.

Une autre personne a terminé cette réparation.

Emily Jacobson

Membre depuis le 04/06/20

288 Réputation

1 tutoriel rédigé

Équipe

Cal Poly, Team S7-G19, Paton Spring 2020 Membre de l'équipe Cal Poly, Team S7-G19, Paton Spring 2020

CPSU-PATON-S20S7G19

3 membres

4 tutoriels rédigés

0 commentaires

Ajouter un commentaire

Nombre de vues :

Dernières 24 heures : 1

7 derniers jours : 1

30 derniers jours : 5

Total : 123