Cette version peut contenir des modifications incorrectes. Passez au dernier aperçu vérifié.
Ce dont vous avez besoin
-
-
Appuyez sur le bouton pour retirer la batterie situé sur le haut du contrôleur.
-
Retirez le conteneur de la batterie du contrôleur.
-
-
Cette étape n’est pas traduite. Aidez à la traduire
-
Use a pair of tweezers to peel the barcode sticker from the battery compartment.
-
-
-
Dévissez les sept vis Torx inviolable T8 de 9,3 mm qui fixent le boîtier arrière au boîtier avant.
Any recommendation on which set of Security Torx tools to use? I've already purchased 2 kits, one of those being sold as "Xbox controller tools" but the diameter of the head does not fit the hole on the controller and that's critical for the 2 screws on the bottom. The tools must obviously be thinner in diameter and long enough to get there.
How to open an XBOX 360 controller without a special screwdriver. http://www.instructables.com/id/How-to-o... Works perfectly.
A lot of thanks for your comment. It's very usefull
Echedey -
I picked up a handy torx key set from Auto Zone. Was about $10, no lose driver bits. has both sizes you need to repair the controller and the console. Here's the link:
It doesn't really matter which set of bits you by or what brand makes them, Torx bits (and the security versions of them) are generic & come in standardized sizes. You do not need a special "xbox" tool kit, you just need a size 8 torx security bit, no matter what brand makes the bit/kit. Those types of "specialty kits" are usually just collections of generic bits that you can buy at a hardware store in a regular bit set. The difference is that a general bit set will have bits for screws that a specific item doesn't have in it, whereas a specialty kit will only include bits for the types & sizes of fasteners used in the specified item.
BTW, with the smaller sizes of torx security bits you can try breaking off the little post in the middle with needlenose pliers or something else that can fit in the there. Even if the post doesn't break off cleanly, it's usually short enough to fit a regular (non security) torx bit in the slot.
-
-
Cette étape n’est pas traduite. Aidez à la traduire
-
Insert a Spudger between the front and rear cases along the left edge of the controller.
-
Rotate the spudger toward the front of the controller, prying the two cases apart.
-
-
-
Cette étape n’est pas traduite. Aidez à la traduire
-
Insert a spudger between the front and rear cases, near the headphone jack.
-
Rotate the spudger toward the front of the controller to pry the two cases apart.
-
-
-
Saisissez la manette du côté du compartiment de la batterie et de la prise jack.
-
Éloignez le compartiment de la batterie de la prise jack, pour séparer le boîtier arrière du boîtier avant et de la carte mère.
Good information
-
-
Cette étape n’est pas traduite. Aidez à la traduire
-
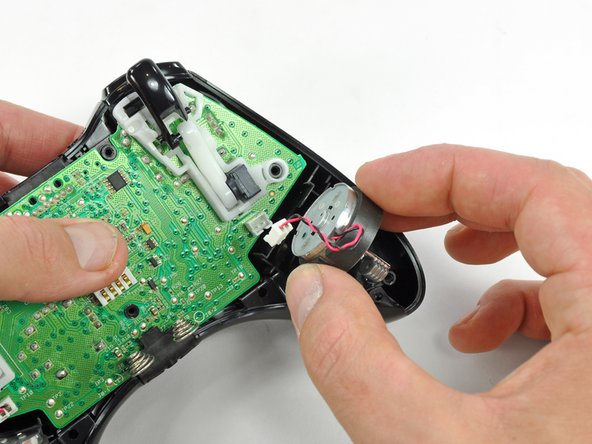
Use the flat end of a spudger to remove the vibration motor cable, moving it upward from its socket on the logic board.
-
Lift the vibration motor out of the front case.
-
-
Cette étape n’est pas traduite. Aidez à la traduire
-
Remove the vibration motor from the other side of the controller using the same method previously described.
The opposite was true for the controller I just opened. It was the left motor counterweight (as you hold the controller normally) which had more weight. Perhaps it doesn't matter which goes where?
For anyone reading this in the future, it does matter. The way you had them originally is the correct way.
-
-
Cette étape n’est pas traduite. Aidez à la traduire
-
Lifting from the headphone jack and power plug, remove the logic board from the front case.
What if you're having difficulty taking the logic board out?
-
-
Cette étape n’est pas traduite. Aidez à la traduire
-
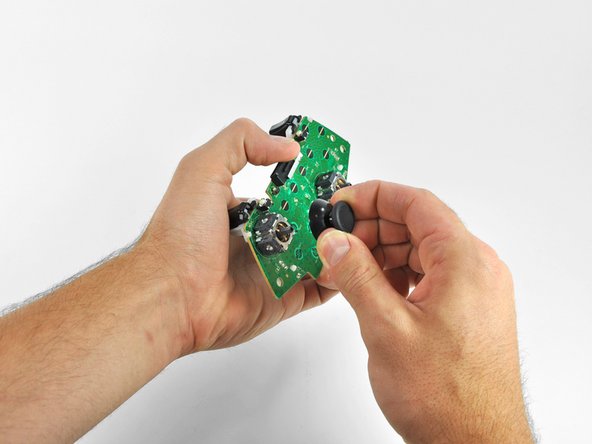
Grasp the right analog stick and pull the cover off its mount peg.
-
-
Cette étape n’est pas traduite. Aidez à la traduire
-
Remove the left analog stick cover using the same procedure previously described.
-
Annulation : je n'ai pas terminé ce tutoriel.
97 autres ont terminé cette réparation.
3 commentaires
unnecessary steps.
3 steps:
remove all 7 screws.
flip upside down remove top plate
pull stick caps off
reinstall in reverse.
you may have to slide the vibration motors into the slots on the top half when putting back together.


