Cette version peut contenir des modifications incorrectes. Passez au dernier aperçu vérifié.
Ce dont vous avez besoin
-
-
Appuyez sur le bouton pour retirer la batterie situé sur le haut du contrôleur.
-
Retirez le conteneur de la batterie du contrôleur.
-
-
Cette étape n’est pas traduite. Aidez à la traduire
-
Use a pair of tweezers to peel the barcode sticker from the battery compartment.
-
-
Cette étape n’est pas traduite. Aidez à la traduire
-
Insert a Spudger between the front and rear cases along the left edge of the controller.
-
Rotate the spudger toward the front of the controller, prying the two cases apart.
-
-
Cette étape n’est pas traduite. Aidez à la traduire
-
Insert a spudger between the front and rear cases, near the headphone jack.
-
Rotate the spudger toward the front of the controller to pry the two cases apart.
-
-
-
Cette étape n’est pas traduite. Aidez à la traduire
-
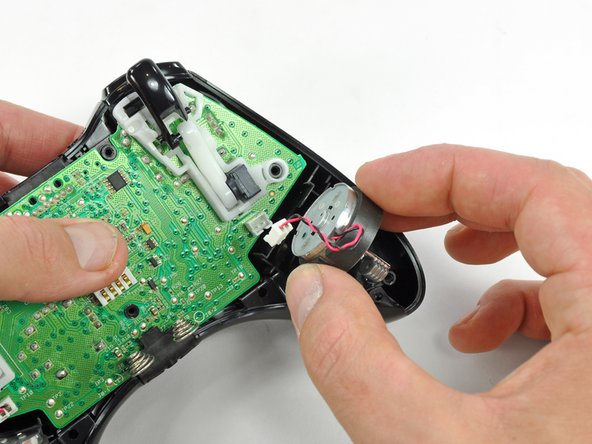
Use the flat end of a spudger to remove the vibration motor cable, moving it upward from its socket on the logic board.
-
Lift the vibration motor out of the front case.
-
-
Cette étape n’est pas traduite. Aidez à la traduire
-
Remove the vibration motor from the other side of the controller using the same method previously described.
-
-
Cette étape n’est pas traduite. Aidez à la traduire
-
Lifting from the headphone jack and power plug, remove the logic board from the front case.
-
-
Cette étape n’est pas traduite. Aidez à la traduire
-
Using your thumb and forefinger, push the left trigger toward the right side of the controller. Simultaneously push the trigger control arm in the opposite direction.
-
Push the trigger arm downward.
-
-
Cette étape n’est pas traduite. Aidez à la traduire
-
Insert the edge of a spudger in between the trigger and the trigger assembly near the left edge. Pry the housing away from the catch on the trigger.
-
Using the previously described technique, pry the housing on the right edge away from the trigger.
-
Rotate the trigger away from the logic board, past its housing.
-
-
Cette étape n’est pas traduite. Aidez à la traduire
-
Using a spudger, pry the trigger spring off its peg on the trigger housing.
-
Pull the trigger spring out of the trigger.
-
-
Cette étape n’est pas traduite. Aidez à la traduire
-
Slide the trigger toward the right side of the logic board, and rotate it clockwise.
-
Remove the right trigger from the logic board.
-
Annulation : je n'ai pas terminé ce tutoriel.
45 autres ont terminé cette réparation.
5 commentaires
use a small tag of double sided tape to hold the counterweights in when you rebuild or its nearly impossible to tip up the two halfs of the controller to fit them together. With the counterweight just slightly stuck into place with a tiny tag of double sided tape you can tip that half of the controller upside down to fit on top of the other half. Still awkward but do-able. Almost impossible otherwise.
If i leave out the vibrations things will it cause the problems tonthe board ??
These instructions were given in proper order and understanding
IMO this could have benefited from some instructions on how to get the triggers back on, cause it was quite a challenge.
The way I managed to do it, is you've got to reverse both step 11 and step 10 in one go, otherwise it would be impossible to get the trigger peg into the white arm (at least I couldn't figure out a way to do it): before reversing step 11, hold the white arm up and to same side you pushed it in the step 10, and then once you click it back into place, the peg would also go into the slot in the arm. For me it was easier to do for LT than RT - the latter too a few tries, so I would recommend doing LT first and then RT.


