Aller au contenu principal

Xbox One X Upper Plastic Case Replacement

Ce dont vous avez besoin

  1. Xbox One X Upper Plastic Case Replacement, Remove the sticker: étape 1, image 1 de 2 Xbox One X Upper Plastic Case Replacement, Remove the sticker: étape 1, image 2 de 2
    • Use blunt tweezers to peel off the sticker covering the right-side screw on the back of the console.

    • Before starting this guide: Turn off the device. Then, unplug any cables from the console.

  2. Xbox One X Upper Plastic Case Replacement, Remove the external screws: étape 2, image 1 de 1
    • Use a T10 Torx screwdriver to remove the two 12.6 mm–long screws located on the back of the console.

  3. Xbox One X Upper Plastic Case Replacement, Slide the upper case horizontally: étape 3, image 1 de 2 Xbox One X Upper Plastic Case Replacement, Slide the upper case horizontally: étape 3, image 2 de 2
    • Rotate the console 90 degrees.

    • Pull the front of the upper plastic case horizontally toward the front of the console until it comes to a stop. This slides the clips out of the slots on the upper plastic case.

  4. Xbox One X Upper Plastic Case Replacement, Lift the upper case off the lower case: étape 4, image 1 de 2 Xbox One X Upper Plastic Case Replacement, Lift the upper case off the lower case: étape 4, image 2 de 2
    • Rotate the console 90 degrees so that the back is facing you.

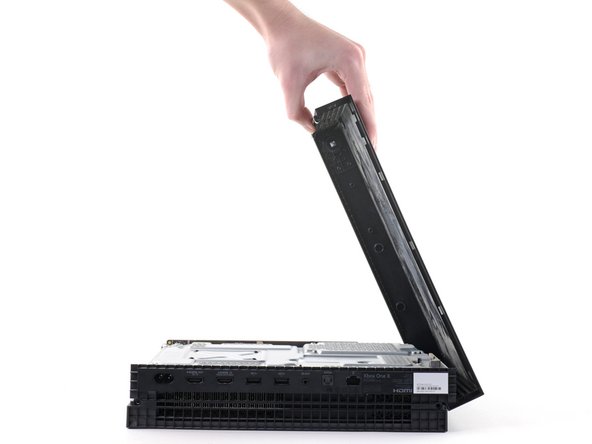
    • Lift up the left side of the upper plastic case (as viewed from the back of the console), stopping when it won’t lift any further.

  5. Xbox One X Upper Plastic Case Replacement: étape 5, image 1 de 3 Xbox One X Upper Plastic Case Replacement: étape 5, image 2 de 3 Xbox One X Upper Plastic Case Replacement: étape 5, image 3 de 3
    • While continuing to hold the left side of the upper plastic case, push up on the right side to move the right-side screw boss out of the way.

    • If pushing up on the case doesn't work, try moving it in different directions until it can swing open.

    • Swing the upper plastic case open to 75 degrees.

  6. Xbox One X Upper Plastic Case Replacement: étape 6, image 1 de 2 Xbox One X Upper Plastic Case Replacement: étape 6, image 2 de 2
    • Push the upper plastic case down and away from the console to remove it completely.

Conclusion

To reassemble your device, follow these instructions in reverse order.

11 autres ont terminé cette réparation.

Kyle Smith

Membre depuis le 02/01/21

40 777 Réputation

123 tutoriels rédigés

0 commentaires

Ajouter un commentaire

Nombre de vues :

Dernières 24 heures : 9

7 derniers jours : 58

30 derniers jours : 309

Total : 10,071