Aller au contenu principal

Il est possible que cette traduction ne reflète pas les dernières mises à jour du tutoriel source. Aidez à mettre à jour la traduction ou bien consultez le tutoriel source.

Xiaomi Mi 8 Complete Screen Replacement (LCD and Digitizer)

Tutoriel Archivé
Ce tutoriel est conservé uniquement à des fins de suivis historiques. Utilisez la version actuelle du tutoriel pour effectuer votre réparation.

Ce dont vous avez besoin

  1. Xiaomi Mi 8 Complete Screen Replacement (LCD and Digitizer), Complete Screen (LCD and Digitizer): étape 1, image 1 de 1
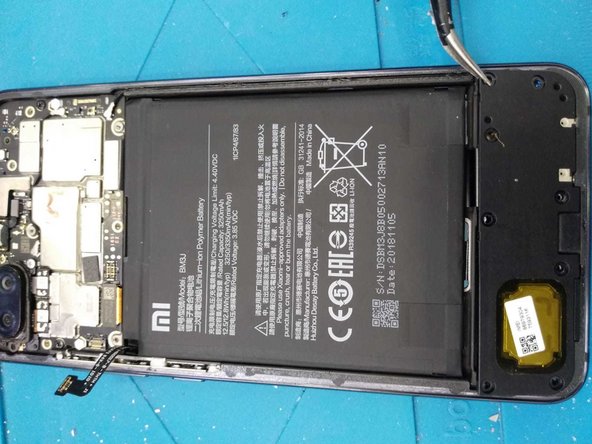
    • Turn off the cell phone and remove the SIM card.

  2. Xiaomi Mi 8 Complete Screen Replacement (LCD and Digitizer): étape 2, image 1 de 1
    • Place on top of a hot plate on soften the adhesive on the back cover (no more than 90ºc of heat). You can also use a heat gun, but be careful not to overdo it.

  3. Xiaomi Mi 8 Complete Screen Replacement (LCD and Digitizer): étape 3, image 1 de 1
    • Use a razor or a piece of plastic to take off the cover. Watch out! It is very fragile, use a lot of caution. Be careful with the flex cable. Do not insert the blade too far or you can cut it.

  4. Xiaomi Mi 8 Complete Screen Replacement (LCD and Digitizer): étape 4, image 1 de 2 Xiaomi Mi 8 Complete Screen Replacement (LCD and Digitizer): étape 4, image 2 de 2
    • Lift the cover from right to left, but do not do it completely while the flex cable is still connected. Unscrew the seven screws and place them as in the image.

  5. Xiaomi Mi 8 Complete Screen Replacement (LCD and Digitizer): étape 5, image 1 de 2 Xiaomi Mi 8 Complete Screen Replacement (LCD and Digitizer): étape 5, image 2 de 2
    • Unscrew the eight screws that fasten the bottom speaker. This step isn't necessary but it makes it much easier to pull the adhesive on the battery.

  6. Xiaomi Mi 8 Complete Screen Replacement (LCD and Digitizer): étape 6, image 1 de 2 Xiaomi Mi 8 Complete Screen Replacement (LCD and Digitizer): étape 6, image 2 de 2
    • Carefully pull the two adhesives that attatch the battery to the middle frame.

  7. Xiaomi Mi 8 Complete Screen Replacement (LCD and Digitizer): étape 7, image 1 de 2 Xiaomi Mi 8 Complete Screen Replacement (LCD and Digitizer): étape 7, image 2 de 2
    • Place the screen on the plate (apply heat), separate the screen from under as you have done with the back cover

  8. Xiaomi Mi 8 Complete Screen Replacement (LCD and Digitizer): étape 8, image 1 de 1
    • Congratulations, you have finished. To mount the new screen continue the guide in reverse.

Conclusion

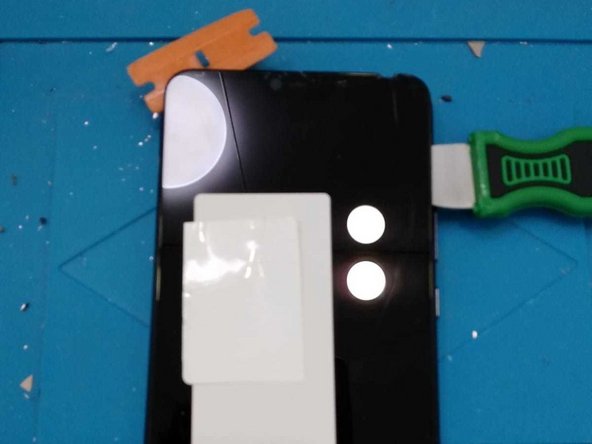
To reassemble your device, follow these instructions in reverse order.

Une autre personne a terminé cette réparation.

Merci à ces traducteurs :

es en

90%

Ces traducteurs nous aident réparer le monde ! Vous voulez contribuer ?
Commencez à traduire ›

Kefelegn Derbew

Membre depuis le 06/23/14

553 Réputation

2 tutoriels rédigés

0 commentaires

Ajouter un commentaire

Nombre de vues :

Dernières 24 heures : 0

7 derniers jours : 4

30 derniers jours : 7

Total : 275