Introduction
Yamaha has a hidden/secret piano sound that can be enabled by replacing the factory selector knob with 6 positions instead with one that has 7 or by removing one of legs of the factory knob.
I opted for replacing the knob in this guide as I’d like to keep all 6 existing sounds and add the hidden one.
Ce dont vous avez besoin
-
-
The Yamaha CP and rotary switch we will be replacing (red).
-
This process includes removing a mind-boggling 42 screws. Make sure you have the space to keep them all in order.
-
-
-
Flip the CP over and unscrew the 17 screws from the bottom. Keep track of which was where as some are longer than others.
-
-
-
Flip CP over and gently lift the front of the top cover.
-
Unscrew ground cable (red circle). You may need to balance the cover in the air for this one as the cable is a bit short.
-
Unplug cables (pink rectangle). I marked the bottom one with tape to not mix them up later.
-
Remove top from bottom half. Store bottom half till the end as we no longer need it.
-
-
-
-
Place top half knob side up and gently pull (with your fingers) the knobs and sliders off.
-
Set flip switches to the middle position and unscrew the nuts with pliers.
-
-
-
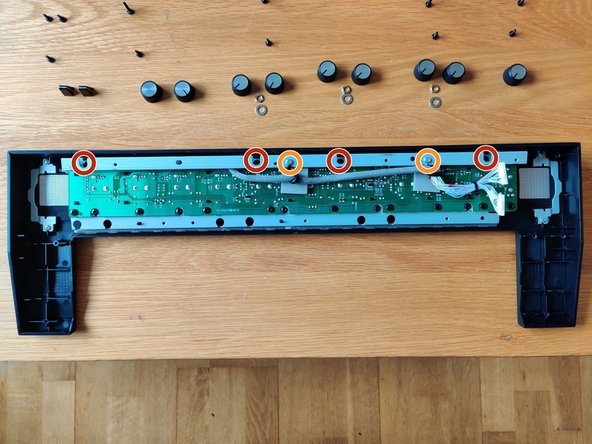
Flip top cover over and remove the metal bar holding the PCB down by removing 4 screws (red) and 2 hooks (orange).
-
Remove another 18 screws (red) to finally free the PCB from the case!
-
-
-
Remove PCB from top cover and tie the cables back to make room for soldering (pink).
-
Desolder the rotary switch (yellow) with the help of the desoldering pump. Or just chop off the switch with the flush pliers (like I did after struggiling with desoldering).
-
Rotary switch removed and scratches from the pliers on the top side of the PCB (green).
-
-
-
Solder the switch with ROHS compilant solder. Please forgive the shoddy work on the stabilizing legs and crushed C110 (it still works).
-
Time to start putting it back together!
-


To reassemble your device, follow these instructions in reverse order.
To enable the hidden sound, turn the knob to position 7 (all the way to the right) before turning on the keyboard. Switching to any other sound and back while on will not re-enable the new sound, you’ll need to turn the keyboard off and set the knob to 7 again and then turn it on again (it’s not a perfect mod, but it is a fairly decent hack).
Congrats, you now have an even better sounding Yamaha Reface CP!
Annulation : je n'ai pas terminé ce tutoriel.
3 autres ont terminé cette réparation.
6 commentaires
Super!!! THANK YOU - the BEST variant for CP! A+++++
P.S.: Just did it. Never been happier of an instrument upgrade! THANKS AGAIN!