Aller au contenu principal

Zoom H6 Handy Recorder Power Switch Replacement

Ce dont vous avez besoin

  1. Zoom H6 Handy Recorder Power Switch Replacement, Case: étape 1, image 1 de 3 Zoom H6 Handy Recorder Power Switch Replacement, Case: étape 1, image 2 de 3 Zoom H6 Handy Recorder Power Switch Replacement, Case: étape 1, image 3 de 3
    • Place device face up and pry off the four knobs using the flat end of the plastic opening tool.

    • You may need to stabilize the device with the other hand.

  2. Zoom H6 Handy Recorder Power Switch Replacement: étape 2, image 1 de 3 Zoom H6 Handy Recorder Power Switch Replacement: étape 2, image 2 de 3 Zoom H6 Handy Recorder Power Switch Replacement: étape 2, image 3 de 3
    • With device facedown, lift the four rubber feet from the device using tweezers or fingernails.

  3. Zoom H6 Handy Recorder Power Switch Replacement: étape 3, image 1 de 2 Zoom H6 Handy Recorder Power Switch Replacement: étape 3, image 2 de 2
    • With device still facedown, unscrew six (PH #1), 9mm screws; two located in center of back side of device right above the battery cover, and four under the rubber feet.

    • An electronics screwdriver small enough to fit in hole (4mm diameter), but long enough to reach the screws (at least 2cm) will be required to unscrew the screws.

  4. Zoom H6 Handy Recorder Power Switch Replacement: étape 4, image 1 de 3 Zoom H6 Handy Recorder Power Switch Replacement: étape 4, image 2 de 3 Zoom H6 Handy Recorder Power Switch Replacement: étape 4, image 3 de 3
    • With the bottom of the device on a table, lift the top of the device and gently place it aside.

  5. Zoom H6 Handy Recorder Power Switch Replacement, Motherboard: étape 5, image 1 de 3 Zoom H6 Handy Recorder Power Switch Replacement, Motherboard: étape 5, image 2 de 3 Zoom H6 Handy Recorder Power Switch Replacement, Motherboard: étape 5, image 3 de 3
    • Unscrew three (PH #1), 7mm screws from the display backing and gently flip over.

  6. Zoom H6 Handy Recorder Power Switch Replacement: étape 6, image 1 de 3 Zoom H6 Handy Recorder Power Switch Replacement: étape 6, image 2 de 3 Zoom H6 Handy Recorder Power Switch Replacement: étape 6, image 3 de 3
    • Using a plastic opening tool, unlatch the clip and carefully unplug the ribbon connector from the device.

    • Set the button board aside.

  7. Zoom H6 Handy Recorder Power Switch Replacement: étape 7, image 1 de 1
    • Unscrew four (PH #1), 8mm screws from the motherboard.

  8. Zoom H6 Handy Recorder Power Switch Replacement: étape 8, image 1 de 1
    • Disconnect wire from motherboard using tweezers.

    • Do not touch the motherboard with metal tweezers. Only touch the plastic part of the plugged-in wire.

  9. Zoom H6 Handy Recorder Power Switch Replacement: étape 9, image 1 de 1
    • Turn device 180 degrees to unscrew two (PH #1), 8mm screws from the mic connector.

  10. Zoom H6 Handy Recorder Power Switch Replacement: étape 10, image 1 de 3 Zoom H6 Handy Recorder Power Switch Replacement: étape 10, image 2 de 3 Zoom H6 Handy Recorder Power Switch Replacement: étape 10, image 3 de 3
    • Gently remove three ribbon connectors from the device.

    • The first is connected to the mic connector.

    • The second is connected to the base of the device, and the third is connected to the power switch on the side of the device; turn the device 180 degrees, and the connectors are near the top of the device next to the "LINE OUT" plug-in (directly behind the device display).

    • It's best to use tweezers to remove the two ribbon connectors behind the display.

    • Avoid touching anything but the ribbon connectors with the metal tweezers.

  11. Zoom H6 Handy Recorder Power Switch Replacement: étape 11, image 1 de 2 Zoom H6 Handy Recorder Power Switch Replacement: étape 11, image 2 de 2
    • Gently lift the motherboard from the base of the device and set aside.

  12. Zoom H6 Handy Recorder Power Switch Replacement, Power Switch: étape 12, image 1 de 3 Zoom H6 Handy Recorder Power Switch Replacement, Power Switch: étape 12, image 2 de 3 Zoom H6 Handy Recorder Power Switch Replacement, Power Switch: étape 12, image 3 de 3
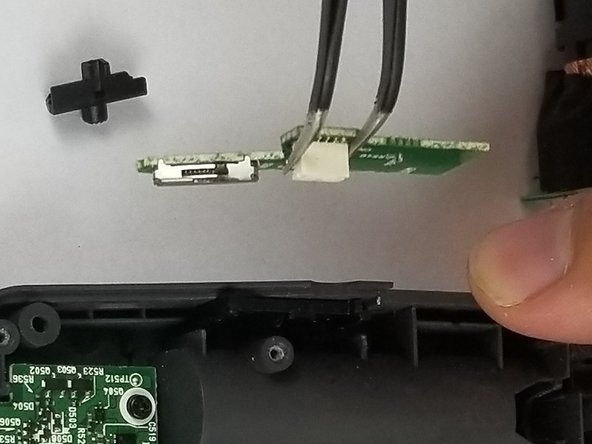
    • Use tweezers to lift the power switch out and set aside.

  13. Zoom H6 Handy Recorder Power Switch Replacement: étape 13, image 1 de 3 Zoom H6 Handy Recorder Power Switch Replacement: étape 13, image 2 de 3 Zoom H6 Handy Recorder Power Switch Replacement: étape 13, image 3 de 3
    • Use tweezers to lift power switch circuit out of device by the plastic ribbon connection.

    • Replace the power switch circuit.

    • Don't touch the metal part of the circuit with the tweezers

Conclusion

To reassemble your device, follow these instructions in reverse order.

Une autre personne a terminé cette réparation.

Rachel Calder

Membre depuis le 02/14/18

1 162 Réputation

5 tutoriels rédigés

Équipe

USF Tampa, Team S5-G2, Eyestone Spring 2018 Membre de l'équipe USF Tampa, Team S5-G2, Eyestone Spring 2018

USFT-EYESTONE-S18S5G2

4 membres

10 tutoriels rédigés

5 commentaires

where can i buy the power switch?

Michael Gombkoetoe - Réponse

Are the parts available anywhere?

Stan Moore - Réponse

If anybody still needs parts, you can get them here: https://shop.audiotronic.fr/en/61-h6

Joseph Ferreira Campos - Réponse

Any US seller for this part?

Tan - Réponse

You get get pretty much all the Parrrts for Zoom devices here:
https://shop.sonj.fr/en/3-zoom

Nils Ahorn Striker (Striker) - Réponse

Ajouter un commentaire

Nombre de vues :

Dernières 24 heures : 0

7 derniers jours : 5

30 derniers jours : 34

Total : 2,932