Cette version peut contenir des modifications incorrectes. Passez au dernier aperçu vérifié.
Ce dont vous avez besoin
-
Cette étape n’est pas traduite. Aidez à la traduire
-
Use a spudger or small flathead screwdriver to remove the three rubber feet from the lower case.
-
-
Cette étape n’est pas traduite. Aidez à la traduire
-
Remove the three newly-revealed Phillips screws.
-
-
Cette étape n’est pas traduite. Aidez à la traduire
-
Use a spudger or small flathead screwdriver to pry up the three metal rings that housed the rubber bumpers.
-
-
Cette étape n’est pas traduite. Aidez à la traduire
-
Remove the three Torx screws using a T8 Torx screwdriver.
-
-
Cette étape n’est pas traduite. Aidez à la traduire
-
Remove the two 4.5 mm Phillips screws on either sides of the battery contacts.
-
-
-
Cette étape n’est pas traduite. Aidez à la traduire
-
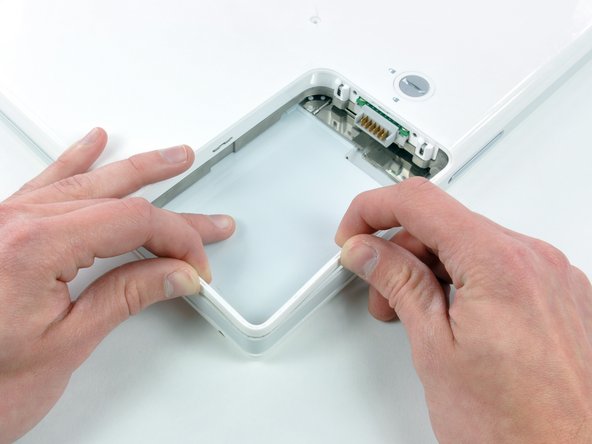
Push the thin rims of the lower case surrounding the battery compartment in, bending them past the tabs, and then lift up to free that corner of the lower case.
-
-
Cette étape n’est pas traduite. Aidez à la traduire
-
There is a slot on the wall of the battery compartment that locks the lower case in place. Use a small flathead screwdriver to pry out the slot's lower rim and pull up on the lower case to free the slot from the tabs holding it.
-
-
Cette étape n’est pas traduite. Aidez à la traduire
-
Run a spudger along the seam between the lower case and upper case on the front of the computer to free the tabs locking the lower case. Pull up on the lower case and continue to use the spudger as necessary until you hear three distinct clicks.
-
-
Cette étape n’est pas traduite. Aidez à la traduire
-
Continue to run the spudger around the front right corner. There are two tabs on the port side of the computer, one near the front corner and one near the sound-out port.
-
-
Cette étape n’est pas traduite. Aidez à la traduire
-
There are three tabs over the optical drive that must be released before the lower case can come off. Slide the spudger into the lower case above the optical drive and run it toward the back of the computer until you hear three distinct clicks.
-
-
Cette étape n’est pas traduite. Aidez à la traduire
-
Turn the computer so that the back is facing you and pull the lower case up and toward you until the back tabs pop free.
-
-
Cette étape n’est pas traduite. Aidez à la traduire
-
Remove the small greasy springs with white plastic caps from either side of the battery contacts.
-
-
Cette étape n’est pas traduite. Aidez à la traduire
-
Have patience and follow the directions, the end result is up to you.
-
-
Cette étape n’est pas traduite. Aidez à la traduire
-
Remove the following 4 screws from the bottom shield:
-
Two 3 mm Phillips.
-
Two 7.5 mm Phillips.
-
-
Cette étape n’est pas traduite. Aidez à la traduire
-
Remove the two Phillips screws securing the DC-In board, removing tape as necessary.
-
-
Cette étape n’est pas traduite. Aidez à la traduire
-
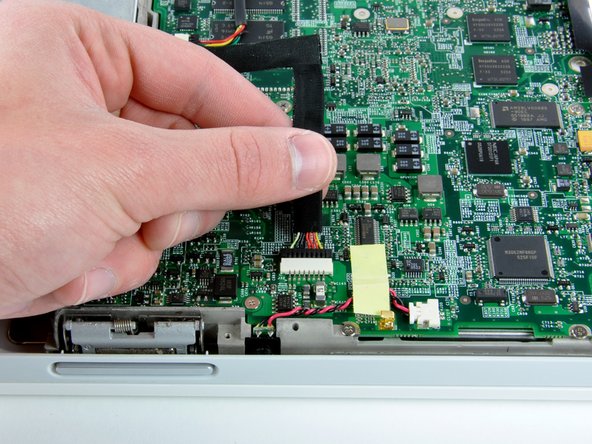
Deroute the cable from around the optical drive, removing tape as necessary.
-
Disconnect the DC-In cable from the logic board and angle the DC-In board out of its compartment.
-


Annulation : je n'ai pas terminé ce tutoriel.
66 autres ont terminé cette réparation.
Pièces jointes

2 commentaires
A HUGE thank you! I took my old iBook G4 into the Apple store a couple years ago to ask about getting my computer fixed - the pin/needle to the charger broke off inside and I could not remove it - and they told me I could try a toothpick and superglue and try to remove the pin, otherwise they couldn't fix it. But after researching for a few hours and because of this website, I was able to purchase a new DC-in Board AND replace it myself! I'm no handy-woman whatsoever and this was very easy. A little intimidating as soon as you pull of the bottom shield, but actually replacing the DC-in Board was definitely the easiest part. Thank you so much for your step by step manual with photos. I can not thank you enough.
I did this procedure twice on 9 June 2019; to remove a working DC-In Card from a “hanger queen” 12”iBook, and install it into an operational G4 iBook with a bad DC-In Card. I lack mechanical expertise as well as strength in my hands, but wanted to try doing this because having someone else fix my iBook would cost 3 or 4 times as much as the iBook is currently worth! Anyway, after researching the take-apart steps here and on YouTube, I first bought a toolset and spudgers from my local Micro Center before attempting the DC-In Card removal and replacement. My “hangar queen” iBook was easier to take apart since it had been worked on previously before being declared “dead.” I really had trouble separating the back cover from the working iBook because it had not been opened for a very long time. I kept at it, and was finally able to separate the back cover, remove the metal interior cover, install the “good” DC-in Card back into my working iBook, and put it back together. My iBook is now charging as it should.