Aller au contenu principal

iBook G4 14" 933 MHz-1.33 GHz Battery Connector Replacement

Ce dont vous avez besoin

  1. iBook G4 14" 933 MHz-1.33 GHz Battery Connector Replacement, Battery: étape 1, image 1 de 1
    • Use a coin to rotate the battery locking screw 90 degrees clockwise.

  2. iBook G4 14" 933 MHz-1.33 GHz Battery Connector Replacement: étape 2, image 1 de 1
    • Lift the battery out of the computer.

  3. iBook G4 14" 933 MHz-1.33 GHz Battery Connector Replacement, Lower Case: étape 3, image 1 de 1
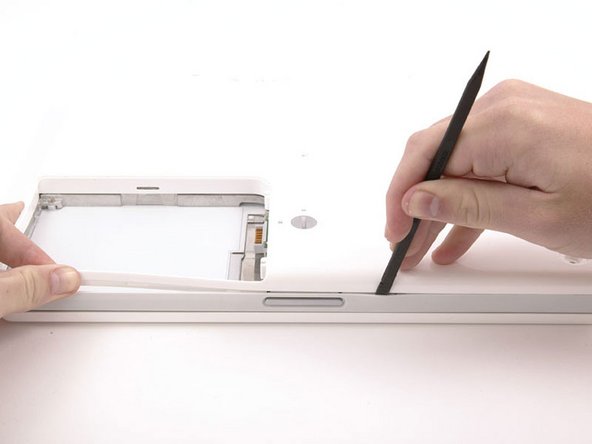
    • Use a pin (or anything you like) to remove the three rubber feet from the lower case.

  4. iBook G4 14" 933 MHz-1.33 GHz Battery Connector Replacement: étape 4, image 1 de 1
    • Remove the three newly-revealed Phillips screws.

  5. iBook G4 14" 933 MHz-1.33 GHz Battery Connector Replacement: étape 5, image 1 de 1
    • Use a spudger or small flathead screwdriver to pry up the three metal rings that housed the rubber bumpers.

  6. iBook G4 14" 933 MHz-1.33 GHz Battery Connector Replacement: étape 6, image 1 de 1
    • Remove the three hex screws using a T8 Torx screwdriver (or Allen screws using an Allen key if these are used).

    • The shorter screw is in the center of the computer.

  7. iBook G4 14" 933 MHz-1.33 GHz Battery Connector Replacement: étape 7, image 1 de 1
    • Remove the two Phillips screws on either side of the battery contacts.

  8. iBook G4 14" 933 MHz-1.33 GHz Battery Connector Replacement: étape 8, image 1 de 1
    • Breathe deeply. Trying times are ahead, but we promise the lower case does come off.

    • Push the thin rims of the lower case surrounding the battery compartment in, bending them past the tabs, and then lift up to free that corner of the lower case.

  9. iBook G4 14" 933 MHz-1.33 GHz Battery Connector Replacement: étape 9, image 1 de 1
    • There is a slot on the wall of the battery compartment that locks the lower case in place. Use a small flathead screwdriver to pry out the slot's lower rim and pull up on the lower case to free the slot from the tabs holding it.

    • Be careful not to break this clip!

  10. iBook G4 14" 933 MHz-1.33 GHz Battery Connector Replacement: étape 10, image 1 de 1
    • Run a spudger along the seam between the lower case and upper case on the front of the computer to free the tabs locking the lower case. Pull up on the lower case and continue to use the spudger as necessary until you hear three distinct clicks.

  11. iBook G4 14" 933 MHz-1.33 GHz Battery Connector Replacement: étape 11, image 1 de 1
    • Continue to run the spudger around the front, right corner. There are two tabs on the port side of the computer, one near the front corner and one near the sound-out port.

  12. iBook G4 14" 933 MHz-1.33 GHz Battery Connector Replacement: étape 12, image 1 de 1
    • There are three tabs over the optical drive that must be released before the lower case can come off. Slide the spudger into the lower case above the optical drive and run it toward the back of the computer until you hear three distinct clicks.

  13. iBook G4 14" 933 MHz-1.33 GHz Battery Connector Replacement: étape 13, image 1 de 1
    • Once the front and sides of the lower case are free, turn the computer so that the back is facing you and pull the lower case up and toward you until the back tabs pop free (it may be helpful to jiggle the case up and down).

  14. iBook G4 14" 933 MHz-1.33 GHz Battery Connector Replacement: étape 14, image 1 de 1
    • Remove the small greasy springs with white plastic caps from either side of the battery contacts.

  15. iBook G4 14" 933 MHz-1.33 GHz Battery Connector Replacement, Bottom Shield: étape 15, image 1 de 1
    • Remove the following 10 screws from the bottom shield:

    • Six 3 mm Phillips

    • Three 7.5 mm Phillips

    • One 14 mm Phillips

  16. iBook G4 14" 933 MHz-1.33 GHz Battery Connector Replacement: étape 16, image 1 de 1
    • Lift the bottom shield off.

  17. iBook G4 14" 933 MHz-1.33 GHz Battery Connector Replacement, Battery Connector: étape 17, image 1 de 1
    • Remove the two Phillips screws securing the battery connector.

  18. iBook G4 14" 933 MHz-1.33 GHz Battery Connector Replacement: étape 18, image 1 de 1
    • Lift the battery connector out of the metal framework and disconnect it from the logic board.

    • The connector may not come free easily. Wiggle it from side to side as you pull it steadily out.

Conclusion

To reassemble your device, follow these instructions in reverse order.

4 autres ont terminé cette réparation.

Pièces jointes

iRobot

Membre depuis le 09/24/09

1 Réputation

636 tutoriels rédigés

0 commentaires

Ajouter un commentaire

Nombre de vues :

Dernières 24 heures : 0

7 derniers jours : 3

30 derniers jours : 7

Total : 8,337