Aller au contenu principal

iHip Fold-up Portable Speaker iPod/iPhone Input Replacement

Ce dont vous avez besoin

  1. iHip Fold-up Portable Speaker iPod/iPhone Input Replacement, Removing the battery case cover: étape 1, image 1 de 1
    • Use your fingers to slide the battery case cover off in the direction of the arrows.

  2. iHip Fold-up Portable Speaker iPod/iPhone Input Replacement, Cleaning the battery case: étape 2, image 1 de 3 iHip Fold-up Portable Speaker iPod/iPhone Input Replacement, Cleaning the battery case: étape 2, image 2 de 3 iHip Fold-up Portable Speaker iPod/iPhone Input Replacement, Cleaning the battery case: étape 2, image 3 de 3
    • Remove the four AAA batteries. Be sure to check your nearest battery recycling point!

    • Use the detailing brush and a paper towel to remove any corrosion left by previous batteries.

  3. iHip Fold-up Portable Speaker iPod/iPhone Input Replacement, Removing the screws: étape 3, image 1 de 2 iHip Fold-up Portable Speaker iPod/iPhone Input Replacement, Removing the screws: étape 3, image 2 de 2
    • Unscrew the four outer 1.0 mm screws with a Phillips-Head screwdriver.

    • Screws will be magnetized in position and will require the use of tweezers to be removed.

    • Push down gently on the battery case cover and slide it in the direction the arrows indicate. Remove the batteries.

    • Unscrew the 0.6 mm screw located in the center of the battery case.

    • Keep the 1.0 mm and 0.6 mm screws separate from each other for reassembly.

  4. iHip Fold-up Portable Speaker iPod/iPhone Input Replacement, Removing the back cover: étape 4, image 1 de 2 iHip Fold-up Portable Speaker iPod/iPhone Input Replacement, Removing the back cover: étape 4, image 2 de 2
    • Remove the back cover carefully; there are many wires that connect it to the device.

  5. iHip Fold-up Portable Speaker iPod/iPhone Input Replacement, Taking out the iPod/iPhone input: étape 5, image 1 de 2 iHip Fold-up Portable Speaker iPod/iPhone Input Replacement, Taking out the iPod/iPhone input: étape 5, image 2 de 2
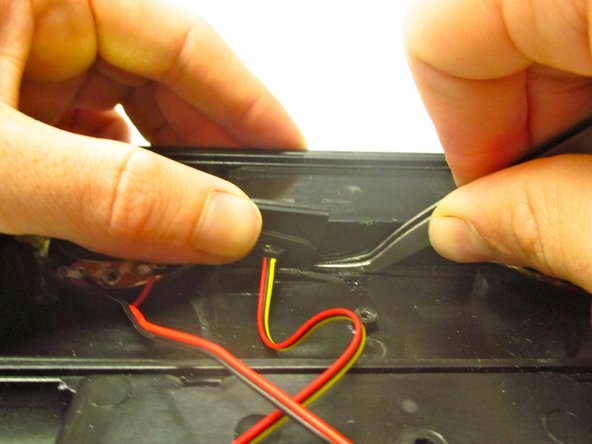
    • Locate the iPhone/iPod input that is in the center of the console.

    • Push the black plastic input stand to the left, and up, with your index finger.

    • Use tweezers to wedge the input stand out of its slot.

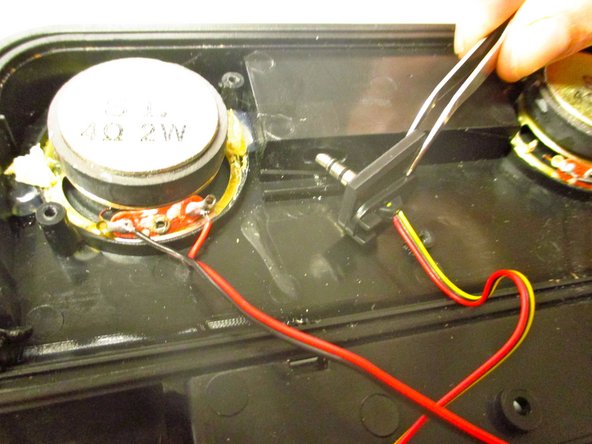
  6. iHip Fold-up Portable Speaker iPod/iPhone Input Replacement, Removing iPod/iPhone Input: étape 6, image 1 de 1
    • Pull out the iPod/iPhone input with tweezers.

  7. iHip Fold-up Portable Speaker iPod/iPhone Input Replacement, Removing the Line In Chip: étape 7, image 1 de 1
    • Gently remove the Line In chip with tweezers.

    • Note: The Line In chip is located on the left side of the device.

  8. iHip Fold-up Portable Speaker iPod/iPhone Input Replacement, Cutting the Input Wires from the Line In Chip: étape 8, image 1 de 1
    • Use scissors to cut the black, yellow, and red wires that connect the Line In chip to the iPod/iPhone input.

    • Remove the old iPod/iPhone input and its associated wires.

  9. iHip Fold-up Portable Speaker iPod/iPhone Input Replacement, Cauterizing the New Input Wires to the Line In Chip: étape 9, image 1 de 1
    Outil utilisé dans cette étape :
    Desoldering Pump
    $3.99
    J'achète
    • Follow the instructions provided with the soldering station to preheat the gun before use.

    • Place new iPod/iPhone input wires, one by one, in their previous position on the Line In chip. Wrap a strip of soldering wire on the point of contact between the chip and input wire.

    • Use the soldering gun to melt the strip of soldering wire.

  10. iHip Fold-up Portable Speaker iPod/iPhone Input Replacement, Replacing the Line In Chip: étape 10, image 1 de 1
    • Use tweezers to carefully place the newly soldered Line In chip back into its original position.

  11. iHip Fold-up Portable Speaker iPod/iPhone Input Replacement, Positioning New iPod/iPhone Input Into Original Position: étape 11, image 1 de 1
    • With tweezers, insert the end of the iPod/iPhone input through its designated hole.

    • Note: The device has been rotated 90 degrees to the left in this picture.

    • With both thumbs, push in the black plastic input stand until it snaps into place.

Conclusion

To reassemble your device, follow these instructions in reverse order.

Jonathon Josephson

Membre depuis le 10/13/14

103 Réputation

1 tutoriel rédigé

Équipe

Clemson, Team 3-4, Benson Fall 2014 Membre de l'équipe Clemson, Team 3-4, Benson Fall 2014

CLEM-BENSON-F14S3G4

5 membres

8 tutoriels rédigés

0 commentaires

Ajouter un commentaire

Nombre de vues :

Dernières 24 heures : 3

7 derniers jours : 8

30 derniers jours : 8

Total : 241