Aller au contenu principal

iMac G5 17" Model A1058 Hard Drive Replacement

Conditions préalables uniquement
Ce tutoriel est uniquement destiné à être utilisé comme prérequis d'autres tutoriels. Il ne se suffit pas à lui-même.

Ce dont vous avez besoin

  1. iMac G5 17" Model A1058 Hard Drive Replacement, Rear Panel: étape 1, image 1 de 1
    • Lay the iMac display-side down on a flat surface.

    • Loosen the three Phillips screws securing the rear panel to the iMac.

    • These screws are captive in the iMac. The center screw will stop turning after about 3.5 turns and the outer screws will stop turning after about 5.5 turns. Do not try to remove these screws from your iMac.

  2. iMac G5 17" Model A1058 Hard Drive Replacement: étape 2, image 1 de 3 iMac G5 17" Model A1058 Hard Drive Replacement: étape 2, image 2 de 3 iMac G5 17" Model A1058 Hard Drive Replacement: étape 2, image 3 de 3
    • Lift the rear panel slightly from the bottom edge of the iMac.

    • Pull the rear panel toward yourself and remove it from the iMac.

  3. iMac G5 17" Model A1058 Hard Drive Replacement, Fan Cover: étape 3, image 1 de 2 iMac G5 17" Model A1058 Hard Drive Replacement, Fan Cover: étape 3, image 2 de 2
    • Remove the two Phillips screws securing the fan cover to the midplane.

    • The shouldered screw belongs in the lower left corner of the fan cover.

    • Lift the fan cover up off midplane.

  4. iMac G5 17" Model A1058 Hard Drive Replacement, Hard Drive: étape 4, image 1 de 1
    • Disconnect the hard drive thermal sensor cable from the hard drive thermal sensor.

    • During reassembly, plug in the hard drive thermal sensor before lowering your new hard drive into the midplane.

  5. iMac G5 17" Model A1058 Hard Drive Replacement: étape 5, image 1 de 2 iMac G5 17" Model A1058 Hard Drive Replacement: étape 5, image 2 de 2
    • Remove the three Phillips screws securing the hard drive to the midplane.

    • Lift the hard drive from its right edge and maneuver it out of the midplane.

    • The hard drive is still connected to the motherboard.

  6. iMac G5 17" Model A1058 Hard Drive Replacement: étape 6, image 1 de 2 iMac G5 17" Model A1058 Hard Drive Replacement: étape 6, image 2 de 2
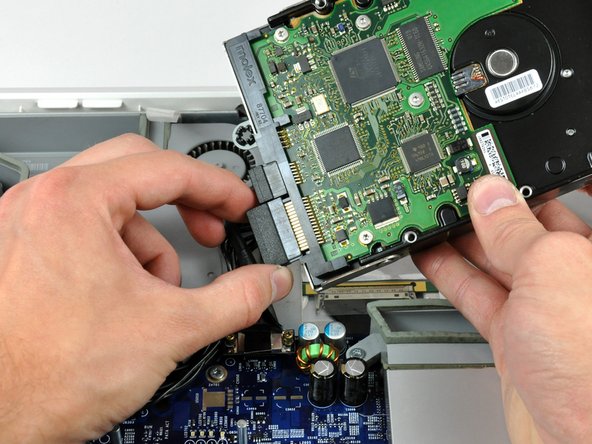
    • Insert the flat end of a spudger between the SATA power cable connector and the body of the hard drive.

    • Twist the spudger counter-clockwise to slightly separate the SATA power cable connector from its socket on the hard drive.

    • Pull the SATA power cable connector away from the hard drive.

  7. iMac G5 17" Model A1058 Hard Drive Replacement: étape 7, image 1 de 1
    • Pull the SATA data cable connector away from the hard drive.

Conclusion

To reassemble your device, follow these instructions in reverse order.

0 commentaires

Ajouter un commentaire

Nombre de vues :

Dernières 24 heures : 0

7 derniers jours : 0

30 derniers jours : 0

Total : 1,732