Introduction
Replace a faulty AirPort card to regain wireless internet connectivity.
Ce dont vous avez besoin
-
-
Loosen the two Phillips screws securing the access door to your iMac.
-
Remove the access door.
-
-
-
Remove the following screws along the lower edge of your iMac:
-
Three 6 mm T8 Torx screws
-
One 8 mm T8 Torx screw (Right side of the RAM slot on 2105)
-
-
-
Insert a plastic card up into the corner of the air vent slot near the top of the rear case.
-
Push the card toward the top of the iMac to release the front bezel latch.
-
Pull the front bezel away from the rear case.
-
Repeat this process for the other side of the front bezel.
-
If the bezel refuses to release, try lifting the lower edge of the front bezel slightly away from the rear case (detailed in the next few steps) and repeat the latch release process.
I have never seen a pict of the bezel latch, I hope this picture link helps you to figure out what is inside that you need the cc to hit to release, I had a tough time making it work but managed just before I gave up! http://i209.photobucket.com/albums/bb35/...
the photo of latch is no longer there at Photobucket
Citation de ReneBruce :
I have never seen a pict of the bezel latch, I hope this picture link helps you to figure out what is inside that you need the cc to hit to release, I had a tough time making it work but managed just before I gave up! http://i209.photobucket.com/albums/bb35/...
Thanks, your picture helped me.
Rather than through the vent at the back. Ease the bottom of the front bezel away from the screen and then in the gap created between the screen and the front bezel, insert your card here and push up to release the latch. This is especially the method to use, if you have already tried everything else above, as you may have bent the latches, and you'll never get them to relase the conventional way.
Good tip. I sort of did this out of desperation before reading this. Seem to work to get it apart. I'll have to see about getting it back together.
Wow, I really got stuck on the bezel. I tried a credit card, even a flexible metal scraper, nope nothing budged. I finally got going with help from this video: http://www.youtube.com/watch?v=QzuBW3mu7... which the guy has the machine lying on its back, then you can carefully bend the front bezel up until you see the latches, and I got the scraper in front of the screen and un-did the latches that way. Onto the next step!
Replaced one of the redundant images of the card going into the slot, with the previously linked image of the latch itself. I was struggling to figure out how to get the thing open, thinking it was a latch that pushed *up* to the top of the system, but it actually pushes *forward* towards the screen. That accounts for the bending of the card, and the excess length required to insert it. After figuring that out, the case came off nicely.
Apple uses a powerful magnet to release these latches, but the official tool is not available. If you have access to a few failed hard drives, you can take out the magnets from those, and stack them up to have a magnet strong enough to easily open these latches.
Simply place the magnet on an upper corner of the machine, and when you hear a click, gently pull the corner of the front case forward. Repeat the process for the other upper corner. Use care not to pull on the iSight cables.
Note: Use care when handling the hard drive magnets, they are powerful, and you don't want them to snap together on your fingers. OUCH!
This was perfect! I wish the original instructions mentioned the magnets.
I used magnets I pilfered from an old hard drive.
veganmo -
The iMacs I've taken apart open simply with a magnet. I made a video to show exactly how the latch works inside. You do need a strong magnet like the hard drive internal magnet suggestion however they can be found in many places, just look for 'rare earth' or 'neodymium' and you'll find one. probably .3" cube would be big enough.
there is the video that shows how the latch works. of course you may need TWO magnets to do both latches at the same time.
Save yourself some headache and get a magnet for this. I used these: www.amazon.com/gp/product/B004PWMVSI/ref=wms_ohs_product?ie=UTF8&psc=1
Sometimes just one will do the job, other times I've had to use all 4 together.
Much easier than trying to use a card.
sleestack is right on. The youtube vid is excellent for sliding the case right off without spudges and cards, etc. The vid's still there as of today, 9/30/2014. And the guy's foil removal is right on target, too. Very simple to replace the battery. I use this old 2006 computer with an old version of the PC program for Jobclock and only for that with Parallels 6 running the PC app. Don't want to upgrade or change anything at this point, going to milk it a couple more years. Got a nice big i5 for everything else. Oh, happy day.
Apple designed the latch to be released with a Magnet. That's it. That is the tool to be used.
Avoid frustration, hassles, wasted time: simply buy a "neodimio" Magnet.
Actually yes – IMHO It would have preferred iFixtit had mentioned a MAGNET to release the front Bezel, the credit card in an awkward and misleading (and not so smart) method.
I hope iFixit will change Step 3.
Be very careful here. One of the sides did not release using the plastic card. I tried to push it a bit but it would not give. It did work using 2 cards. What I did not realized until the very end, when I turned the imac back on, is that I broke the display. Thanks a lot ifixit. I get the hard drive back to work now but with a damaged display. And I can't even buy a replacement one from you.
Yes the screens in these machines are easy to break. I've opened these sorts of machines at least a 40 times. You do need to be very careful with the display. The won't take any pressure from a wayward thumb or finger etc. I have broken one once, trying to get a latch to give. You have to be very conscious not to out any fingers in the display at all.
BUT, how you think this is anyone's but your own fault is beyond me. iFixit has no blame to take here.
Please everyone, read through all instructions carefully and learn from others'.
And to this poster, go buy one of these machines from eBay or find in one in hard rubbish to repair yours. These white iMacs are almost 10 years old now. And are scrap in most people's minds.
-
-
-
Lay your iMac stand-side down on a flat surface.
-
To lift the front bezel off the iMac, simultaneously:
-
Use your thumbs to press in the RAM arms and hold the iMac down.
-
Use your index fingers to pull the small bridge of material on the front bezel toward yourself.
-
Pull the front bezel up with your index fingers.
-
Once the small bridge of material has cleared the RAM arms, lift the front bezel by its lower edge just enough to clear the bottom edge of the rear case.
-
-
-
i posted a note on the next page about disconnecting the microphone and camera cable. may help. reed it before disconnect.
-
-
Disconnect the microphone cable.
-
Disconnect the camera cable by pulling its connector away from the socket on the camera board.
there's no need to disconnect the microphone and camera cable. you can work against a wall and carefully rest the frame and the display on the wall.
Citation de sebalancea :
there's no need to disconnect the microphone and camera cable. you can work against a wall and carefully rest the frame and the display on the wall.
I didn't even use the wall, I just carefully pivoted the frame backwards and laid it on the table without disconnecting the wires
Be careful. My microphone and camera cables looked a little bit different from this. My camera cable connector did NOT plug directly into the camera board (and I almost tried pulling the cable out of the board), but rather there was a cable to cable connector that was stuffed behind the monitor. I had to skip this step until the monitor was out. I have an early 2006 20" iMac.
My Mac had a different camera board and it didn't appear that the cables could be detached. Leaving them in place and propping up the back of the case worked for me.
-
-
-
Tape the EMI shield to the face of the display to keep it out of the way.
Citation de Bob :
I didn't see the need to tape the foil to the display (and I didn't want to get any sticky residue on the screen), so I skipped this bit with no problems.
I agree, and tape doesn't stick to the screen (I tried and the tape came loose before I was done)
-
-
-
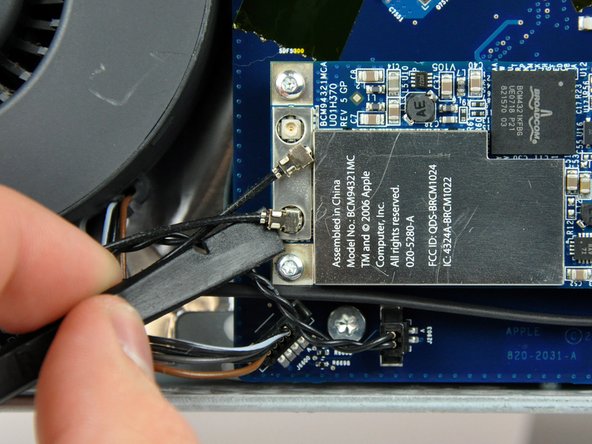
Use the flat end of a spudger to pry both antenna cable connectors up off the AirPort card.
-


To reassemble your device, follow these instructions in reverse order.
To reassemble your device, follow these instructions in reverse order.
Annulation : je n'ai pas terminé ce tutoriel.
10 autres ont terminé cette réparation.

Un commentaire
Hello, it would be possible to use the PCIe to replace by SATA or USB3 PCIe?. Thank you.
Swapping in a new CPU and an SSD took me about 10 hours. I did take a dinner break and spent another hour rooting around in my garage to find my thermal paste. Still, this procedure can take a long time.
gordonhamachi - Réponse
Only a french translation proposal. We use to say “démontage” instead of “installation'“ in that specific case. ;-) (Dismantling)
francis barbier - Réponse