Aller au contenu principal

iMac Intel 20" EMC 2105 and 2118 Logic Board Replacement

Ce dont vous avez besoin

  1. iMac Intel 20" EMC 2105 and 2118 Logic Board Replacement, Access Door: étape 1, image 1 de 2 iMac Intel 20" EMC 2105 and 2118 Logic Board Replacement, Access Door: étape 1, image 2 de 2
    • Loosen the two Phillips screws securing the access door to your iMac.

    • Both screws remain captive within the access door.

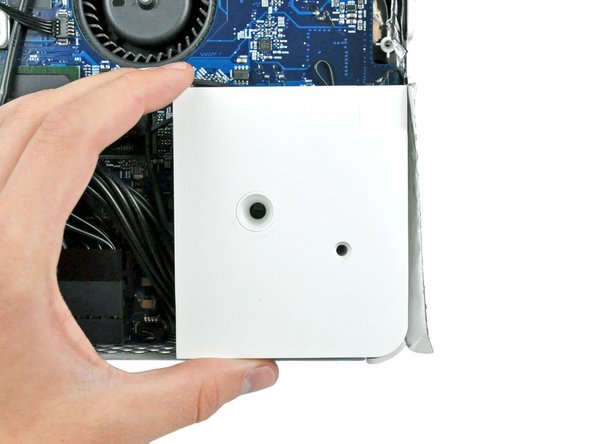
    • Remove the access door.

    • Before beginning the repair, unplug the computer and press and hold the power switch for 20-30 seconds, to discharge internal capacitors.

  2. iMac Intel 20" EMC 2105 and 2118 Logic Board Replacement, Front Bezel: étape 2, image 1 de 1
    • Remove the following screws along the lower edge of your iMac:

    • Three 6 mm T8 Torx screws

    • One 8 mm T8 Torx screw (Right side of the RAM slot on 2105)

  3. iMac Intel 20" EMC 2105 and 2118 Logic Board Replacement: étape 3, image 1 de 3 iMac Intel 20" EMC 2105 and 2118 Logic Board Replacement: étape 3, image 2 de 3 iMac Intel 20" EMC 2105 and 2118 Logic Board Replacement: étape 3, image 3 de 3
    Outil utilisé dans cette étape :
    Plastic Cards
    $2.99
    J'achète
    • Re-orient your iMac so it sits upright on the stand.

    • Insert a plastic card up into the corner of the air vent slot near the top of the rear case.

    • Push the card toward the top of the iMac to release the front bezel latch.

    • Pull the front bezel away from the rear case.

    • Repeat this process for the other side of the front bezel.

    • It may be necessary to apply several layers of duct tape to the top of the access card to aid in releasing the latches. Or use two cards for the additional thickness.

    • If the bezel refuses to release, try lifting the lower edge of the front bezel slightly away from the rear case (detailed in the next few steps) and repeat the latch release process.

  4. iMac Intel 20" EMC 2105 and 2118 Logic Board Replacement: étape 4, image 1 de 2 iMac Intel 20" EMC 2105 and 2118 Logic Board Replacement: étape 4, image 2 de 2
    • Lay your iMac stand-side down on a flat surface.

    • To lift the front bezel off the iMac, simultaneously:

    • Use your thumbs to press in the RAM arms and hold the iMac down.

    • Use your index fingers to pull the small bridge of material on the front bezel toward yourself.

    • Pull the front bezel up with your index fingers.

    • Once the small bridge of material has cleared the RAM arms, lift the front bezel by its lower edge just enough to clear the bottom edge of the rear case.

  5. iMac Intel 20" EMC 2105 and 2118 Logic Board Replacement: étape 5, image 1 de 2 iMac Intel 20" EMC 2105 and 2118 Logic Board Replacement: étape 5, image 2 de 2
    • Lift the front bezel off the rear case and rotate it away from the bottom edge of the iMac, minding the camera and microphone cables still attached to its upper edge.

  6. iMac Intel 20" EMC 2105 and 2118 Logic Board Replacement: étape 6, image 1 de 1
    • If necessary, remove the strip of tape covering the microphone cable connector.

    • The microphone connector is located near the inside of top edge of your iMac.

  7. iMac Intel 20" EMC 2105 and 2118 Logic Board Replacement: étape 7, image 1 de 3 iMac Intel 20" EMC 2105 and 2118 Logic Board Replacement: étape 7, image 2 de 3 iMac Intel 20" EMC 2105 and 2118 Logic Board Replacement: étape 7, image 3 de 3
    • Disconnect the microphone cable.

    • Disconnect the camera cable by pulling its connector away from the socket on the camera board.

    • The camera cable connector and socket are delicate and easily bent. Remove with caution.

  8. iMac Intel 20" EMC 2105 and 2118 Logic Board Replacement, Lower EMI Shield: étape 8, image 1 de 1
    • Peel up the lower EMI shield from the rear case.

    • It is only necessary to peel the shield up from three sides. Leave it attached to the display.

    • If you happen to rip the EMI shield, use a piece of foil tape to cover the tear.

  9. iMac Intel 20" EMC 2105 and 2118 Logic Board Replacement: étape 9, image 1 de 1
    • Tape the EMI shield to the face of the display to keep it out of the way.

  10. iMac Intel 20" EMC 2105 and 2118 Logic Board Replacement, Display: étape 10, image 1 de 2 iMac Intel 20" EMC 2105 and 2118 Logic Board Replacement, Display: étape 10, image 2 de 2
    • Remove the two 5 mm T6 Torx screws securing the display data cable connector to the logic board.

    • Pull the display data cable connector up off the logic board by its black pull tab.

  11. iMac Intel 20" EMC 2105 and 2118 Logic Board Replacement: étape 11, image 1 de 1
    • Peel back the EMI tape from the two vertical edges of the display.

    • During reassembly, it is helpful to use several small strips of tape to hold the EMI shielding along the left and right edges of the display footprint out of the way before lowering the display into the rear case of your iMac.

  12. iMac Intel 20" EMC 2105 and 2118 Logic Board Replacement: étape 12, image 1 de 2 iMac Intel 20" EMC 2105 and 2118 Logic Board Replacement: étape 12, image 2 de 2
    • Allow the lower EMI shield to hang down from the display.

    • Remove the four 7.5 mm T10 Torx screws securing the display to the rear case.

    • The screws are recessed, so a thin magnetic screwdriver aids in removal. Most bit drivers are too short to reach these screws.

  13. iMac Intel 20" EMC 2105 and 2118 Logic Board Replacement: étape 13, image 1 de 1
    • Lift the lower edge of the display and rotate it toward the top edge of your iMac.

    • Do not lift it too much, as the inverter cables are still attached.

  14. iMac Intel 20" EMC 2105 and 2118 Logic Board Replacement: étape 14, image 1 de 2 iMac Intel 20" EMC 2105 and 2118 Logic Board Replacement: étape 14, image 2 de 2
    • Disconnect both inverter cables from the inverter board.

    • These connectors are seated very tightly in their sockets. It is helpful to use your fingernails or the tip of a spudger to push the ears on either side of the connectors to dislodge them from their sockets. A small pair of hemostats helps a lot.

  15. iMac Intel 20" EMC 2105 and 2118 Logic Board Replacement: étape 15, image 1 de 1
    • Disconnect the two inverter cables at the top edge of the inverter using the method explained in the previous step.

  16. iMac Intel 20" EMC 2105 and 2118 Logic Board Replacement: étape 16, image 1 de 1
    • Rotate the display until it is nearly perpendicular to the rear case and lift it up to peel it off the EMI shield stuck to its top edge.

  17. iMac Intel 20" EMC 2105 and 2118 Logic Board Replacement, Speakers: étape 17, image 1 de 2 iMac Intel 20" EMC 2105 and 2118 Logic Board Replacement, Speakers: étape 17, image 2 de 2
    • Remove the single T10 Torx screw securing the left speaker to the rear case.

    • Pull the left speaker out of the rear case.

    • The screw for the left speaker is longer than the screw for the right speaker.

  18. iMac Intel 20" EMC 2105 and 2118 Logic Board Replacement: étape 18, image 1 de 2 iMac Intel 20" EMC 2105 and 2118 Logic Board Replacement: étape 18, image 2 de 2
    • Use the flat end of a spudger to pry both antenna connectors up off the AirPort Extreme card.

    • Some models may have only one AirPort antenna wire.

  19. iMac Intel 20" EMC 2105 and 2118 Logic Board Replacement: étape 19, image 1 de 2 iMac Intel 20" EMC 2105 and 2118 Logic Board Replacement: étape 19, image 2 de 2
    Outil utilisé dans cette étape :
    Metal Spudger
    $2.99
    J'achète
    • Use a metal spudger to disconnect the SATA data cable up off the logic board.

    • The SATA connector on most iMacs tends to stick in its socket on the logic board. If you are having trouble disconnecting the SATA cable, insert a metal spudger or any other thin tool into the gap between the SATA connector and its socket and twist the spudger's shaft to safely separate the two pieces.

  20. iMac Intel 20" EMC 2105 and 2118 Logic Board Replacement: étape 20, image 1 de 1
    • Pull the IR board cable connector away from its socket on the IR board.

    • Pull the connector parallel to the face of the logic board.

  21. iMac Intel 20" EMC 2105 and 2118 Logic Board Replacement: étape 21, image 1 de 1
    • De-route the speaker cables from beneath the IR Board and heatsink assembly.

  22. iMac Intel 20" EMC 2105 and 2118 Logic Board Replacement: étape 22, image 1 de 2 iMac Intel 20" EMC 2105 and 2118 Logic Board Replacement: étape 22, image 2 de 2
    • Remove the single T10 Torx screw securing the right speaker to the logic board.

    • Lift the right speaker out of the rear case and move it out of the way.

    • Both speakers are still attached to the logic board by the speaker cable.

  23. iMac Intel 20" EMC 2105 and 2118 Logic Board Replacement: étape 23, image 1 de 1
    • Disconnect the speaker cable connector by lifting it straight up off its socket on the logic board.

    • Pull the connector parallel to the face of the logic board.

  24. iMac Intel 20" EMC 2105 and 2118 Logic Board Replacement, Logic Board: étape 24, image 1 de 2 iMac Intel 20" EMC 2105 and 2118 Logic Board Replacement, Logic Board: étape 24, image 2 de 2
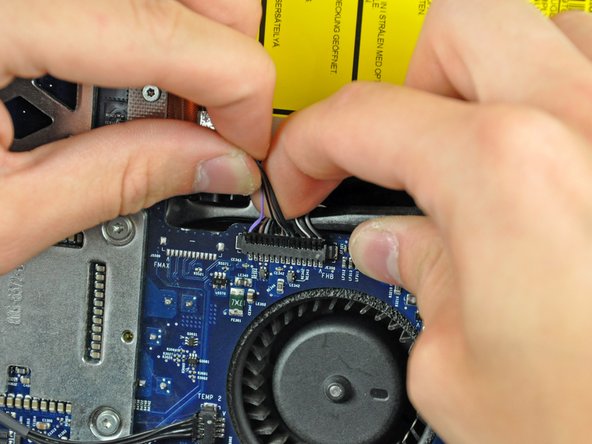
    • Disconnect the HDD fan and power button from the logic board by pulling their connectors straight up off the sockets on the logic board.

  25. iMac Intel 20" EMC 2105 and 2118 Logic Board Replacement: étape 25, image 1 de 1
    • If necessary, remove the pieces of tape holding the SATA data cable to the logic board.

    • Move the SATA data cable away from the face of the logic board.

  26. iMac Intel 20" EMC 2105 and 2118 Logic Board Replacement: étape 26, image 1 de 2 iMac Intel 20" EMC 2105 and 2118 Logic Board Replacement: étape 26, image 2 de 2
    • Disconnect the DC-In cable by simultaneously depressing both locking arms and pulling its connector away from the socket on the logic board toward the top of your iMac.

    • After both locking arms pass their retaining tabs, it is helpful to push the arms toward the top edge of your iMac while wiggling the connector.

  27. iMac Intel 20" EMC 2105 and 2118 Logic Board Replacement: étape 27, image 1 de 1
    • Pull the ambient light sensor cable connector up off the logic board.

  28. iMac Intel 20" EMC 2105 and 2118 Logic Board Replacement: étape 28, image 1 de 1
    • Use the flat end of a spudger to pry the Bluetooth antenna cable connector up off the Bluetooth board.

  29. iMac Intel 20" EMC 2105 and 2118 Logic Board Replacement: étape 29, image 1 de 1
    • Carefully de-route the IR board cable out from under the IR board and move it out of the way of the logic board.

  30. iMac Intel 20" EMC 2105 and 2118 Logic Board Replacement: étape 30, image 1 de 2 iMac Intel 20" EMC 2105 and 2118 Logic Board Replacement: étape 30, image 2 de 2
    • Disconnect the following connectors from the logic board:

    • Camera/IR board cable.

    • Optical drive fan.

    • When removing the optical drive fan connector, it is helpful to use a spudger or your fingernails to push the ears on either side of the connector toward the top edge of the iMac.

    • To aid in removing the camera/IR board connector, it is helpful to use one hand to pinch the cables against a spudger and pull up toward the top edge of the iMac while pulling up gently on the cables with your other hand.

  31. iMac Intel 20" EMC 2105 and 2118 Logic Board Replacement: étape 31, image 1 de 1
    • Disconnect the optical drive thermal sensor cable from the logic board by pulling its connector away from the socket on the logic board.

    • Pull the connector parallel to the face of the logic board.

  32. iMac Intel 20" EMC 2105 and 2118 Logic Board Replacement: étape 32, image 1 de 1
    • Remove the two T6 Torx screws securing the optical drive ribbon cable connector to the logic board.

  33. iMac Intel 20" EMC 2105 and 2118 Logic Board Replacement: étape 33, image 1 de 1
    • Use the flat end of a spudger to pry the optical drive ribbon cable connector up off the logic board.

    • The connector is most easily removed when prying from the top or bottom of the connector.

    • Bend the optical drive ribbon cable back away from the logic board.

    • Be very careful when moving the optical drive ribbon cable as it is delicate and easily ripped.

  34. iMac Intel 20" EMC 2105 and 2118 Logic Board Replacement: étape 34, image 1 de 1
    • Disconnect the following connectors from the logic board:

    • Hard drive thermal sensor cable.

    • CPU fan cable.

    • When removing these connectors, it is helpful to push the ears on either side of the connector with your fingernails or the tip of a spudger toward the top edge of the iMac.

  35. iMac Intel 20" EMC 2105 and 2118 Logic Board Replacement: étape 35, image 1 de 1
    • Remove the two T6 Torx screws securing the top of the heat sink framework to the chassis.

  36. iMac Intel 20" EMC 2105 and 2118 Logic Board Replacement: étape 36, image 1 de 1
    • Remove the following seven screws securing the logic board to the rear case:

    • Three coarse-thread T10 Torx.

    • Three fine-thread T10 Torx.

    • One long coarse-thread T10 Torx.

  37. iMac Intel 20" EMC 2105 and 2118 Logic Board Replacement: étape 37, image 1 de 1
    • Carefully rotate the top edge of the logic board out of the rear case and lift the board up out of the iMac, minding the RAM arms and any cables that may get caught.

    • Be especially careful with the hard drive thermal sensor cable that is routed underneath the heat sink framework.

    • Only handle the logic board by its edges.

Conclusion

To reassemble your device, follow these instructions in reverse order.

38 autres ont terminé cette réparation.

Un commentaire

Dear Walter Galan,After disassembling my Apple IMac,I happened to see your guide.Ofcourse very interesting.Now I want your expert tips to solve my problem.When I switched on the device,I got only vertical color lines on the display.No apple symbol or letters,but initial sound was there.Kindly let me know the exact problem and how to solve.If you mail me the circuit diagram of the motherboard,it would be very usefull to me.Also reference voltages at various stages. My mail id : saswra@gmail.com.

Thanking you

Ramachandran

Ramachandran Natarajan - Réponse

Ajouter un commentaire

Nombre de vues :

Dernières 24 heures : 0

7 derniers jours : 10

30 derniers jours : 34

Total : 58,747