Cette version peut contenir des modifications incorrectes. Passez au dernier aperçu vérifié.
Ce dont vous avez besoin
-
-
Desserrez l'unique vis Phillips au centre de la trappe d'accès.
-
Retirez la trappe d'accès de votre iMac.
-
-
-
Collez une ventouse sur un angle de la vitre et une autre ventouse sur l'angle opposé.
-
-
-
Retirez les 12 vis suivantes par lesquelles le cadre avant est fixé au boîtier arrière :
-
Huit vis Torx T8 13 mm.
-
Quatre vis Torx T8 25 mm.
-
-
Cette étape n’est pas traduite. Aidez à la traduire
-
be sure to tuck the microphone cable and connector into the void next to the camera board.
-
Gently guide the microphone connector and cables through the ±1in long slot at the right of the iSight camera. Once the bezel is properly assembled, gently push the microphone connector and cable into the bezel through that slot.
-
-
-
Débranchez le connecteur du capteur de température LCD de sa prise sur la carte mère en le tenant bien droit.
-
Si nécessaire, libérez le câble du capteur de température LCD qui passe derrière la carte mère.
-
-
-
Pendant que l'écran est levé, débranchez les quatre câbles inverter.
-
Si vous changez de disque dur et avez une paire de mains libres à disposition, il est possible de retirer le disque dur en débranchant seulement le connecteur de l'écran et celui de la température LCD à l'étape précédente.
-
-
Cette étape n’est pas traduite. Aidez à la traduire
-
Disconnect the left speaker cable connector from the audio board by pulling it straight away from its socket.
-
-
Cette étape n’est pas traduite. Aidez à la traduire
-
De-route the left speaker cable from the channel in the CPU fan. Continue completely de-routing the cable through the undersides of the IR board and heat sink.
-
-
-
Cette étape n’est pas traduite. Aidez à la traduire
-
Disconnect the ambient temperature sensor cable by pulling its connector straight up off the logic board.
-
-
Cette étape n’est pas traduite. Aidez à la traduire
-
If necessary, de-route the ambient temperature sensor cable from under the power button cables.
-
-
Cette étape n’est pas traduite. Aidez à la traduire
-
Remove the single 28 mm T10 Torx screw securing the left speaker to the rear case.
-
Lift the left speaker up and out of the rear case. Don't try to slide the speaker out, since there is a plastic mounting pin under the top end of the speaker housing that holds it in place.
-
-
Cette étape n’est pas traduite. Aidez à la traduire
-
Disconnect the power button and CPU fan by lifting their connectors straight up off the logic board.
-
-
Cette étape n’est pas traduite. Aidez à la traduire
-
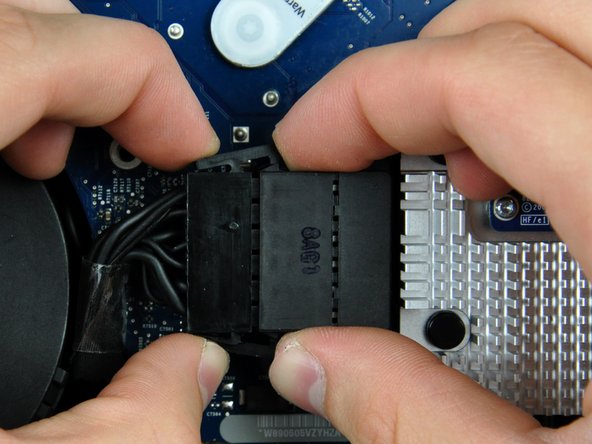
Disconnect the SATA data cable from the logic board by carefully pulling it straight away from its socket.
-
-
Cette étape n’est pas traduite. Aidez à la traduire
-
Pull the SATA data cable out of its channel in the logic board and tuck it aside near the left edge of the rear case.
-
-
Cette étape n’est pas traduite. Aidez à la traduire
-
Disconnect the DC-in cable by simultaneously depressing both locking arms and pulling its connector away from the socket on the logic board.
-
-
Cette étape n’est pas traduite. Aidez à la traduire
-
Use the flat end of a spudger to pry both AirPort antenna connectors up off the AirPort card.
-
-
Cette étape n’est pas traduite. Aidez à la traduire
-
Move both AirPort antennas toward the lower edge of your iMac, out of the way of the logic board.
-
-
Cette étape n’est pas traduite. Aidez à la traduire
-
Use the flat end of a spudger to pry the Bluetooth antenna connector up off the Bluetooth board.
-
-
Cette étape n’est pas traduite. Aidez à la traduire
-
Pull the camera cable connector straight up out of its socket on the logic board.
-
-
Cette étape n’est pas traduite. Aidez à la traduire
-
Pull the right speaker cable connector straight up out of its socket on the audio board.
-
-
Cette étape n’est pas traduite. Aidez à la traduire
-
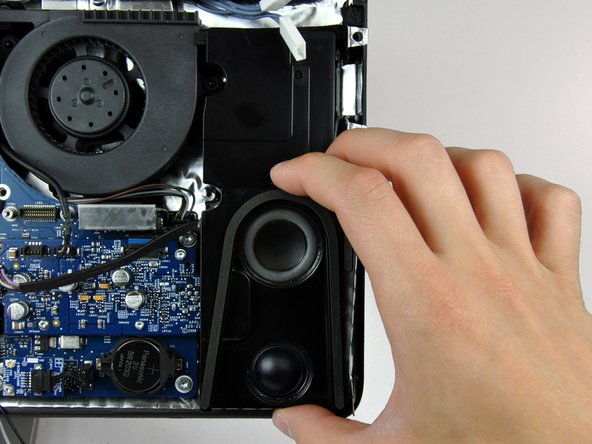
Remove the single 12 mm T10 Torx screw securing the right speaker to the rear case.
-
Lift the right speaker up and out of the rear case, to clear the plastic mounting pins underneath it.
-
-
Cette étape n’est pas traduite. Aidez à la traduire
-
Lift the optical drive fan connector straight up out of its socket on the logic board.
-
-
Cette étape n’est pas traduite. Aidez à la traduire
-
Use the flat end of a spudger to pry the optical drive cable clip up off the optical drive connector.
-
Lift the optical drive cable clip off the logic board.
-
-
Cette étape n’est pas traduite. Aidez à la traduire
-
Push the optical drive cable connector toward the top of your iMac to disconnect it from the logic board.
-
-
Cette étape n’est pas traduite. Aidez à la traduire
-
Lift the microphone cable connector straight up out of its socket on the audio board.
-
-
Cette étape n’est pas traduite. Aidez à la traduire
-
If necessary, remove the piece of tape securing the thermal sensor and fan cables to the chassis.
-
-
Cette étape n’est pas traduite. Aidez à la traduire
-
Disconnect the following three cables from the logic board:
-
Hard drive thermal sensor.
-
Optical drive thermal sensor.
-
Hard drive fan.
-
-
Cette étape n’est pas traduite. Aidez à la traduire
-
Remove the following 13 screws securing the logic board to the rear case:
-
Six 7.2 mm coarse-thread T10 Torx.
-
Two 6.8 mm T8 Torx. When reinstalling these two screws, don't overtighten them, as the plastic tabs they hold down are thin and brittle, and can crack.
-
Three 7 mm fine-thread T10 Torx.
-
Two 24 mm T10 Torx.
-
-
Cette étape n’est pas traduite. Aidez à la traduire
-
Lift the logic board out of the rear case, minding any cables that may get caught.
-
-
Cette étape n’est pas traduite. Aidez à la traduire
-
Lift the optical drive fan up off the plastic posts protruding from the rear case.
-
-
Cette étape n’est pas traduite. Aidez à la traduire
-
Remove the two 3.5 mm T6 Torx screws securing the optical drive connector to the optical drive.
-
-
Cette étape n’est pas traduite. Aidez à la traduire
-
Insert the flat end of a spudger between the optical drive connector and the body of the optical drive.
-
Twist the spudger to separate the connector from the optical drive.
-
-
Cette étape n’est pas traduite. Aidez à la traduire
-
De-route the optical drive data cable out of the rear case.
-


Annulation : je n'ai pas terminé ce tutoriel.
4 autres ont terminé cette réparation.
