Aller au contenu principal

iMac Intel 21.5" EMC 2389 Stand Replacement

Ce dont vous avez besoin

  1. iMac Intel 21.5" EMC 2389 Stand Replacement, Access Door: étape 1, image 1 de 2 iMac Intel 21.5" EMC 2389 Stand Replacement, Access Door: étape 1, image 2 de 2
    • Unplug your iMac's AC cord along with any peripheral devices.

    • Lay your iMac face-down on a soft, clean surface as shown.

    • Be sure there isn't any dirt or debris on your work surface, as it may scratch the glass panel on the front of your iMac. We recommend placing a towel between the iMac and the work surface.

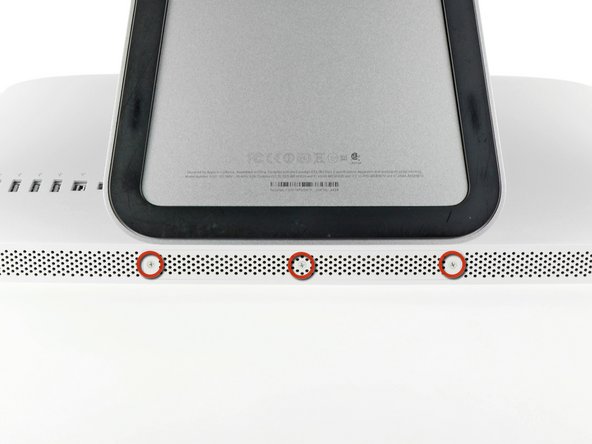
    • Loosen the three Phillips screws securing the access door to the bottom edge of your iMac.

    • All three screws will remain captive in the access door.

    • Remove the access door.

  2. iMac Intel 21.5" EMC 2389 Stand Replacement, RAM: étape 2, image 1 de 3 iMac Intel 21.5" EMC 2389 Stand Replacement, RAM: étape 2, image 2 de 3 iMac Intel 21.5" EMC 2389 Stand Replacement, RAM: étape 2, image 3 de 3
    • Gently slide the black plastic RAM pull tab out from the RAM slot.

    • Pull the black plastic tab away from the bottom edge of the iMac to eject the module(s) on that side of the RAM bay.

    • This may require a bit of force.

  3. iMac Intel 21.5" EMC 2389 Stand Replacement: étape 3, image 1 de 1
    • Slide the old RAM module(s) out of their slots in the RAM bay and set them aside.

  4. iMac Intel 21.5" EMC 2389 Stand Replacement: étape 4, image 1 de 3 iMac Intel 21.5" EMC 2389 Stand Replacement: étape 4, image 2 de 3 iMac Intel 21.5" EMC 2389 Stand Replacement: étape 4, image 3 de 3
    • Repeat the process in the previous steps to remove the RAM module(s) from the other side of the RAM bay.

  5. iMac Intel 21.5" EMC 2389 Stand Replacement: étape 5, image 1 de 3 iMac Intel 21.5" EMC 2389 Stand Replacement: étape 5, image 2 de 3 iMac Intel 21.5" EMC 2389 Stand Replacement: étape 5, image 3 de 3
    • When installing new RAM modules, it is important to orient them correctly.

    • Be sure the small notch cut into each RAM module (shown in the first picture) mates with the protrusion in each RAM slot (shown in the second picture).

    • Your iMac has four RAM slots. Be sure to slide each RAM module into its slot horizontally. This will prevent getting the modules stuck between two of the adjacent slots.

    • Once you have oriented the new RAM modules correctly, gently slide them completely into the iMac and use your thumbs to firmly seat them in their sockets.

  6. iMac Intel 21.5" EMC 2389 Stand Replacement, Glass Panel: étape 6, image 1 de 2 iMac Intel 21.5" EMC 2389 Stand Replacement, Glass Panel: étape 6, image 2 de 2
    Outil utilisé dans cette étape :
    Heavy-Duty Suction Cups (Pair)
    $14.95
    J'achète
    • Before beginning, unplug your iMac and lay it on a soft surface as shown.

    • Stick a suction cup near each of the two top corners of the glass panel.

    • To attach the suction cups we sell, first position the suction cup with the movable handle parallel to the face of the glass panel. While lightly holding the suction cup against the glass, raise the movable handle until it is parallel with the other handle.

    • If your suction cups refuse to stick, try cleaning both the glass panel and the suction cup with a mild solvent.

  7. iMac Intel 21.5" EMC 2389 Stand Replacement: étape 7, image 1 de 2 iMac Intel 21.5" EMC 2389 Stand Replacement: étape 7, image 2 de 2
    • Gently lift the glass panel perpendicular to the face of the LCD enough to clear the steel mounting pins attached along the underside of the top edge of the glass panel.

    • Pull the glass panel away from the lower edge of the iMac and carefully set it aside.

    • During reinstallation, be sure to meticulously clean the inside of the glass panel and the face of the LCD as any dust or fingerprints trapped inside will be annoyingly visible when the machine is turned on.

  8. iMac Intel 21.5" EMC 2389 Stand Replacement, Display: étape 8, image 1 de 3 iMac Intel 21.5" EMC 2389 Stand Replacement, Display: étape 8, image 2 de 3 iMac Intel 21.5" EMC 2389 Stand Replacement, Display: étape 8, image 3 de 3
    • Remove the eight 8 mm T10 Torx screws securing the display to the outer case.

    • The last two pictures are detail shots of each side of the display.

  9. iMac Intel 21.5" EMC 2389 Stand Replacement: étape 9, image 1 de 1
    • Slightly lift the top edge of the display out of the outer case.

    • Do not lift it too much. There are several cables attaching the display to the logic board.

  10. iMac Intel 21.5" EMC 2389 Stand Replacement: étape 10, image 1 de 2 iMac Intel 21.5" EMC 2389 Stand Replacement: étape 10, image 2 de 2
    • Pull the vertical sync cable connector out of its socket on the LED driver board near the top left corner of your iMac.

  11. iMac Intel 21.5" EMC 2389 Stand Replacement: étape 11, image 1 de 2 iMac Intel 21.5" EMC 2389 Stand Replacement: étape 11, image 2 de 2
    • Rotate the display out of the outer case enough to disconnect the LED backlight power cable from the LED driver board.

    • Disconnect the LED backlight power cable by depressing the locking mechanism while pulling the connector away from its socket (toward the bottom edge of the iMac).

  12. iMac Intel 21.5" EMC 2389 Stand Replacement: étape 12, image 1 de 2 iMac Intel 21.5" EMC 2389 Stand Replacement: étape 12, image 2 de 2
    • The display data cable plug has a wire lock. Disengage the plug's lock by rotating the plastic tab so that it points upward. (It is not a pull tab.)

    • Pull the display data cable straight out of its socket on the logic board.

    • Do not lift up on the display data cable, as its socket is very fragile. Pull the cable parallel to the face of the logic board.

  13. iMac Intel 21.5" EMC 2389 Stand Replacement: étape 13, image 1 de 2 iMac Intel 21.5" EMC 2389 Stand Replacement: étape 13, image 2 de 2
    • Disconnect the LCD thermal sensor cable connector from its socket on the logic board.

    • If your fan is spinning full speed after completion, check this connection or the hard drive's thermal sensor cable.

  14. iMac Intel 21.5" EMC 2389 Stand Replacement: étape 14, image 1 de 1
    • Carefully pull the display toward the top edge of your iMac and lift it out of the outer case, minding any cables that may get caught.

  15. iMac Intel 21.5" EMC 2389 Stand Replacement, Optical Drive: étape 15, image 1 de 1
    • Remove the following four screws:

    • One 9.3 mm T10 Torx screw with a large head

    • Three 9.3 mm T10 Torx screws with a normal sized head

  16. iMac Intel 21.5" EMC 2389 Stand Replacement: étape 16, image 1 de 2 iMac Intel 21.5" EMC 2389 Stand Replacement: étape 16, image 2 de 2
    • Pull the optical drive thermal sensor connector toward the top edge of the iMac to disconnect it from its socket on the logic board.

  17. iMac Intel 21.5" EMC 2389 Stand Replacement: étape 17, image 1 de 2 iMac Intel 21.5" EMC 2389 Stand Replacement: étape 17, image 2 de 2
    • Lift the inner edge of the optical drive and maneuver its connector past the GPU frame attached to the logic board.

    • Carefully pull the optical drive off its mounting pins on the right side of the outer case to gain clearance for disconnecting the optical drive cable.

    • Allow the optical drive to hang down as you de-route the optical drive thermal sensor connector from behind the GPU heat sink.

  18. iMac Intel 21.5" EMC 2389 Stand Replacement: étape 18, image 1 de 1
    • Disconnect the optical drive cable by pulling its connector away from the optical drive.

    • Remove the optical drive from the iMac.

    • Do not forget to also move the thermal sensor from the optical drive to the enclosure when you install the second hard drive.

  19. iMac Intel 21.5" EMC 2389 Stand Replacement, Optical Drive Fan: étape 19, image 1 de 1
    • Remove the single 13 mm T10 Torx screw securing the optical drive fan to the outer case.

  20. iMac Intel 21.5" EMC 2389 Stand Replacement: étape 20, image 1 de 1
    • Pull the optical drive fan off the pins attached to the outer case.

  21. iMac Intel 21.5" EMC 2389 Stand Replacement: étape 21, image 1 de 1
    • Pull the optical drive fan connector out of its socket on the logic board.

    • Remove the optical drive fan from the iMac.

  22. iMac Intel 21.5" EMC 2389 Stand Replacement, Logic Board: étape 22, image 1 de 1
    • In the proceeding steps, you will disconnect the following cables:

    • SD Board and microphone

    • Left/Right Speaker

    • Wi-Fi Antenna

    • Bluetooth/Ambient Light Sensor/Camera/Left Temperature Sensor, Hard Drive Temperature Sensor and Hard Drive Fan

    • CPU Fan/Ambient Temperature and Power Button

    • IR Sensor

  23. iMac Intel 21.5" EMC 2389 Stand Replacement: étape 23, image 1 de 1
    • Pull the microphone cable connector toward the top edge of the iMac to disconnect it from the logic board.

  24. iMac Intel 21.5" EMC 2389 Stand Replacement: étape 24, image 1 de 1
    • Pull the SD board cable out of its socket on the logic board.

  25. iMac Intel 21.5" EMC 2389 Stand Replacement: étape 25, image 1 de 2 iMac Intel 21.5" EMC 2389 Stand Replacement: étape 25, image 2 de 2
    • Disconnect the left speaker and right speaker cables by pulling their connectors toward the right side of the iMac.

  26. iMac Intel 21.5" EMC 2389 Stand Replacement: étape 26, image 1 de 2 iMac Intel 21.5" EMC 2389 Stand Replacement: étape 26, image 2 de 2
    • Use the flat end of a spudger to pry both AirPort antenna connectors up from their sockets on the AirPort board.

    • The gray antenna attaches to the socket on the left and the black antenna attaches to the socket on the right.

  27. iMac Intel 21.5" EMC 2389 Stand Replacement: étape 27, image 1 de 1
    • Disconnect the hard drive fan by pulling its connector toward the top edge of the iMac.

  28. iMac Intel 21.5" EMC 2389 Stand Replacement: étape 28, image 1 de 1
    • Pull the hard drive thermal sensor cable out of its socket and toward the top edge of the iMac to disconnect it from the logic board.

  29. iMac Intel 21.5" EMC 2389 Stand Replacement: étape 29, image 1 de 1
    • Use your thumbnails on both sides of the Bluetooth/ambient light sensor/camera/left temperature connector to push it toward the top edge of the iMac and out of its socket on the logic board.

  30. iMac Intel 21.5" EMC 2389 Stand Replacement: étape 30, image 1 de 3 iMac Intel 21.5" EMC 2389 Stand Replacement: étape 30, image 2 de 3 iMac Intel 21.5" EMC 2389 Stand Replacement: étape 30, image 3 de 3
    • Pull the CPU fan/ambient temperature sensor connector toward the bottom left edge of the iMac and out of its socket on the logic board.

    • Pull the power button connector toward the bottom left corner of the iMac to disconnect it from its socket on the logic board.

  31. iMac Intel 21.5" EMC 2389 Stand Replacement: étape 31, image 1 de 1
    • Remove the piece of tape covering the IR sensor cable.

  32. iMac Intel 21.5" EMC 2389 Stand Replacement: étape 32, image 1 de 1
    • Use your thumbs to push the IR sensor connector out of its socket and toward the top edge of the iMac.

  33. iMac Intel 21.5" EMC 2389 Stand Replacement: étape 33, image 1 de 1
    • Pull the IR sensor board up from behind the front face of the outer case.

    • Remove the IR sensor and set it aside.

  34. iMac Intel 21.5" EMC 2389 Stand Replacement: étape 34, image 1 de 1
    • Remove the following seven screws:

    • Two 7 mm T10 torx screws

    • One 30 mm T10 Torx screw

    • Two 25 mm T10 Torx screws

    • Two 21 mm T10 Torx screws

  35. iMac Intel 21.5" EMC 2389 Stand Replacement: étape 35, image 1 de 2 iMac Intel 21.5" EMC 2389 Stand Replacement: étape 35, image 2 de 2
    • Be careful not to touch any solder joints on the back of the power supply. Capacitors may be charged enough to give you a dangerous shock.

    • Remove the following four screws:

    • One 9.3 mm T10 coarse-threaded screw

    • One 25 mm T10 coarse-threaded screw

    • Two 22 mm fine-threaded screws

    • Pull the upper right and lower left corners of the power supply away from the rear case to dislodge the mounting posts attached to the power supply's corners.

  36. iMac Intel 21.5" EMC 2389 Stand Replacement: étape 36, image 1 de 2 iMac Intel 21.5" EMC 2389 Stand Replacement: étape 36, image 2 de 2
    • Carefully lift the power supply out of the outer case and rotate it to expose the cable lock as shown, minding the DC-out and AC-in cables still attaching it to the iMac.

    • Disconnect the DC-out cable by depressing the locking mechanism on the connector while you pull the connector away from its socket on the power supply.

    • Once the locking mechanism has cleared the socket, pull the DC-in connector away from the power supply.

  37. iMac Intel 21.5" EMC 2389 Stand Replacement: étape 37, image 1 de 1
    • Disconnect the AC-In cable by depressing the locking mechanism while pulling the connector away from its socket.

    • Remove the power supply from the outer case.

  38. iMac Intel 21.5" EMC 2389 Stand Replacement: étape 38, image 1 de 1
    • Remove the plastic wall that is installed directly to the right of the LED driver board.

  39. iMac Intel 21.5" EMC 2389 Stand Replacement: étape 39, image 1 de 1
    • Remove the plastic pressure wall installed next to the hard drive.

  40. iMac Intel 21.5" EMC 2389 Stand Replacement: étape 40, image 1 de 2 iMac Intel 21.5" EMC 2389 Stand Replacement: étape 40, image 2 de 2
    • Slightly pull the logic board away from the back of the outer case, then lift it upward to clear the lower front face of the outer case.

  41. iMac Intel 21.5" EMC 2389 Stand Replacement: étape 41, image 1 de 1
    • Disconnect the audio port cable by pulling its connector away from the front face of the logic board.

  42. iMac Intel 21.5" EMC 2389 Stand Replacement: étape 42, image 1 de 1
    • If present, peel off the tape securing the hard drive SATA cable to the logic board.

  43. iMac Intel 21.5" EMC 2389 Stand Replacement: étape 43, image 1 de 2 iMac Intel 21.5" EMC 2389 Stand Replacement: étape 43, image 2 de 2
    • Depress the locking mechanism and carefully pull the DC-In cable out of its socket on the back of the logic board.

  44. iMac Intel 21.5" EMC 2389 Stand Replacement: étape 44, image 1 de 1
    • Being careful not to damage the socket on the logic board, gently pull the hard drive SATA data cable straight out of its socket on the logic board.

    • Remove the logic board, minding any cables that may get caught.

    • When reinstalling the logic board, plug in a mini display port cable and a USB cable into the outer USB port before tightening the logic board screws to ensure proper alignment.

  45. iMac Intel 21.5" EMC 2389 Stand Replacement, Remove HD Fan: étape 45, image 1 de 1
    • Remove the one T10 screw holding the HD Fan (circled in Red)

    • Carefully lift the HD Fan vertically from the plastic mounting pegs (circled in Green)

    • Ensure the HD Fan is lifted straight off the plastic mounting pegs to ensure they do not break

  46. iMac Intel 21.5" EMC 2389 Stand Replacement, Enclosure removal: étape 46, image 1 de 1
    • Remove the two screws circled red and place them aside.

    • Remove the two screws circled blue and set them aside

    • Keep these two screws seperate because they are different sizes.

    • Remove the metal enclosure covering the hinge.

    • It may take a little wiggling and force, but try not to use excessive force.

  47. iMac Intel 21.5" EMC 2389 Stand Replacement, Stand Removal: étape 47, image 1 de 2 iMac Intel 21.5" EMC 2389 Stand Replacement, Stand Removal: étape 47, image 2 de 2
    • It will be VERY helpful if you have an iMac servicing wedge here. If not, have someone hold the iMac in place while you unscrew these particular screws.

    • Remove all 7 T10 Torx screws. Put them in a safe place for re-assembly.

    • The stand should come right out now. Congratulations!

  48. iMac Intel 21.5" EMC 2389 Stand Replacement, Stand Hinge Removal: étape 48, image 1 de 2 iMac Intel 21.5" EMC 2389 Stand Replacement, Stand Hinge Removal: étape 48, image 2 de 2
    • If removing/replacing the stand's hinge:

    • Remove the remaining T10 screws (circled in Red)

    • Lift the hinge assembly from the case

    • The hinge assembly sets under part of the plastic divider. (As shown marked with the Red Square) Ensure the hinge is installed under the divider during installation

Conclusion

To reassemble your device, follow these instructions in reverse order.

4 autres ont terminé cette réparation.

[deleted]

Membre depuis le 08/28/18

26 292 Réputation

21 tutoriels rédigés

Un commentaire

Ajouter un commentaire

Nombre de vues :

Dernières 24 heures : 11

7 derniers jours : 55

30 derniers jours : 265

Total : 11,165