Cette version peut contenir des modifications incorrectes. Passez au dernier aperçu vérifié.
Ce dont vous avez besoin
-
-
Collez une ventouse sur chacun des deux angles supérieurs de la vitre.
-
Si la ventouse n'adhère pas à la vitre, essayez de les nettoyer, l'une et l'autre, à l'aide d'un solvant doux.
-
-
-
Retirez les huit vis Torx T10 8 mm par lesquelles l'écran est fixé au boîtier extérieur.
-
-
-
Cette étape n’est pas traduite. Aidez à la traduire
-
Remove the following four screws securing the power supply to the outer case:
-
One 9.3 mm T10 coarse-threaded screw
-
One 25 mm T10 coarse-threaded screw
-
Two 22 mm T10 fine-threaded screws
-
-
Cette étape n’est pas traduite. Aidez à la traduire
-
Pull the upper right and lower left corners of the power supply away from the rear case to dislodge the mounting posts attached to the power supply's corners.
-
-
Cette étape n’est pas traduite. Aidez à la traduire
-
Carefully lift the power supply out of the outer case and rotate it to expose the cable lock as shown, minding the DC-Out and AC-In cables still attaching it to the iMac.
-
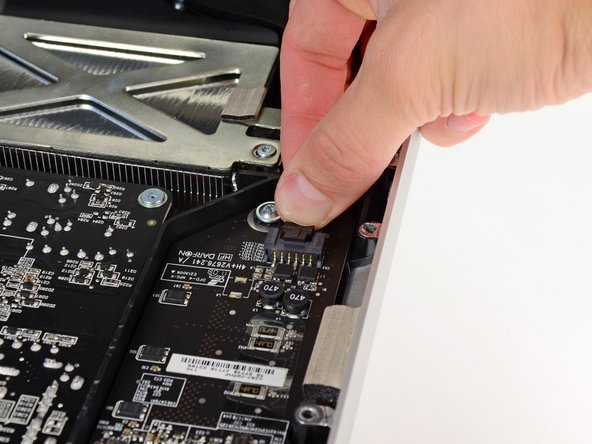
Disconnect the DC-Out cable by depressing the locking mechanism on the connector while you pull the connector away from its socket on the power supply.
-
Once the locking mechanism has cleared the socket, pull the DC-Out connector away from the power supply.
-
-
Cette étape n’est pas traduite. Aidez à la traduire
-
Disconnect the AC-In cable by depressing the locking mechanism while pulling the connector away from its socket.
-
Remove the power supply from the outer case.
-


Annulation : je n'ai pas terminé ce tutoriel.
49 autres ont terminé cette réparation.

10 commentaires
I avoided this repair for a while. My iMac would not turn on, no fans or response of any kind from pushing the power button. Reapir took me less than 30 minutes and was very straight forward.
is there a fuse in the PCB where it can be replaced instead of replacing the whole power supply unit?