Aller au contenu principal

Ce tutoriel a des changements plus récents. Passer à la dernière version non vérifiée.

Changement processeur (CPU) iMac Intel 21,5" EMC 2544

Ce dont vous avez besoin

  1. Changement processeur (CPU) iMac Intel 21,5" EMC 2544, Écran: étape 1, image 1 de 1
    Outil utilisé dans cette étape :
    iMac Intel 21.5" Cardboard Service Wedge
    $4.99
    J'achète
    • Si la charnière n'est pas bloquée, l'iMac sera mal équilibré et vous aurez du mal à le manipuler. Vous pouvez effectuer votre réparation iMac en suivant les instructions de ce tuto, mais ce sera plus rapide et plus facile avec une cale de maintien pour iMac.

    • Si vous utilisez la cale de maintien en carton iFixit, vous pouvez utiliser ces instructions de montage pour l'assembler.

    • Avant de commencer à travailler sur votre iMac : débranchez l'ordinateur et appuyez sur le bouton de mise sous tension pendant dix secondes afin de décharger les condensateurs de l'alimentation.

    • Veillez à ne pas toucher les fils des condensateurs ni les soudures exposées à l'arrière de la carte d'alimentation. Tenez toujours la carte par les côtés.

    I have (21.5 inch, mid 2017, 2.3 ghz) base model same as this but not 4k. How much max ram can I install in my iMac??

    Narendra Verma - Réponse

    This guide contains many extra steps for what should be a straight forward, simple parts replacement without disturbing more than the display, left hand speaker and removal of 4 logic board screws for play. Nothing else except for the left hand speaker wire & iSight cable from logic board, the lower support bracket and loosening the speaker so as to move it around a bit.

    For the ram, I bent a pair of cheap tweezers long ago supplied with these replacement kits to the perfect angle for holding, locating and inserting the ram into the slots under the logic bd after moving each retainer w/spudger and popping out the old. Pay attention to the orientation of the ram when removing/inserting the ram! An automotive mirror is handy along with a small flashlight for closeups. Once the ram is aligned properly substitute your fingers for the tweezers, ease it into the slot, push up & engage! Reinstall screws and all else. I have done this job successfully this way countless times. For a tweezers pic contact me!

    Ross Elkins - Réponse

    Additionally, if a blade is present, I install the OSx system on the blade and everything else, apps and home folders on the new SSD. You get the very fast boot off of the blade and the full ssd for all else!

    Ross Elkins - Réponse

  2. Changement processeur (CPU) iMac Intel 21,5" EMC 2544: étape 2, image 1 de 2 Changement processeur (CPU) iMac Intel 21,5" EMC 2544: étape 2, image 2 de 2
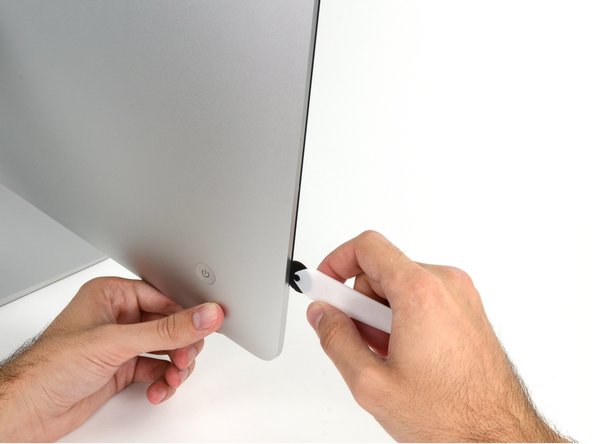
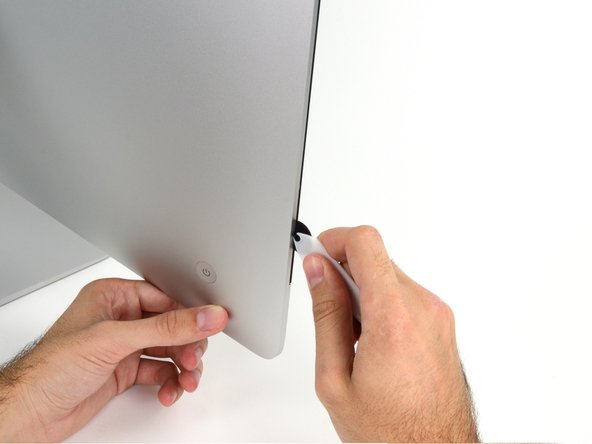
    • En partant de la gauche de l'écran, près du bouton de mise sous tension, insérez l'outil d'ouverture de l'iMac dans l'interstice entre la vitre et le boîtier arrière.

    • Le moyeu de l'outil d'ouverture de l'iMac vous empêchera d'engager la roulette trop loin. Si vous vous servez d'un autre outil, ne l'insérez pas de plus d'un centimètre dans l'écran. Sinon, vous risquez de sectionner les câbles de l'antenne et de provoquer de graves dégâts.

    • Soyez prudent ! La vitre peut se fissurer si elle est trop sollicitée. Utilisez un sèche-cheveux pour chauffer les bords et ramollir l'adhésif si la température ambiante est basse.

    Always use a hairdryer!! I cracked my glass

    8bit !!! - Réponse

  3. Changement processeur (CPU) iMac Intel 21,5" EMC 2544: étape 3, image 1 de 3 Changement processeur (CPU) iMac Intel 21,5" EMC 2544: étape 3, image 2 de 3 Changement processeur (CPU) iMac Intel 21,5" EMC 2544: étape 3, image 3 de 3
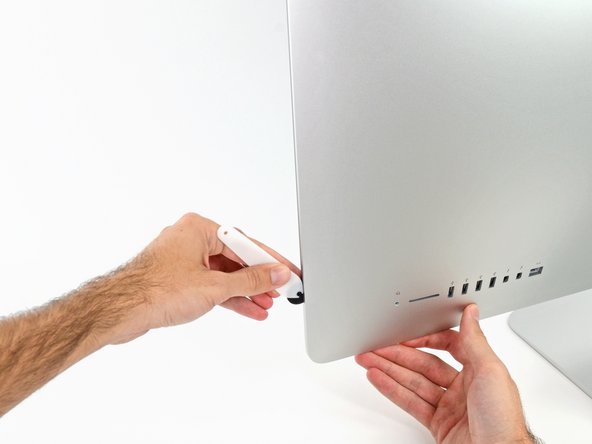
    • Servez-vous de l'outil comme d'une roulette à pizza, en suivant le pourtour de l'iMac, de manière à effectuer une découpe au centre de la mousse adhésive.

    • Veillez à toujours pousser l'outil en plaçant la poignée derrière la roulette. Si vous tirez sur l'outil, la roulette risque de sortir de la poignée.

    • Passez l'outil de haut en bas sur le côté gauche de l'écran.

  4. Changement processeur (CPU) iMac Intel 21,5" EMC 2544: étape 4, image 1 de 3 Changement processeur (CPU) iMac Intel 21,5" EMC 2544: étape 4, image 2 de 3 Changement processeur (CPU) iMac Intel 21,5" EMC 2544: étape 4, image 3 de 3
    • Continuez à passer l'outil en suivant l'angle supérieur gauche de l'écran.

  5. Changement processeur (CPU) iMac Intel 21,5" EMC 2544: étape 5, image 1 de 2 Changement processeur (CPU) iMac Intel 21,5" EMC 2544: étape 5, image 2 de 2
    • Découpez la mousse adhésive le long du bord supérieur gauche de l'écran.

  6. Changement processeur (CPU) iMac Intel 21,5" EMC 2544: étape 6, image 1 de 2 Changement processeur (CPU) iMac Intel 21,5" EMC 2544: étape 6, image 2 de 2
    • Continuez tout au long du bord supérieur de l'écran.

    • Vous pouvez repasser l'outil plusieurs fois au même endroit pour découper le plus de mousse adhésive possible.

  7. Changement processeur (CPU) iMac Intel 21,5" EMC 2544: étape 7, image 1 de 3 Changement processeur (CPU) iMac Intel 21,5" EMC 2544: étape 7, image 2 de 3 Changement processeur (CPU) iMac Intel 21,5" EMC 2544: étape 7, image 3 de 3
    • Passez l'outil dans l'angle supérieur droit de l'écran.

  8. Changement processeur (CPU) iMac Intel 21,5" EMC 2544: étape 8, image 1 de 2 Changement processeur (CPU) iMac Intel 21,5" EMC 2544: étape 8, image 2 de 2
    • Passez l'outil de haut en bas sur le côté droit de l'écran.

  9. Changement processeur (CPU) iMac Intel 21,5" EMC 2544: étape 9, image 1 de 2 Changement processeur (CPU) iMac Intel 21,5" EMC 2544: étape 9, image 2 de 2
    • Pour finir, passez l'outil au bas de l'écran en partant de la droite.

    • À ce stade, vous pouvez repasser l'outil tout autour de l'écran pour découper le plus de mousse adhésive possible.

  10. Changement processeur (CPU) iMac Intel 21,5" EMC 2544: étape 10, image 1 de 3 Changement processeur (CPU) iMac Intel 21,5" EMC 2544: étape 10, image 2 de 3 Changement processeur (CPU) iMac Intel 21,5" EMC 2544: étape 10, image 3 de 3
    Outil utilisé dans cette étape :
    Plastic Cards
    $2.99
    J'achète
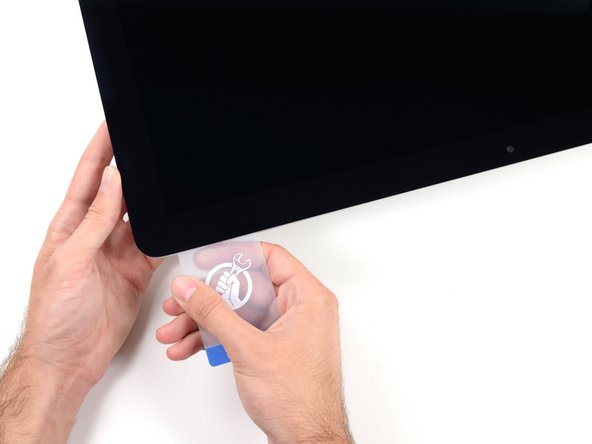
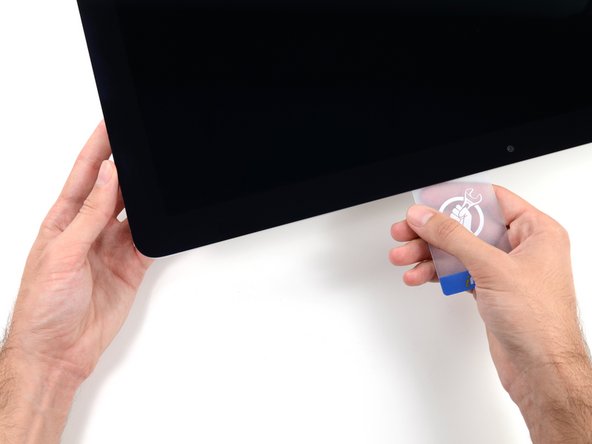
    • Bien que l'outil permette de découper l'essentiel de la mousse adhésive, il est probable que l'écran continue d'adhérer légèrement au boîtier. Vous aurez besoin d'une carte plastifiée pour découper le reste de la mousse adhésive.

    • Posez l'iMac à l'envers sur une table.

    • En partant de l'angle supérieur droit de l'iMac, insérez une carte en plastique entre l'écran et le cadre.

    • Ne l'enfoncez pas de plus d'un centimètre, vous pourriez endommager les composants internes.

    Don't forget to place the mac face up on the table. Unlike older models, there is no more flap at the bottom holding the display in place. If you do these steps with the Mac upright, the screen will pop out, hit your table, and shatter :( Don't ask me how I know.

    John M - Réponse

    So sorry. Thanks for that caution.

    Ted Horodynsky - Réponse

    Using suction cups (the ones that were made for removing the magnetic front glass on the 2011 and earlier iMacs) work well too. Place one in each top corner, while the Mac is lying face up on a table, and gently pull and it will separate the display from the main body. You might need to do a little more slicing around the edges if you did not get all the way through the first time with the roller. Then you can lift the display up at an angle to disconnect the cables.

    Peter Hillman - Réponse

    This was a great idea, worked well for me. Thanks!

    Florin -

  11. Changement processeur (CPU) iMac Intel 21,5" EMC 2544: étape 11, image 1 de 2 Changement processeur (CPU) iMac Intel 21,5" EMC 2544: étape 11, image 2 de 2
    • Tournez doucement la carte plastifiée sur le côté pour élargir l'interstice entre l'écran et le cadre.

    • Déplacez la carte lentement en veillant à ne pas exercer une pression excessive sur la vitre de l'écran. Un espace d'environ 0,6 cm est suffisant.

  12. Changement processeur (CPU) iMac Intel 21,5" EMC 2544: étape 12, image 1 de 3 Changement processeur (CPU) iMac Intel 21,5" EMC 2544: étape 12, image 2 de 3 Changement processeur (CPU) iMac Intel 21,5" EMC 2544: étape 12, image 3 de 3
    • Faites glisser la carte vers le centre de l'écran pour découper le reste de mousse adhésive dans l'angle supérieur droit de l'iMac.

    • Veillez à vous arrêter avant la caméra iSight afin de ne pas l'endommager.

  13. Changement processeur (CPU) iMac Intel 21,5" EMC 2544: étape 13, image 1 de 2 Changement processeur (CPU) iMac Intel 21,5" EMC 2544: étape 13, image 2 de 2
    • Réintroduisez la carte dans l'angle et laissez-la en place pour éviter que la mousse adhésive ne recolle l'écran et le cadre.

  14. Changement processeur (CPU) iMac Intel 21,5" EMC 2544: étape 14, image 1 de 3 Changement processeur (CPU) iMac Intel 21,5" EMC 2544: étape 14, image 2 de 3 Changement processeur (CPU) iMac Intel 21,5" EMC 2544: étape 14, image 3 de 3
    • Insérez une seconde carte dans l'interstice entre l'écran et le cadre, dans l'angle supérieur gauche de l'iMac.

  15. Changement processeur (CPU) iMac Intel 21,5" EMC 2544: étape 15, image 1 de 2 Changement processeur (CPU) iMac Intel 21,5" EMC 2544: étape 15, image 2 de 2
    • Tournez doucement la carte vers le haut pour élargir l'interstice entre l'écran et le cadre.

    • Procédez comme vous l'avez fait de l'autre côté : déplacez la carte lentement pour découper la mousse adhésive, en veillant à ne pas exercer de pression excessive sur la vitre de l'écran.

  16. Changement processeur (CPU) iMac Intel 21,5" EMC 2544: étape 16, image 1 de 3 Changement processeur (CPU) iMac Intel 21,5" EMC 2544: étape 16, image 2 de 3 Changement processeur (CPU) iMac Intel 21,5" EMC 2544: étape 16, image 3 de 3
    • Faites glisser la carte vers le centre de l'écran et veillez à vous arrêter juste avant la caméra iSight.

  17. Changement processeur (CPU) iMac Intel 21,5" EMC 2544: étape 17, image 1 de 2 Changement processeur (CPU) iMac Intel 21,5" EMC 2544: étape 17, image 2 de 2
    • Réinsérez la carte dans l'angle supérieur gauche.

  18. Changement processeur (CPU) iMac Intel 21,5" EMC 2544: étape 18, image 1 de 3 Changement processeur (CPU) iMac Intel 21,5" EMC 2544: étape 18, image 2 de 3 Changement processeur (CPU) iMac Intel 21,5" EMC 2544: étape 18, image 3 de 3
    • Les deux cartes étant insérées près des angles de l'iMac, comme illustré, faites-les délicatement pivoter pour élargir l'interstice entre l'écran et le boîtier.

    • Si l'écran et le boîtier restent collés à certains endroits, utilisez l'une des cartes pour découper la mousse adhésive et les séparer.

    • Commencez à soulever le haut de l'écran pour le séparer du cadre.

    • Soulevez l'écran de quelques centimètres seulement, car il est encore relié à la carte mère par les nappes de données et d'alimentation.

    Ne forcez surtout pas et soulevez l’écran par les deux extrémités ! Il faut que tous les adhésifs soient bien découpés pour que l’écran se dégage du boitier sans effort. Toute torsion de l’écran peut entraîner une superbe fissure sur le verre :-/

    mf - Réponse

  19. Changement processeur (CPU) iMac Intel 21,5" EMC 2544: étape 19, image 1 de 2 Changement processeur (CPU) iMac Intel 21,5" EMC 2544: étape 19, image 2 de 2
    • Tout en maintenant l'écran d'une main, débranchez sa nappe d'alimentation de l'autre main.

    • Soulevez l'écran suffisamment pour accéder sans difficulté aux connexions (environ 20 cm), mais pas trop, afin de ne pas soumettre les nappes et les connecteurs à des tensions excessives.

    As seen in photo:

    bottom cable pulls up

    top cable cable pulls right, after safety clip opened

    airshack - Réponse

  20. Changement processeur (CPU) iMac Intel 21,5" EMC 2544: étape 20, image 1 de 3 Changement processeur (CPU) iMac Intel 21,5" EMC 2544: étape 20, image 2 de 3 Changement processeur (CPU) iMac Intel 21,5" EMC 2544: étape 20, image 3 de 3
    • À l'aide de la pointe d'une spatule (spudger), basculez vers le haut le clapet métallique qui fixe la nappe de données de l'écran.

    • Avec précaution, débranchez la nappe de données de l'écran de sa prise sur la carte mère.

    • Veillez à tirer bien à plat le connecteur de la nappe de données de l'écran, pour le débrancher de sa prise.

  21. Changement processeur (CPU) iMac Intel 21,5" EMC 2544: étape 21, image 1 de 2 Changement processeur (CPU) iMac Intel 21,5" EMC 2544: étape 21, image 2 de 2
    • Relevez l'écran jusqu'à ce qu'il soit presque vertical.

    • À ce stade, il reste une bande de mousse adhésive en bas de l'écran, qui maintient ensemble l'écran et le cadre comme une charnière. Vous pouvez la décoller en abaissant et en relevant l'écran plusieurs fois de suite.

    There are pull tabs at each side off the bottom edge to allow easy release of the tape

    DarrenG - Réponse

    DarrenG’s observation about the pull tabs saved me a ton of time trying to pry the display as per the original instructions. Thanks!

    lesfam5 - Réponse

  22. Changement processeur (CPU) iMac Intel 21,5" EMC 2544: étape 22, image 1 de 3 Changement processeur (CPU) iMac Intel 21,5" EMC 2544: étape 22, image 2 de 3 Changement processeur (CPU) iMac Intel 21,5" EMC 2544: étape 22, image 3 de 3
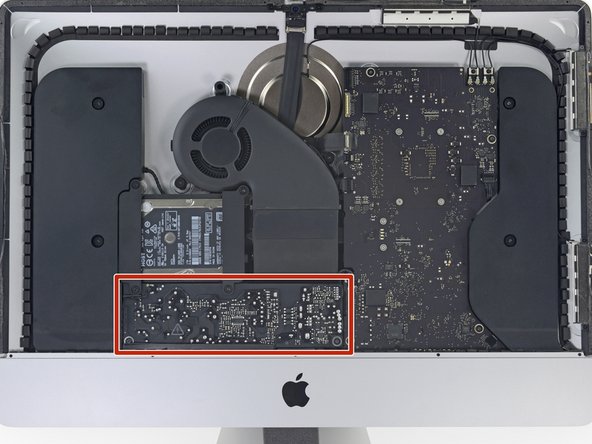
    • Faites très attention à ne pas toucher les pattes des condensateurs ou les soudures apparentes au dos de l'alimentation (dans l'encadré rouge).

    • Attrapez la petite languette au bout de l'une des bandes adhésives du bord inférieur de l'écran, et tirez la bande vers le haut de l'iMac pour l'enlever.

    • Répétez cette étape pour l'autre bande adhésive et enlevez-la.

    • Si l'une des bandes adhésives casse avant d'être enlevée, utilisez une carte en plastique pour couper l'adhésif restant.

    The roller tool for slicing open the display works great for this step. Get in there like using the card and roll across the bottom to slice through the remaining adhesive.

    Peter Hillman - Réponse

  23. Changement processeur (CPU) iMac Intel 21,5" EMC 2544: étape 23, image 1 de 3 Changement processeur (CPU) iMac Intel 21,5" EMC 2544: étape 23, image 2 de 3 Changement processeur (CPU) iMac Intel 21,5" EMC 2544: étape 23, image 3 de 3
    • Soulevez l'écran pour le séparer du cadre et sortez-le de l'iMac.

    • Vous devrez peut-être soulever lentement l'écran d'un côté pour le décoller complètement.

    • Faites très attention lorsque vous manipulez l'écran : il est grand, lourd et en verre.

    • Au moment de remonter l'écran, consultez ce tutoriel pour installer les nouvelles bandes adhésives.

    After removing the display, I also removed the 3 screws for the processor fan, disconnected the power connector for it and set the fan shroud aside. Disconnecting the remaining cable (similar style to 1 of the cables for the display) that is in the way of the RAM chips is all that's left to do. I was then able to access and quickly remove the two Apple-provided RAM chips, and replace them with 3rd party RAM. Turning the iMac on its side, so that it's in a position where you're physically putting the RAM chips DOWNWARD into their respective slots is the best way to go about uninstalling and reinstalling the chips. Using a narrow but long'ish plastic spudger tool is the best way to defeat the spring-tabs which hold the RAM chips in place. After removing the LCD display, changing the RAM is about a 10 minute process!! And I'd SURE prefer not to remove all the parts and risk damage to the iMac via the standard procedure listed. As per usual, take your time and work gently :-)

    Mitch K - Réponse

    Teardown the whole machine just to change RAM? While preparing to comment on this procedure I just noticed the comment made by Mitch K above. I ran pretty much the same procedure that he describes this afternoon (steps 1-23, 43-45, and step 55). Then I swapped out the original 2x4GB RAM chips for 2x8GB chips by reaching behind the logic board, releasing the spring retaining clips one chip at a time (starting with the chip further away from the logic board), pivoting the RAM towards the back of the machine, and then carefully sliding it out of the slot. I easily slid in the new chips and then pivoted them to lock them down. No hassle, no time lost. As Mitch K states above, not only is this “shortcut” method much quicker and easier, but it provides less risk of damaging cables, sockets and other delicate components during a total teardown. Why mess with the power supply board just to change RAM? I do not advise to follow the current iFixit.com procedure written by Sam Lionheart, regardless of user skill-level.

    nycsandor - Réponse

    THAT sounds one !&&* of a lot easier than the full tear down. I wonder if there’s a video of the process described by Mitch K? Adding that to these verbal instructions would really help relieve the apprehension and anxiety around the process! I do sometimes find the additional warnings, though appreciated from a “safety first” perspective, are somewhat overstated. It’s been a very long time since I shorted out RAM, or fried a PCB, or broke a connector, regardless of how finicky, fragile or awkwardly designed and positioned. I may have WANTED to break something, and the air might be blue for a few seconds, but inevitably, things go back together, the start button gets pressed, the startup chime sounds, and we’re in business. Practice DOES make as close to perfect we are likely to get.

    bruce - Réponse

    Mitch has the exact method that works a treat. You don’t need to follow steps 24-37 and also 40-63. Step 51 is the step to remove the camera cable and is needed. Steps 38 and 39 are for the Fan. That is all that is needed. Done quite a few like this.

    Be careful not to drop the RAM down the back of the logic board!

    By NOT removing all the other stuff you can avoid either damaging it or forgetting to plug in a cable.

    Charlie Nancarrow - Réponse

    I just trued this shortcut and it was not successful. I was not able to seat both RAM chips with this shortcut, and managed to slightly damage one of the retainer clips. I simply could not manipulate the chips into and out of the slots effectively without taking everything apart as described in the full set of steps.. I ended up retracing my steps and following the entire procedure, carefully, and that worked without incident. So, bottomline, it is definitely more work to follow all the steps but from my experience, it is decidedly safer. Your mileage may, of course, vary. It was successful in the end, and I swapped out the hard drive with an ssd during the same procedure and my machine is very, very much faster.

    jan - Réponse

    I have completed by following the Mitch K post and it is much easier than stripping down the whole thing, just be aware that to remove and replace the ram chips means working in a tight space, you need slim fingers and don’t be tempted to use force, take your time.

    Barrie Price - Réponse

    Well, I have slim fingers, but they are 60 years old, and they don’t work like they used to! LOL.

    Jan Hogle -

    Agree with Mitch K’s procedure. The only added tip I would throw in is to use two 45 degree tweezers with their plastic covers still installed to easily pop loose the RAM. I couldn’t get the plastic spudger tool to work myself, but the tweezers easily reach the RAM clips. Just make sure the plastic covers are installed and you won’t be in danger of scratching or shorting anything out.

    charlesnick - Réponse

    So thankful I discovered these comments. Saved me a TON of time! Thank you!!

    Adam Roberts - Réponse

    These comments were very useful. Thank you. I just needed to modify a pair of tweezers to allow me to seat the new RAM more easily. The ifixit screwdriver wasn't able to turn some of the screws as they were installed too tightly, and I didn't want to wait to order and reveive a pair of right angled Torx screwdrivers that would give me more leverage to get those boards off.

    Upgrader - Réponse

  24. Changement processeur (CPU) iMac Intel 21,5" EMC 2544, Support inférieur: étape 24, image 1 de 2 Changement processeur (CPU) iMac Intel 21,5" EMC 2544, Support inférieur: étape 24, image 2 de 2
    • Retirez les cinq vis cruciformes suivantes, qui maintiennent le support inférieur en place :

    • Quatre vis de 3,2 mm

    • Une vis de 1,7 mm

    • Sur certaines machines EMC 2544 au moins, les cinq vis sont de la même taille.

    • Vous devrez peut-être décoller l'adhésif de l'écran sur le bord inférieur du boîtier de l'iMac pour accéder aux vis.

    I used the CR-V 4.0 standard screwdriver head to help peel away the adhesive lining. My fingers were too big to grab it, and my fingernails too short to get the removal started. This 4 screw head worked perfectly.

    airshack - Réponse

  25. Changement processeur (CPU) iMac Intel 21,5" EMC 2544: étape 25, image 1 de 1
    • Retirez le support inférieur du boîtier de l'iMac.

    Of all the parts of this entire procedure, replacing this one piece is the hardest part! The screws are tiny and they just don’t seem to want to grab the support piece. Also it seems to perform no function which is also annoying.

    John M - Réponse

    I left mine out. LOL

    jerrid_foiles -

    Line up the screw holes and press on the bracket from the back to help the screws grab. If your fingers are too big, press with the flat side of your spudger. As long as there’s no gap between the bracket and the iMac’s frame, the screws should grab easily.

    Jeff Suovanen -

    I put it in at a slight angle lining up the right hand side holes, screwed in the two screws and gently pressed my finger behind it on the rest

    jmorphett5 - Réponse

    If you only want to replace the HD and RAM, take a big shortcut and leave the logic board in, as well as all the parts needed to remove it (speaker, power supply etc). Once the display is removed, just take out the fan and the top two logic board screw. There is than sufficient space to gently remove and insert the two ram modules. HD can easily be replaced with an SSD by just removing the HD mounting brackets...

    diddl14 - Réponse

    Voces mudaram de modelo iMac, desta foto para proxima, esse modelo desta foto nao tem slot nvme. O da proxima foto sim. Voces me fizeram comprar un nvme por engano...

    tgb4rr0s tege - Réponse

  26. Changement processeur (CPU) iMac Intel 21,5" EMC 2544, Haut-parleur droit: étape 26, image 1 de 2 Changement processeur (CPU) iMac Intel 21,5" EMC 2544, Haut-parleur droit: étape 26, image 2 de 2
    • À l'aide d'une spatule, détachez le connecteur du câble du haut-parleur droit de sa prise sur la carte mère.

    • Il convient d'appliquer l'effet de levier sur les deux côtés courts du connecteur. Faites attention aux angles des connecteurs, car ils peuvent se casser facilement.

    • Tirez le connecteur vers le bas pour le débrancher de sa prise.

    I highly recommend doing steps 27 and 28 first and then pull out the cable. It will give you more room on the right side of the cable to work with making this step that much easier.

    Eddie de la Rosa - Réponse

    The two corners of the connector are latches that need to be pushed toward the center of the connector to release. This is easily done with the pointed end of the spudger. Once the two corner latches are released, the connector comes apart easily.

    Fred Heineman - Réponse

  27. Changement processeur (CPU) iMac Intel 21,5" EMC 2544: étape 27, image 1 de 1
    • Retirez les deux vis T10 10 mm par lesquelles le haut-parleur droit est fixé au boîtier arrière.

  28. Changement processeur (CPU) iMac Intel 21,5" EMC 2544: étape 28, image 1 de 2 Changement processeur (CPU) iMac Intel 21,5" EMC 2544: étape 28, image 2 de 2
    • Tirez le haut du haut-parleur droit et écartez-le du boîtier arrière d'environ 1,2 cm pour accéder au câble d'antenne qui passe sur son côté droit.

  29. Changement processeur (CPU) iMac Intel 21,5" EMC 2544: étape 29, image 1 de 3 Changement processeur (CPU) iMac Intel 21,5" EMC 2544: étape 29, image 2 de 3 Changement processeur (CPU) iMac Intel 21,5" EMC 2544: étape 29, image 3 de 3
    • Insérez la pointe d'une spatule entre le haut-parleur droit et le câble d'antenne qui est encastré sur le côté droit du haut-parleur.

    • Déplacez la spatule vers le bas le long du côté droit du haut-parleur, afin de dégager le câble d'antenne de la rainure sur la droite du haut-parleur.

  30. Changement processeur (CPU) iMac Intel 21,5" EMC 2544: étape 30, image 1 de 3 Changement processeur (CPU) iMac Intel 21,5" EMC 2544: étape 30, image 2 de 3 Changement processeur (CPU) iMac Intel 21,5" EMC 2544: étape 30, image 3 de 3
    • Tirez le haut-parleur droit vers le haut de l'iMac sur environ 2,50 cm, en le tenant bien droit.

    • Soulevez le haut-parleur droit en le tenant bien droit et sortez-le de l'iMac.

    Th HP is VERY HARD to take off in this thin place

    bruno - Réponse

  31. Changement processeur (CPU) iMac Intel 21,5" EMC 2544, Supports du disque dur: étape 31, image 1 de 1
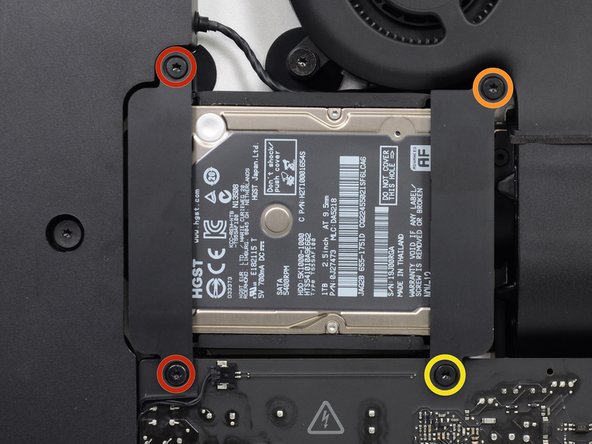
    • Retirez les vis suivantes par lesquelles le support du disque dur est fixé au boîtier arrière :

    • Deux vis Torx T10 21 mm du support gauche du disque dur.

    • Une vis Torx T10 9 mm.

    • Une vis Torx T10 27 mm.

    Pay attention to this photo and where the fan is. It is 180° from where the previous step shows it is oriented to you.

    Max Romano - Réponse

  32. Changement processeur (CPU) iMac Intel 21,5" EMC 2544: étape 32, image 1 de 2 Changement processeur (CPU) iMac Intel 21,5" EMC 2544: étape 32, image 2 de 2
    • Retirez les supports gauche et droit du disque dur de l'iMac.

  33. Changement processeur (CPU) iMac Intel 21,5" EMC 2544, Carte d'alimentation: étape 33, image 1 de 3 Changement processeur (CPU) iMac Intel 21,5" EMC 2544, Carte d'alimentation: étape 33, image 2 de 3 Changement processeur (CPU) iMac Intel 21,5" EMC 2544, Carte d'alimentation: étape 33, image 3 de 3
    • Dans les étapes suivantes, vous serez amené à travailler près de la surface exposée de la carte d'alimentation. Évitez tout contact avec la surface de la carte d'alimentation. Les nombreux condensateurs soumis à une tension élevée présents sur la carte pourraient provoquer un choc électrique.

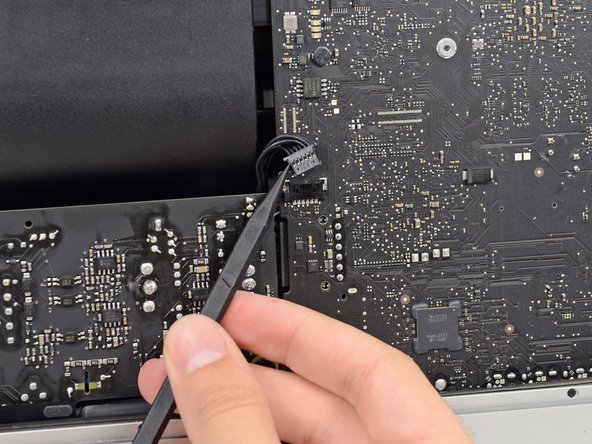
    • À l'aide de la pointe d'une spatule, poussez doucement chaque côté du connecteur du câble du bouton de marche, pour débrancher le connecteur de sa prise.

    Accomplished with spudger on top and thumbnail on bottom. Otherwise couldn’t rock it loose.

    airshack - Réponse

  34. Changement processeur (CPU) iMac Intel 21,5" EMC 2544: étape 34, image 1 de 2 Changement processeur (CPU) iMac Intel 21,5" EMC 2544: étape 34, image 2 de 2
    • À l'aide de la pointe d'une spatule, poussez doucement chaque côté du connecteur du câble de commande de l'alimentation vers le haut, pour débrancher le connecteur de sa prise.

    Doing this with spudger on right and thumbnail on left seemed easier and safer.

    airshack - Réponse

  35. Changement processeur (CPU) iMac Intel 21,5" EMC 2544: étape 35, image 1 de 1
    • Retirez les deux vis T10 7,2 mm par lesquelles la carte d'alimentation est fixée au boîtier arrière.

    What if these are too tight to remove?

    Rafael Garcia - Réponse

    Hi Rafael,

    Be very careful not to strip these screws. Use a new, accurate T10 bit and a driver with good leverage to loosen these screws.

    Arthur Shi -

    They are T9 in my iMac

    Glenn Koslowsky - Réponse

    They were T8 screws on my machine.

    Ed Beachwood - Réponse

  36. Changement processeur (CPU) iMac Intel 21,5" EMC 2544: étape 36, image 1 de 2 Changement processeur (CPU) iMac Intel 21,5" EMC 2544: étape 36, image 2 de 2
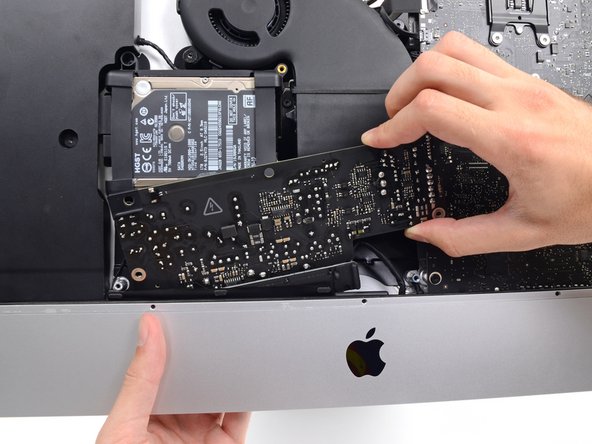
    • Lorsque vous manipulez la carte d'alimentation, veillez à ne pas toucher les fils des condensateurs ni les soudures exposées à l'arrière de la carte d'alimentation. Tenez toujours la carte par les côtés.

    • Inclinez la carte d'alimentation vers l'avant.

  37. Changement processeur (CPU) iMac Intel 21,5" EMC 2544: étape 37, image 1 de 3 Changement processeur (CPU) iMac Intel 21,5" EMC 2544: étape 37, image 2 de 3 Changement processeur (CPU) iMac Intel 21,5" EMC 2544: étape 37, image 3 de 3
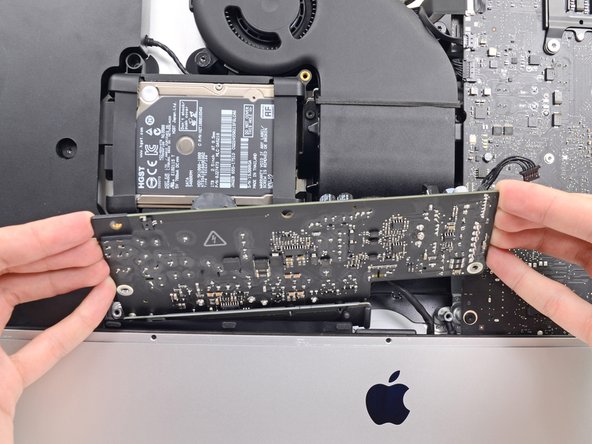
    • Tirez la carte d'alimentation légèrement vers le haut hors du boîtier arrière.

    • Faites pivoter la carte d'alimentation dans le sens inverse des aiguilles d'une montre, en soulevant le côté droit d'environ 2,5 cm de plus que le côté gauche.

  38. Changement processeur (CPU) iMac Intel 21,5" EMC 2544: étape 38, image 1 de 2 Changement processeur (CPU) iMac Intel 21,5" EMC 2544: étape 38, image 2 de 2
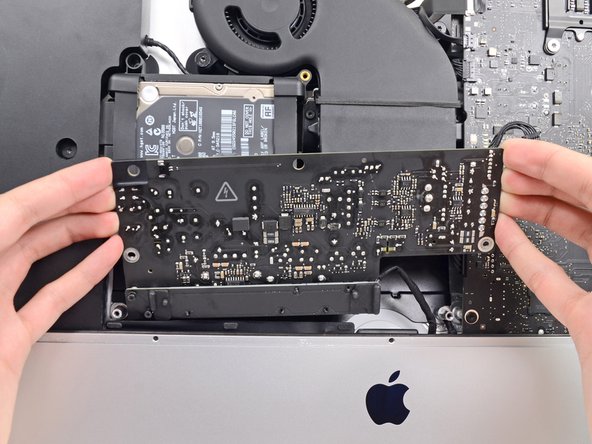
    • Faites coulisser la carte d'alimentation vers la droite pour la dégager des deux montants de vis sur le boîtier arrière.

  39. Changement processeur (CPU) iMac Intel 21,5" EMC 2544: étape 39, image 1 de 3 Changement processeur (CPU) iMac Intel 21,5" EMC 2544: étape 39, image 2 de 3 Changement processeur (CPU) iMac Intel 21,5" EMC 2544: étape 39, image 3 de 3
    • Inclinez la carte d'alimentation vers l'avant et retirez-la de son emplacement dans le boîtier arrière.

    • N'essayez pas de retirer complètement la carte d'alimentation de l'iMac pour le moment, car elle est encore reliée à la carte mère.

  40. Changement processeur (CPU) iMac Intel 21,5" EMC 2544: étape 40, image 1 de 2 Changement processeur (CPU) iMac Intel 21,5" EMC 2544: étape 40, image 2 de 2
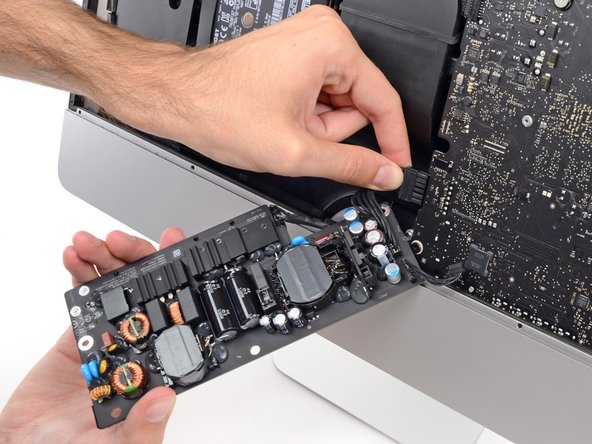
    • Veillez à ne pas toucher les fils des condensateurs ni les soudures exposées à l'arrière de la carte d'alimentation. Tenez toujours la carte par les côtés.

    • Basculez le haut de la carte d'alimentation vers vous afin d'accéder au connecteur du câble d'alimentation CC derrière la carte mère.

    • Pincez la patte du connecteur du câble d'alimentation CC et débranchez ce dernier de sa prise à l'arrière de la carte mère en le tenant bien droit.

    what happens if you damage the power socket on the logic board?

    Racheal Major - Réponse

    The tab is on the bottom of the connector. You can’t see it. Squeeze the bottom of the connector close to the cables to properly release tab. Pulling straight out is important.

    Eddie de la Rosa - Réponse

    This step might be easier if you do the next step first (step 41) and then come back to this step.

    Eddie de la Rosa - Réponse

    I loosened the logic board attached to the power supply board. I then could easily remove the 2 power cables.

    Gerard Stoffels - Réponse

    A photo of the disconnected power connector would be helpful in seeing how the tab release works here.

    airshack - Réponse

    In the photo above, the index finger is shown squeezing the connector locking tab. Do this while using the flat end of a spudger to release the latch. Once the connector is moved about an eigth of an inch the latch is released and the connector should come out freely.

    Fred Heineman - Réponse

    The photo you added is of the wrong side of the power cable connector? Please add a photo of the rear facing side so the clip mechanism so disconnection can be clearly understood.

    airshack - Réponse

    The key is to squeeze the tab in the part near the cables. You won’t feel like the tab is moving, but squeezing it there is necessary to get it out.

    Adrià - Réponse

  41. Changement processeur (CPU) iMac Intel 21,5" EMC 2544: étape 41, image 1 de 3 Changement processeur (CPU) iMac Intel 21,5" EMC 2544: étape 41, image 2 de 3 Changement processeur (CPU) iMac Intel 21,5" EMC 2544: étape 41, image 3 de 3
    • Pour les deux prochaines étapes, il peut être utile de poser l'iMac à l'envers sur une table.

    • À l'aide de l'extrémité plate d'une spatule, poussez le clip sur le côté du câble d'entrée CA vers l'intérieur.

    • Tout en maintenant le clip de déverrouillage à l'aide de votre spatule, saisissez le câble d'entrée CA et débranchez le connecteur de sa prise en le tenant bien droit.

  42. Changement processeur (CPU) iMac Intel 21,5" EMC 2544: étape 42, image 1 de 1
    • Retirez le bloc d'alimentation de l'iMac.

  43. Changement processeur (CPU) iMac Intel 21,5" EMC 2544, Ventilateur: étape 43, image 1 de 2 Changement processeur (CPU) iMac Intel 21,5" EMC 2544, Ventilateur: étape 43, image 2 de 2
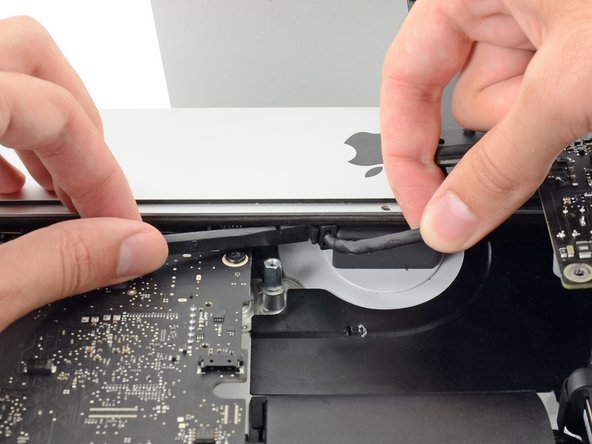
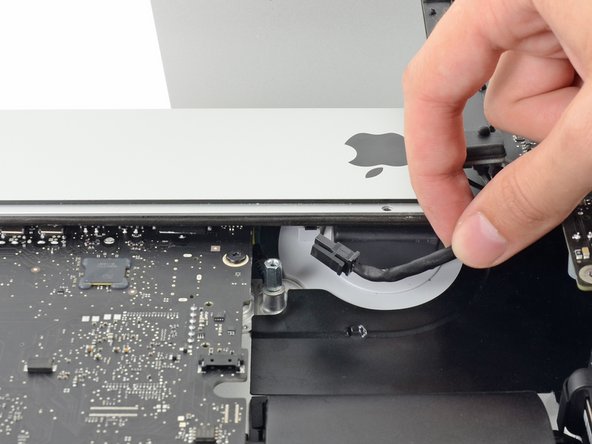
    • Tirez doucement sur le connecteur du câble du ventilateur pour le débrancher de sa prise sur la carte mère.

    I don’t like to pull on wires as shown in the photos above. I used my index fingernail on the top corner of the connector and the pointed end of a spudger on the bottom corner to pull the connector straight out of its socket.

    Fred Heineman - Réponse

  44. Changement processeur (CPU) iMac Intel 21,5" EMC 2544: étape 44, image 1 de 1
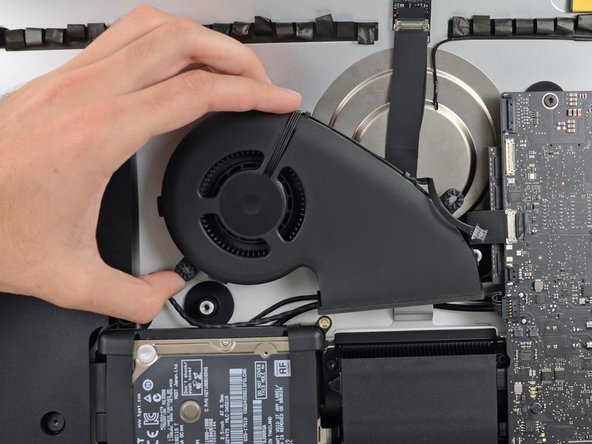
    • Retirez les trois vis à épaulement T10 12,3 mm par lesquelles le ventilateur est fixé au boîtier arrière.

  45. Changement processeur (CPU) iMac Intel 21,5" EMC 2544: étape 45, image 1 de 2 Changement processeur (CPU) iMac Intel 21,5" EMC 2544: étape 45, image 2 de 2
    • Retirez le ventilateur de l'iMac.

  46. Changement processeur (CPU) iMac Intel 21,5" EMC 2544, Disque dur: étape 46, image 1 de 3 Changement processeur (CPU) iMac Intel 21,5" EMC 2544, Disque dur: étape 46, image 2 de 3 Changement processeur (CPU) iMac Intel 21,5" EMC 2544, Disque dur: étape 46, image 3 de 3
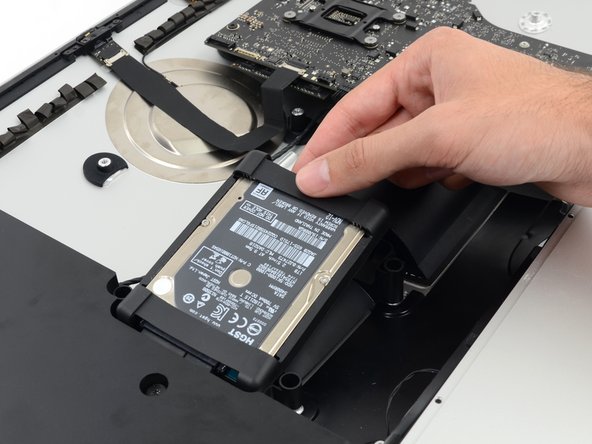
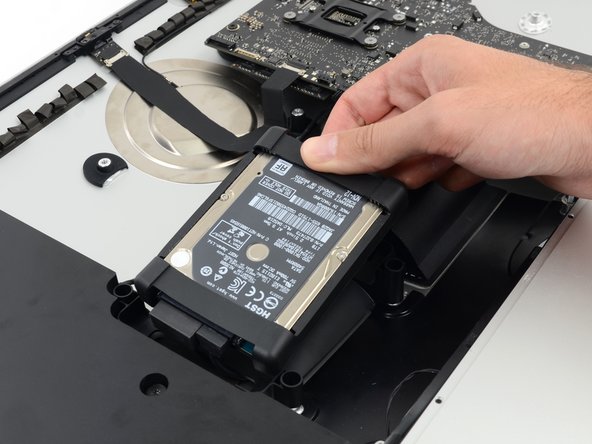
    • Soulevez le disque dur par le bord le plus proche de la carte mère et sortez-le doucement de son emplacement.

    • N'essayez pas de retirer complètement le disque dur de l'iMac, car il est encore relié à deux câbles.

  47. Changement processeur (CPU) iMac Intel 21,5" EMC 2544: étape 47, image 1 de 2 Changement processeur (CPU) iMac Intel 21,5" EMC 2544: étape 47, image 2 de 2
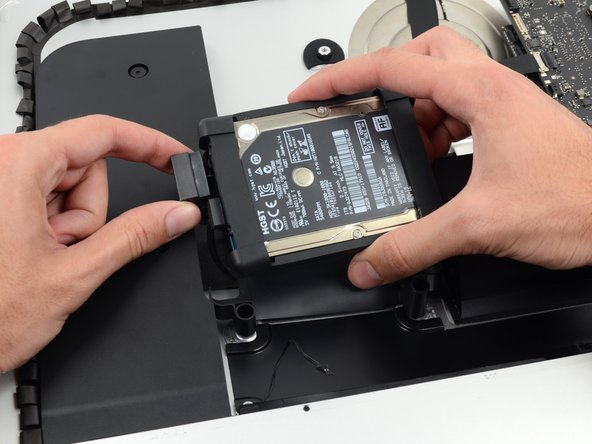
    • Débranchez le câble d'alimentation SATA.

  48. Changement processeur (CPU) iMac Intel 21,5" EMC 2544: étape 48, image 1 de 2 Changement processeur (CPU) iMac Intel 21,5" EMC 2544: étape 48, image 2 de 2
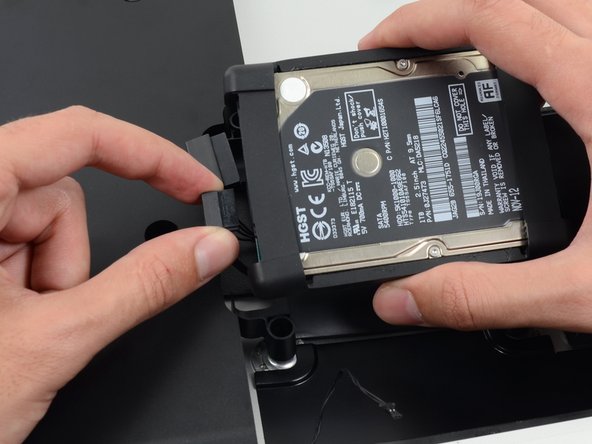
    • Débranchez le câble de données SATA du disque dur.

  49. Changement processeur (CPU) iMac Intel 21,5" EMC 2544: étape 49, image 1 de 1
    • Déposez le disque dur de l'iMac.

  50. Changement processeur (CPU) iMac Intel 21,5" EMC 2544, Plateau du disque dur: étape 50, image 1 de 1
    • Retirez la vis Torx T10 7,2 mm par laquelle le plateau du disque dur est fixé au boîtier arrière.

    2017 imac EMC 3069 this is a T9

    Glenn Koslowsky - Réponse

  51. Changement processeur (CPU) iMac Intel 21,5" EMC 2544: étape 51, image 1 de 1
    • Retirez le plateau du disque dur du boîtier arrière.

    Cables are routed through the backside of the tray. Take a picture for reassembly.

    Mitchell Scheffler - Réponse

  52. Changement processeur (CPU) iMac Intel 21,5" EMC 2544, Carte mère: étape 52, image 1 de 2 Changement processeur (CPU) iMac Intel 21,5" EMC 2544, Carte mère: étape 52, image 2 de 2
    • À l'aide de la pointe d'une spatule, poussez doucement chaque côté du connecteur du câble du haut-parleur gauche, pour débrancher le connecteur de sa prise.

    As noted in the right speaker cable section, the two corners of the connector are latches that need to be pushed toward the center of the connector to release. This is easily done with the pointed end of the spudger. Once the two corner latches are released, the connector comes apart easily.

    Fred Heineman - Réponse

  53. Changement processeur (CPU) iMac Intel 21,5" EMC 2544: étape 53, image 1 de 2 Changement processeur (CPU) iMac Intel 21,5" EMC 2544: étape 53, image 2 de 2
    • Tirez le câble du haut-parleur gauche vers le haut pour le dégager du clip de fixation derrière le boîtier arrière.

  54. Changement processeur (CPU) iMac Intel 21,5" EMC 2544: étape 54, image 1 de 3 Changement processeur (CPU) iMac Intel 21,5" EMC 2544: étape 54, image 2 de 3 Changement processeur (CPU) iMac Intel 21,5" EMC 2544: étape 54, image 3 de 3
    • Comme à l'étape précédente, dégagez les câbles de données et d'alimentation SATA du clip de fixation.

  55. Changement processeur (CPU) iMac Intel 21,5" EMC 2544: étape 55, image 1 de 3 Changement processeur (CPU) iMac Intel 21,5" EMC 2544: étape 55, image 2 de 3 Changement processeur (CPU) iMac Intel 21,5" EMC 2544: étape 55, image 3 de 3
    • À l'aide de l'extrémité plate d'une spatule, basculez vers le haut le support de fixation métallique sur le connecteur de la nappe vidéo iSight.

    • Débranchez la nappe vidéo iSight de sa prise sur la carte mère en la tenant droite.

    • Ce connecteur est fragile et peut être facilement endommagé.

    As seen in the photo this clip clearly has a pull tab. Forget the spudger and just open the clip with the pull tab.

    airshack - Réponse

  56. Changement processeur (CPU) iMac Intel 21,5" EMC 2544: étape 56, image 1 de 3 Changement processeur (CPU) iMac Intel 21,5" EMC 2544: étape 56, image 2 de 3 Changement processeur (CPU) iMac Intel 21,5" EMC 2544: étape 56, image 3 de 3
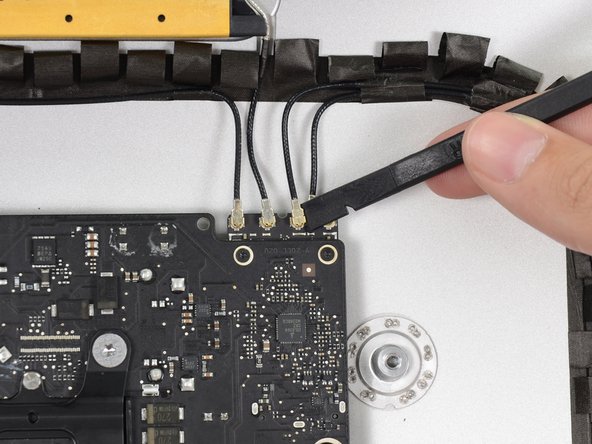
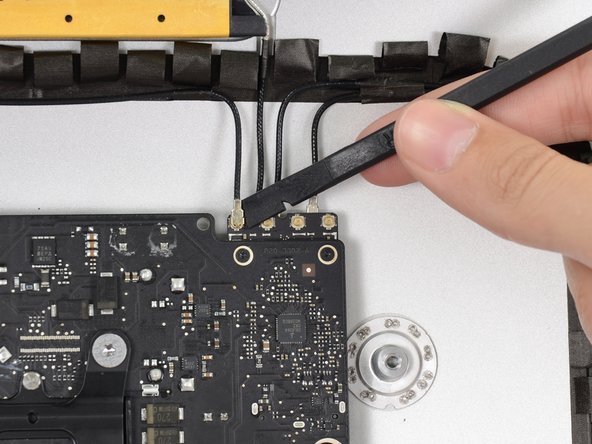
    • À l'aide de l'extrémité plate d'une spatule, débranchez les quatre connecteurs d'antenne de la carte AirPort/Bluetooth.

    • Repérez la position initiale de chaque connecteur. Vous en aurez besoin pour rebrancher les câbles.

    I broke off one of the antenna connectors when I took off the antenna wires, but the new 802.11ac card is working:) I seems the way to take off the wires is lifting it up from the wire side. In hindsight I just wasn´t careful enough.

    Runar Vaernes - Réponse

    how do I check a working logic board

    Navneet Garg - Réponse

    I labeled mine with label printer labels prior to disconnection.

    airshack - Réponse

    I labeled mine with label printer labels prior to disconnection. The label/tabs made reinstalling easier as I held onto the label/tabs while pressing down on the connectors. Much easier than holding onto the physical wires.

    airshack - Réponse

    If you have a pair of angled tweezers, they work well for grabbing under the connector so that you aren’t pulling on the wire. The head of the T10 screwdriver works well for pressing them back on.

    Mitchell Scheffler - Réponse

    iMac 2017 EMC 3069 this has the antenna brackets with two T5

    Glenn Koslowsky - Réponse

  57. Changement processeur (CPU) iMac Intel 21,5" EMC 2544: étape 57, image 1 de 3 Changement processeur (CPU) iMac Intel 21,5" EMC 2544: étape 57, image 2 de 3 Changement processeur (CPU) iMac Intel 21,5" EMC 2544: étape 57, image 3 de 3
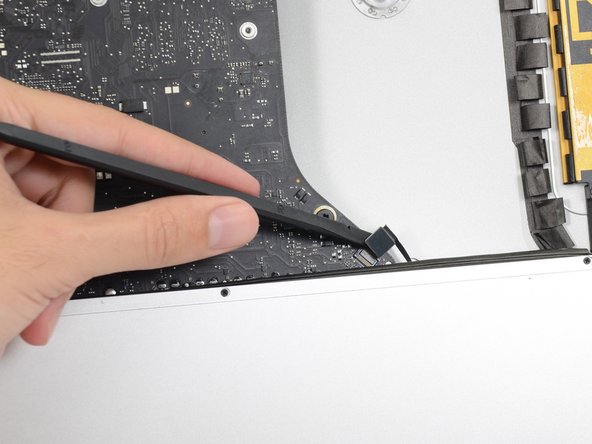
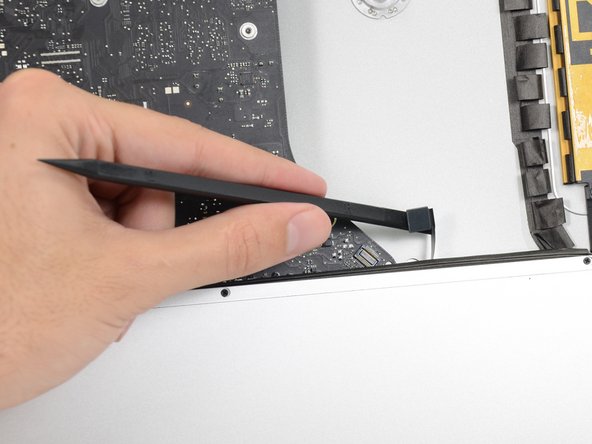
    • À l'aide de l'extrémité plate d'une spatule, faites levier sur le connecteur du câble de la prise jack, pour le débrancher de sa prise sur la carte mère.

    • Poussez légèrement le câble vers la droite.

    Unlike the rest of the connectors on the logic board, this one lifts up away from the board rather than to the side. That “Push the cable slightly to the right.” notation is after the connector is free.

    Fred Heineman - Réponse

  58. Changement processeur (CPU) iMac Intel 21,5" EMC 2544: étape 58, image 1 de 1
    • Retirez les vis suivantes par lesquelles le conduit d'échappement est fixé au boîtier arrière :

    • Deux vis T8 6,3 mm

    • Deux vis T8 4,7 mm

    Weirdly, these screws didn’t work with my T8 driver. Not with T6 or T10.

    Every other screw (to this point) has been fine. Hmm.

    Jake Lodwick - Réponse

    ??? The T8 worked fine for me. Not sure what the difference would be.

    Fred Heineman - Réponse

    Fare molta attenzione alla vite in fondo a destra, è facile (soprattutto se la punta del proprio cacciavite non è magnetizzata) che la vite si perda sotto alla Logic board. Se la punta del cacciavite non è magnetizzata consiglio o di utilizzare un magnete esterno o di utilizzare delle pinze mentre si svita la vite in modo da non incorrere in questo problema.

    Carlo Molta - Réponse

  59. Changement processeur (CPU) iMac Intel 21,5" EMC 2544: étape 59, image 1 de 1
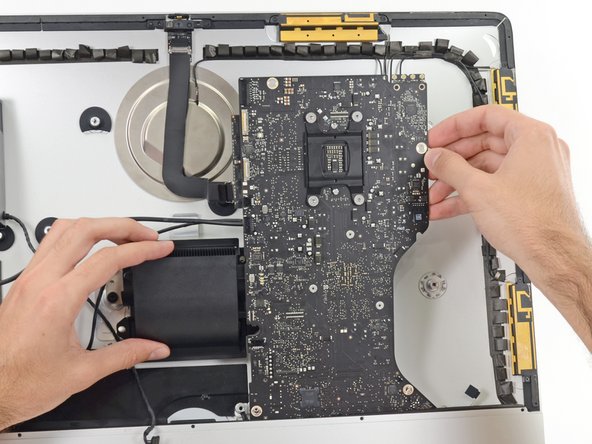
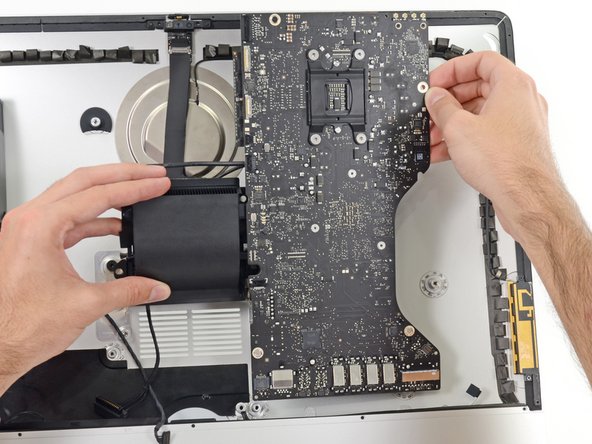
    • Retirez les quatre vis T10 7,2 mm par lesquelles la carte mère est fixée au boîtier arrière.

    When reinstalling the logic board, install four screws loose. Insert thumb drives into the back in all slots to ensure alignment. Once aligned, then tighten screws.

    Gary Kelch - Réponse

    On some models there is a tiny microphone cable connector, just above the lower left logic board screw. Remove by carefully pulling straight down. There is also a piece of insulating plastic w/adhesive on top of the screw which can be pulled off prior to removal. Save and reuse with the same screw on installation.

    Ed Beachwood - Réponse

  60. Changement processeur (CPU) iMac Intel 21,5" EMC 2544: étape 60, image 1 de 3 Changement processeur (CPU) iMac Intel 21,5" EMC 2544: étape 60, image 2 de 3 Changement processeur (CPU) iMac Intel 21,5" EMC 2544: étape 60, image 3 de 3
    • Inclinez le haut de la carte mère en l'écartant du boîtier arrière.

    • Soulevez la carte mère en la tenant bien droit et sortez-la de l'iMac.

    • Veillez à ce que la carte mère ne heurte pas les montants des vis du boîtier arrière.

    • La principale difficulté viendra des cartes d'E/S en bas de la carte mère. Nous vous recommandons de tirer doucement pour éviter tout dommage.

    • Lors du remontage de la carte mère, faites attention à la position des connecteurs d'E/S. Lorsque la carte est de retour dans le boîtier, insérez un câble USB ou Thunderbolt dans l'un des connecteurs pour l'aligner parfaitement.

    When inserting the logic board back, pay attention of the position of the I/O connectors. When it is back in place, put a USB / Thunderbolt cable into the connectors to ensure the perfect alignment.

    Peter - Réponse

    This is fantastic advice. I used a combination of USB and display port plugs to ensure proper alignment and help keep the logic board steady while i screwed it back in. Thank you!!

    kazoodac -

    Great technique. I plugged a cable into every port before tightening logic board screws.

    airshack - Réponse

    ive gotten this far and i still have one question, i’m replacing my HDD With A SSD should i also remove the original Blade drive ? and run exclusively off the ssd, ? i wasn’t 100 on whether or not i was getting the fusion set up so i’m not in possession of a upgraded blade, so i though this was a good question id hadn’t seen asked.

    Eliasar - Réponse

  61. Changement processeur (CPU) iMac Intel 21,5" EMC 2544, Remplacement de la RAM dans l'iMac Intel 21,5" EMC 2544: étape 61, image 1 de 3 Changement processeur (CPU) iMac Intel 21,5" EMC 2544, Remplacement de la RAM dans l'iMac Intel 21,5" EMC 2544: étape 61, image 2 de 3 Changement processeur (CPU) iMac Intel 21,5" EMC 2544, Remplacement de la RAM dans l'iMac Intel 21,5" EMC 2544: étape 61, image 3 de 3
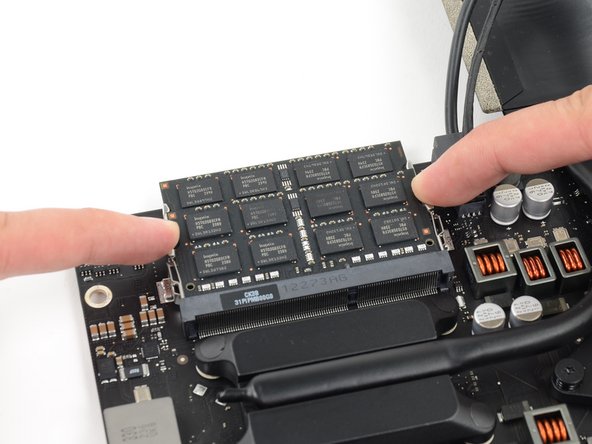
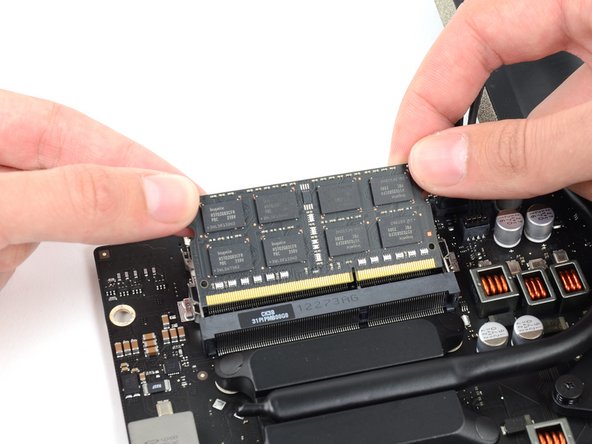
    • Écartez les deux clips de chaque côté du module de RAM en même temps.

    • Le module de RAM devrait se soulever légèrement de sa prise.

    • Saisissez les coins supérieurs gauche et droit du module RAM et retirez-le délicatement de sa prise.

    • Répétez la procédure pour retirer d'autres modules de RAM si nécessaire.

    This would also be a good time to replace the CMOS 2032 coin battery while you have access.

    Joshua Moyer - Réponse

    Update on logic board alignment - use two USB plugs one in each end of the connectors through the back to be sure alignment is good before tightening screws.

    Carl Schultz - Réponse

  62. Changement processeur (CPU) iMac Intel 21,5" EMC 2544, Dissipateur thermique: étape 62, image 1 de 3 Changement processeur (CPU) iMac Intel 21,5" EMC 2544, Dissipateur thermique: étape 62, image 2 de 3 Changement processeur (CPU) iMac Intel 21,5" EMC 2544, Dissipateur thermique: étape 62, image 3 de 3
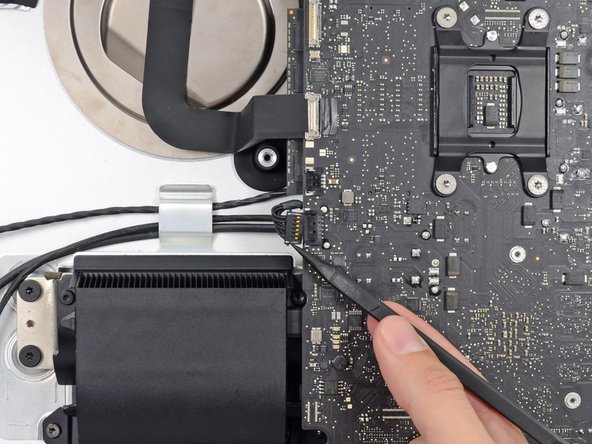
    • Déconnectez et retirez les câbles SATA de données et d'alimentation de la carte mère.

  63. Changement processeur (CPU) iMac Intel 21,5" EMC 2544: étape 63, image 1 de 1
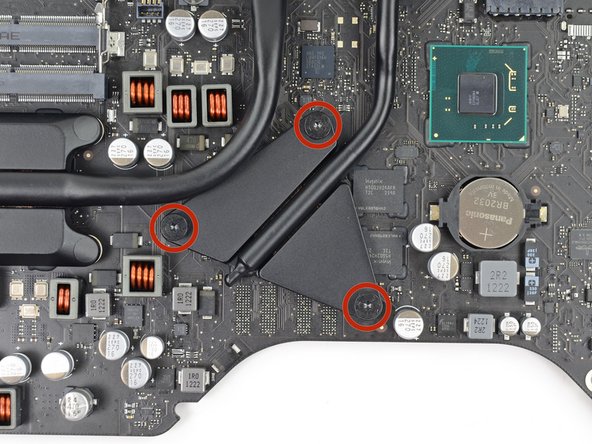
    • Retirez les quatre vis épaulées T10 de 12 mm de la plaque à ressort située derrière le processeur.

  64. Changement processeur (CPU) iMac Intel 21,5" EMC 2544: étape 64, image 1 de 1
    • Retirez la plaque à ressort située derrière le dissipateur thermique du processeur.

  65. Changement processeur (CPU) iMac Intel 21,5" EMC 2544: étape 65, image 1 de 1
    • Soulevez et retirez la plaque arrière de l'arrière du dissipateur thermique du processeur.

    • La plaque de support comporte deux fixations qui s'insèrent dans les trous d'alignement de la carte mère et du dissipateur thermique.

  66. Changement processeur (CPU) iMac Intel 21,5" EMC 2544: étape 66, image 1 de 2 Changement processeur (CPU) iMac Intel 21,5" EMC 2544: étape 66, image 2 de 2
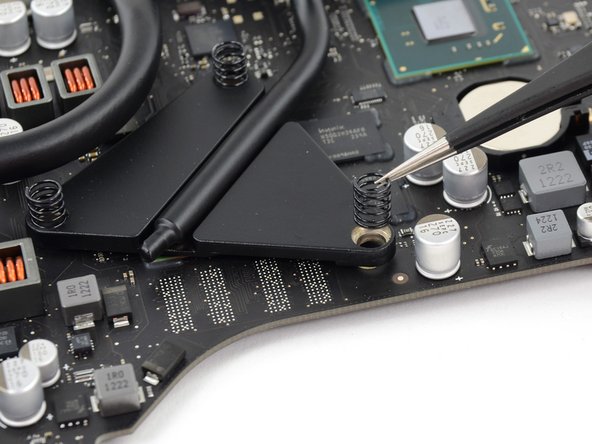
    • Retirez les trois vis Torx T8 de 12 mm qui fixent le dissipateur thermique du processeur graphique à la carte mère.

    • Retirez les trois ressorts restants.

    • Ces ressorts peuvent remonter avec les vis. Veillez à ne pas les perdre.

  67. Changement processeur (CPU) iMac Intel 21,5" EMC 2544: étape 67, image 1 de 2 Changement processeur (CPU) iMac Intel 21,5" EMC 2544: étape 67, image 2 de 2
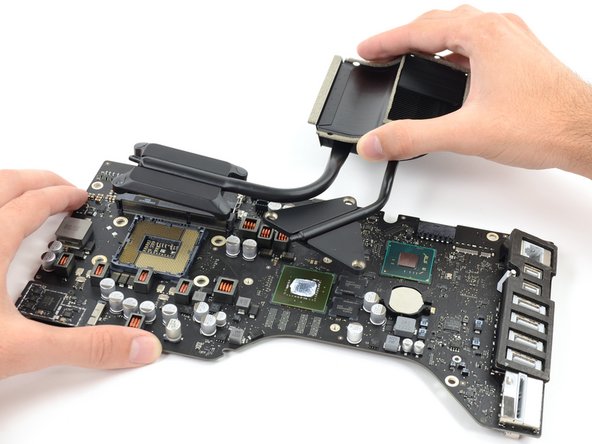
    • Soulevez et retirez le dissipateur thermique de la carte mère.

    • Le processeur se détachera probablement avec le dissipateur thermique, faites donc attention à l'endroit où vous le posez.

  68. Changement processeur (CPU) iMac Intel 21,5" EMC 2544, Processeur (CPU): étape 68, image 1 de 2 Changement processeur (CPU) iMac Intel 21,5" EMC 2544, Processeur (CPU): étape 68, image 2 de 2
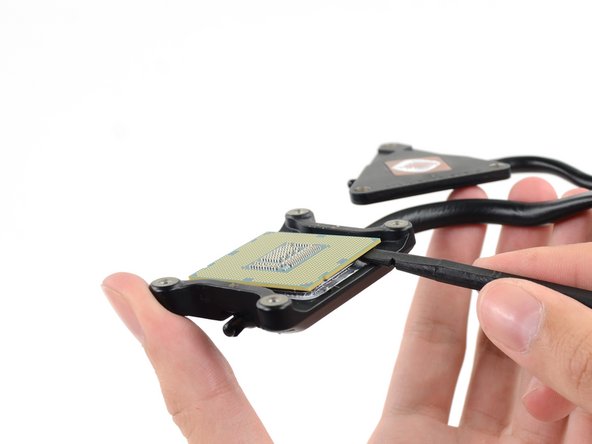
    • Le processeur sera probablement collé au dissipateur thermique avec de la pâte thermique.

    • Insérez le bord plat d'une spatule entre le processeur et le dissipateur thermique.

    • Soulevez doucement le processeur du dissipateur thermique en tournant légèrement le spatuleur vers le haut.

  69. Changement processeur (CPU) iMac Intel 21,5" EMC 2544: étape 69, image 1 de 1
    • Retirez le processeur du dissipateur thermique. Veillez à ne pas toucher les contacts.

    • Pour installer un nouveau processeur, consultez notre tutoriel sur la pâte thermique pour obtenir des instructions sur la façon de nettoyer et de préparer les surfaces thermiques et d'appliquer une nouvelle couche de pâte thermique sur les matrices du processeur et du processeur graphique.

Conclusion

Pour remonter votre appareil, suivez ces instructions en sens inverse.

36 autres ont terminé cette réparation.

Merci à ces traducteurs :

en fr

100%

Annika Faelker nous aide à réparer le monde ! Vous voulez contribuer ?
Commencez à traduire ›

Sam Goldheart

Membre depuis le 10/18/12

465 762 Réputation

538 tutoriels rédigés

Équipe

iFixit Membre de l'équipe iFixit

Staff

135 membres

16 817 tutoriels rédigés

10 commentaires

I just upgraded my 2544 base model iMac (2.7 i5, 8gb ram, 5400 rpm HDD) with all possible options: 3.1 i7 3770s CPU, 16gb ram and a Samsung EVO 850 SSD. The upgrades all worked perfectly, and were made possible for an amateur such as myself thanks to these amazingly detailed and well photographed instruction guides. I can't tell you how helpful they were to me, and just wanted to thank you and share my success. I am an amateur with no significant experience at all with computers, so I wanted to encourage anyone who is hesitant to get the right tools for the job and get to it! Thanks again!

dtfreelancevideo - Réponse

What are the compatible CPUs? Is the 3770s the highest option or is it possible to upgrade to an even faster CPU used in 27in models?

Thanks.

s m - Réponse

The i7-3770s is the max. for the 21,5" 2012 late iMac, because of the thermal design.

Thanks iFixit for providing this excellent guide!

opeter1 - Réponse

Hello,

thank you for this great guide.

which other CPU could I use to upgrade from 2,7 Ghz i5 CPU?

Is an i7-3770 also possible or will he get too hot? (I am asking, because I cannot find any i7-3770s for under 300€)

thank you

robert - Réponse

Use Core i7-3770 3.4Ghz (70€ eBay ) (not 3770s) + HyperX Impact  16Gb 1833Mhz 70€ + SSD Samsung 1TB QVO (trim enable) 95€ - all good, without issue. Same TDP have i7 - 3770K iMAC 2012 now have same power as basic iMac 2019. I’m happy. https://browser.geekbench.com/v4/cpu/130...

Vadim Rotari - Réponse

Did you put just 1 Hyper x impact of 16gb or it is capable of 2 X16

paviliondv5520 -

now use 3770? 3770k?

banga77 -

I just tried all the upgrades today, Samsung EVO SSD, 16 GB of RAM, and 3770s i7 processor… and the computer doesn’t turn on, only the fan turns on :(

i’m pretty sure i followed the guide, and this is not the first time i crack into a computer, any hints as to easy stuff or what might be happening?

Wilford McGee - Réponse

so it turned out my cpu was just improperly re-seated, so i pulled it all apart again, re-seated the cpu in the socket, put it all back together, et voila, good as grapes.

next step, seeing if a de-lidded xeon processor might work… :)

Wilford McGee -

Thank you for such a well written and photographed set of instructions. I’ve upgraded from an i5 2.7 Mhz to an i7-3770S 3.1 MHz , increased RAM to 16 GB and replaced the hard disk with a Crucial BX500 1TB SSD. Everything worked first time. Only issue I had was dropping the smallest screw that holds the fan exhaust while re-inserting it, but managed to grab it with tweezers. Well worthwhile doing, and not too difficult, took me about an hour to complete. Thank you again

Norman Hitch - Réponse

Ajouter un commentaire

Nombre de vues :

Dernières 24 heures : 4

7 derniers jours : 56

30 derniers jours : 173

Total : 19,435