Aller au contenu principal

Changement bandes adhésives iMac Intel 21,5" écran Retina 4K (2017)

Ce dont vous avez besoin

  1. Changement bandes adhésives iMac Intel 21,5" écran Retina 4K (2017), Poser la cale de maintien pour iMac: étape 1, image 1 de 1
    • Lorsque la charnière n'est pas coincée, l'iMac est instable et difficile à manipuler. Stabilisez-le avec une cale de maintien pour iMac.

    • Si vous utilisez la cale de maintien iFixit en carton, consultez ces instructions pour l'assembler.

    • Si vous n'avez pas de cale de maintien pour iMac, prenez toutes vos précautions. L'écran risque facilement de tomber et de se casser si l'iMac bouge de façon imprévue.

  2. Changement bandes adhésives iMac Intel 21,5" écran Retina 4K (2017), Ôter les résidus d'adhésif: étape 2, image 1 de 2 Changement bandes adhésives iMac Intel 21,5" écran Retina 4K (2017), Ôter les résidus d'adhésif: étape 2, image 2 de 2
    • Avant de poser les nouvelles bandes, enlevez tous les résidus d'adhésif du périmètre du boîtier arrière.

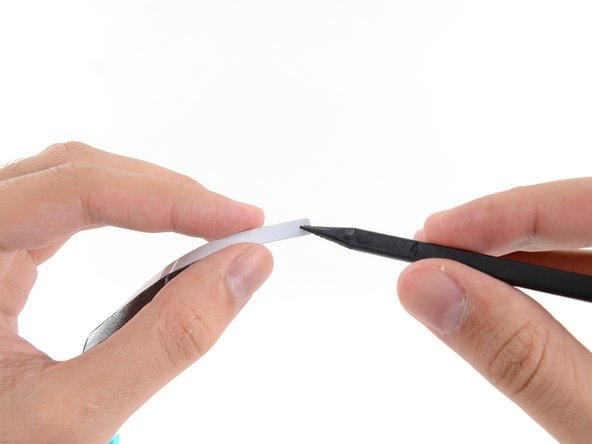
    • Si vous réutilisez votre ancien écran, vous devez aussi ôter les restes d'adhésif au dos de l'écran.

    • Décollez les vieux morceaux d'adhésif avec une pincette ou vos doigts. Décollez-les en commençant en bas et en tirant vers le haut de l'appareil.

    • Une fois que les résidus sont décollés, nettoyez soigneusement les zones d'adhérence avec de l'alcool isopropylique à haute concentration (90 % ou plus) et un chiffon non pelucheux. Frottez toujours dans la même direction.

    • Ne sautez pas cette étape, sinon les bandes adhésives risquent de ne pas adhérer correctement et l'écran de tomber de votre iMac.

    The aluminum frame have a plastic zone. Could the isopropyl alcohol damage the plastic surface?

    Fer Triva - Réponse

    Hello! Isopropyl alcohol should not damage the plastic surface.

    Arthur Shi -

    It’s not clear if you’re supposed to remove the black strips under the adhesives from the screen. Sometimes they come off when removing the main adhesives, but they seem to be two separate layers.

    online - Réponse

    Only the adhesive should be removed—the black strips underneath them should stay in place.

    Arthur Shi -

    “Only the adhesive should be removed—the black strips underneath them should stay in place.”

    By fault I’ve removed the black strips, now there is a gap between the glass and the aluminum frame in the bottom.

    the display is perfectly pasted, it’s only a matter of appearance…

    If I open the computer again, what kind of adhesive tape (caption tape?) could I use to eliminate the gap between the glass and the frame?

    Or it’s better to let it go…

    Thanks for your support

    Massimiliano Nannetti - Réponse

    Hi Massimiliano ,

    You should be fine. The bottom edge doesn’t have black strips. It should be bare metal. However, there shouldn’t be any gaps between the glass and the frame. Make sure that the adhesive is fully adhered on the bottom edge.

    Arthur Shi -

    Hi Arthur,

    my English is not perfect…

    I would mean that I removed all the black strips under the adhesives on the screen; so I believe that the glass has become too thin compared to the bottom aluminium frame.

    I thought to open the Mac again and put some black strips to increase the thickness of the glass screen but I don’t know what kind of tape I should use (Kapton or other?).

    And then I will put a new set of ifixit adhesives strips.

    Maybe it’s a waste of time… it’ s only an aesthetic matter

    Thanks again

    Massimiliano Nannetti - Réponse

    Thanks for the clarification. Since there is always a chance to crack the screen glass when cutting the adhesive, I’d suggest not to open up the iMac again. However, if you do open it, I suggest using Tesa tape.

    Arthur Shi -

    Thanks Arthur,

    I will follow your suggestion… I will not open again my computer…

    Now it works very well and fast.

    Massimiliano Nannetti - Réponse

    So, the bit about the adhesive strips really needs to be clarified. Nowhere in the instructions is there talk about multiple layers of adhesive, one that should be removed and one that should remain. And looking at the pictures further on, clearly the wider sections where the adhesive go are completely clean of any black strips. However, on the screen side, I’ve noted that indeed there are two layers, at least on the top. And removing both layers leads to the adhesive *not* really taking hold and the screens falling out. Really wish this had been clearer. I’ve helped dozens of people upgrade their iMac but after the first time that I had to replace a screen due to it falling and breaking, I’ve been using clear strong adhesive tape externally on the corners to ensure that the screen stays in place. Ugly, but better than the risk.

    David - Réponse

    I’m putting in an SSD, don’t have any strips. Would super glue work?

    natfrey - Réponse

    no! don't do that. if for any reason in the future you need to open it up again, you will only destroy your screen. you can get strips really cheap on Amazon.

    David -

    I too started removing the second layer of adhesive strips before reading these comments. PLEASE update the article to reflect that the other black strips should stay!

    Mark Sandell - Réponse

  3. Changement bandes adhésives iMac Intel 21,5" écran Retina 4K (2017): étape 3, image 1 de 2 Changement bandes adhésives iMac Intel 21,5" écran Retina 4K (2017): étape 3, image 2 de 2
    • La bande adhésive étiquetée 4R devrait inclure une encoche prédécoupée pour le microphone.

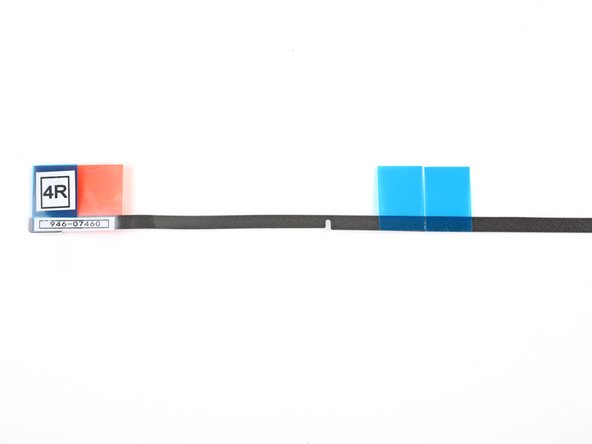
    • Si votre bande 4R n'a pas d'encoche, consultez ce tutoriel à la place.

    As far as I can tell, this model still had the mic at the top near the webcam, not at the bottom, so this notch is not needed for this model (2014 21.5” iMac A1418)

    Neddy - Réponse

  4. Changement bandes adhésives iMac Intel 21,5" écran Retina 4K (2017): étape 4, image 1 de 2 Changement bandes adhésives iMac Intel 21,5" écran Retina 4K (2017): étape 4, image 2 de 2
    • Disposez les bandes adhésives devant vous afin de ne pas en mettre une au mauvais endroit :

    • Bande 01 en haut à gauche

    • Bande 02 en haut à droite

    • Bande 03 tout à droite

    • Bande 4R en bas à droite, côté foncé vers le haut

    • Bande 4L en bas à gauche, côté foncé vers le haut

    • Bande 05 tout à gauche

  5. Changement bandes adhésives iMac Intel 21,5" écran Retina 4K (2017), Décoller le film de la première bande: étape 5, image 1 de 3 Changement bandes adhésives iMac Intel 21,5" écran Retina 4K (2017), Décoller le film de la première bande: étape 5, image 2 de 3 Changement bandes adhésives iMac Intel 21,5" écran Retina 4K (2017), Décoller le film de la première bande: étape 5, image 3 de 3
    • Commencez par la bande 03 qui se pose le long du bord droit du boîtier arrière.

    • Avant de décoller quoi que ce soit, alignez la bande le long du châssis de l'iMac pour vous faire une idée de son emplacement.

    • Saisissez la languette bleue et décollez le petit morceau de film qui protège la colle au dos de la bande.

  6. Changement bandes adhésives iMac Intel 21,5" écran Retina 4K (2017), Poser la première bande adhésive: étape 6, image 1 de 2 Changement bandes adhésives iMac Intel 21,5" écran Retina 4K (2017), Poser la première bande adhésive: étape 6, image 2 de 2
    • Insérez la pointe d'une spatule (spudger) dans le trou au bout de la bande, là où vous venez de retirer le film. Insérez votre spatule du côté encore recouvert d'un film de protection blanc.

  7. Changement bandes adhésives iMac Intel 21,5" écran Retina 4K (2017): étape 7, image 1 de 3 Changement bandes adhésives iMac Intel 21,5" écran Retina 4K (2017): étape 7, image 2 de 3 Changement bandes adhésives iMac Intel 21,5" écran Retina 4K (2017): étape 7, image 3 de 3
    • Puis mettez la pointe de la spatule dans le trou correspondant du châssis de l'iMac.

    • Servez-vous du trou et de la spatule pour coincer la bande adhésive, alignez cette dernière le long du bord droit, tirez dessus pour qu'elle soit bien tendue et collez-la au châssis.

  8. Changement bandes adhésives iMac Intel 21,5" écran Retina 4K (2017): étape 8, image 1 de 2 Changement bandes adhésives iMac Intel 21,5" écran Retina 4K (2017): étape 8, image 2 de 2
    • Une fois que vous avez collé la partie inférieure de la bande adhésive, décollez le reste du film adhésif au dos de la bande.

    • Si la partie inférieure n'est pas alignée correctement, vous pouvez la décoller soigneusement, puis la recoller au bon endroit avant de décoller le reste du film de protection. Veillez à utiliser la pointe de la spatule pour coincer la partie supérieure.

  9. Changement bandes adhésives iMac Intel 21,5" écran Retina 4K (2017): étape 9, image 1 de 2 Changement bandes adhésives iMac Intel 21,5" écran Retina 4K (2017): étape 9, image 2 de 2
    • Alignez la partie supérieure de la bande le long du bord droit du boîtier arrière et collez-la.

  10. Changement bandes adhésives iMac Intel 21,5" écran Retina 4K (2017): étape 10, image 1 de 2 Changement bandes adhésives iMac Intel 21,5" écran Retina 4K (2017): étape 10, image 2 de 2
    • Lissez la bande avec votre doigt. Vérifiez qu'elle est bien alignée avec le bord droit du châssis et qu'elle ne fait pas de plis.

    • Ne décollez pas encore l'autre film adhésif de protection.

  11. Changement bandes adhésives iMac Intel 21,5" écran Retina 4K (2017), Poser les autres bandes adhésives: étape 11, image 1 de 1
    • Progressez dans le sens inverse des aiguilles d'une montre autour de votre iMac en collant trois bandes de la même façon :

    • Bande 02 en haut à droite

    • Bande 01 en haut à gauche

    • Bande 05 tout à gauche

  12. Changement bandes adhésives iMac Intel 21,5" écran Retina 4K (2017), Poser les bandes inférieures: étape 12, image 1 de 3 Changement bandes adhésives iMac Intel 21,5" écran Retina 4K (2017), Poser les bandes inférieures: étape 12, image 2 de 3 Changement bandes adhésives iMac Intel 21,5" écran Retina 4K (2017), Poser les bandes inférieures: étape 12, image 3 de 3
    • Les étapes suivantes vous montrent comment poser la bande inférieure droite (4R), dont l'encoche doit être alignée avec le microphone.

    • Lisez cette étape et les quatre suivantes avant de vous lancer dans la procédure.

    • Saisissez la languette rouge et tirez dessus pour décoller environ 5 cm du film de protection blanc de la bande.

    These steps instruct you to install the lower strips to the iMac frame first, as that is what Apple instructs their techs to do. If you have an iMac without a microphone hole, you can choose to install the lower strips onto the display first. Peel the blue tab instead of the red to expose the adhesive. Carefully place the adhesive along the bottom edge of the display. The L-bend on the adhesive should match the display contours.

    Arthur Shi - Réponse

    i have no microphone hole - which is good . . . because the 4R and 4L stips must be labelled incorrectly as the L’s are on the wrong side. Also the strips don’t completely cover the bottom. And there are no holes in these strips making placement less secure. Someone certainly goofed. (Reckon I’ll use snipped off L’s to cover the open space.

    George Guess - Réponse

    Ah, the L strips don’t overlap - so they’re long enuf, but they are still reversed.

    George Guess - Réponse

    Die Löcher in den Klebestreifen passen nicht (mehr) zu den Löchern im Rahmen. Ich habe mich an den breiten Stellen orientiert und die Klebestreifen daran ausgerichtet. Das ging besser.

    The holes in the adhesive strips no longer match the holes in the frame. I oriented myself towards the wide areas and aligned the adhesive strips with them. That worked better.

    Stefan - Réponse

  13. Changement bandes adhésives iMac Intel 21,5" écran Retina 4K (2017): étape 13, image 1 de 3 Changement bandes adhésives iMac Intel 21,5" écran Retina 4K (2017): étape 13, image 2 de 3 Changement bandes adhésives iMac Intel 21,5" écran Retina 4K (2017): étape 13, image 3 de 3
    • Repliez le morceau de film de protection décollé et marquez le pli avec vos doigts.

    • Vous aurez ainsi décollé environ 5 cm d'adhésif et la languette rouge ne vous gênera pas au cours des étapes suivantes.

  14. Changement bandes adhésives iMac Intel 21,5" écran Retina 4K (2017): étape 14, image 1 de 3 Changement bandes adhésives iMac Intel 21,5" écran Retina 4K (2017): étape 14, image 2 de 3 Changement bandes adhésives iMac Intel 21,5" écran Retina 4K (2017): étape 14, image 3 de 3
    • Le trou du microphone se trouve au milieu et est flanqué de deux trous plus gros.

    • Alignez la bande adhésive le long du bord inférieur en positionnant l'encoche du microphone au-dessus de son trou.

    • Si votre iMac n'a pas de trou de microphone, alignez l'extrémité droite de la bande de façon que la partie en forme de L se trouve à côté de la bande adhésive verticale droite, mais sans la recouvrir.

    • L'adhésif se déchire facilement. Faites attention à ne pas tirer trop fort sur la bande.

    • Une fois que vous avez aligné la bande, appliquez-en soigneusement la partie gauche sur l'iMac pour conserver l'alignement.

    The strips that I received from OWC do not have a notch cut out for the microphone. The instructions advise you, for 2017 and later 21.5” iMacs, to cut about 2 inches off from the left side of the strip so you do not cover the microphone hole.

    Peter Hillman - Réponse

    As far as the remaining 2 inches I cut off, I snipped off a little more on the right side to leave a small gap for the microphone and placed that small remaining part in the center where it should have been if there was no microphone, just to complete the adhesive.

    Peter Hillman - Réponse

    I have done quite a few of these now. It is easier to apply the bottom strips to the Display, rather than the housing. With the Red tabs folded at 90 degrees to the adhesive. You can then remove these tabs with the display kind in place, secured by painters tape on the out side before closing it up.

    Charlie Nancarrow - Réponse

    Don't make the mistake i just did - if you want to cut a notch, cut the BOTTOM 2/3rds section of the strip, not the top! :P

    Also, here's a some pics of the mic location in the 2017 retina version from iFIXit: Muffled Microphone - iMac 21.5" (mid 2017) - Following Adhesive Strips.

    Philip Sedlmair - Réponse

  15. Changement bandes adhésives iMac Intel 21,5" écran Retina 4K (2017): étape 15, image 1 de 3 Changement bandes adhésives iMac Intel 21,5" écran Retina 4K (2017): étape 15, image 2 de 3 Changement bandes adhésives iMac Intel 21,5" écran Retina 4K (2017): étape 15, image 3 de 3
    • Finissez de décoller le film de protection blanc derrière la bande.

  16. Changement bandes adhésives iMac Intel 21,5" écran Retina 4K (2017): étape 16, image 1 de 3 Changement bandes adhésives iMac Intel 21,5" écran Retina 4K (2017): étape 16, image 2 de 3 Changement bandes adhésives iMac Intel 21,5" écran Retina 4K (2017): étape 16, image 3 de 3
    • Lissez la bande de gauche à droite avec votre doigt pour la faire adhérer à l'iMac en vous assurant qu'elle est bien plate et ne fait pas de plis.

  17. Changement bandes adhésives iMac Intel 21,5" écran Retina 4K (2017): étape 17, image 1 de 3 Changement bandes adhésives iMac Intel 21,5" écran Retina 4K (2017): étape 17, image 2 de 3 Changement bandes adhésives iMac Intel 21,5" écran Retina 4K (2017): étape 17, image 3 de 3
    • Répétez les étapes précédentes pour poser la bande 4L le long du bord inférieur gauche de l'iMac.

    • Positionnez la bande 4L de façon que la partie en forme de L soit à côté de la bande adhésive gauche, mais sans la recouvrir.

  18. Changement bandes adhésives iMac Intel 21,5" écran Retina 4K (2017), Poser l'écran: étape 18, image 1 de 2 Changement bandes adhésives iMac Intel 21,5" écran Retina 4K (2017), Poser l'écran: étape 18, image 2 de 2
    • Posez délicatement l'écran sur l'iMac et alignez-le soigneusement.

    In my experience, it is easier to lay the Mac flat on its back, especially if you do not have a wedge, because the display will tilt up and down and you do not want that happening. With the Mac on its back, I removed all the front adhesive strips and then angled the display (not a big angle) against the chin making sure it was even on both sides. Then reconnect the video cables and gently bring the display down into the proper position. Step 23 below seems too much of a hassle to try and get the bottom adhesive strips out while the display is resting on them, and taping the bottom of the display in Step 19 also seems to be a hassle.

    Peter Hillman - Réponse

  19. Changement bandes adhésives iMac Intel 21,5" écran Retina 4K (2017): étape 19, image 1 de 2 Changement bandes adhésives iMac Intel 21,5" écran Retina 4K (2017): étape 19, image 2 de 2
    • Fixez temporairement le bord inférieur de l'écran au châssis de l'iMac à l'aide de ruban de masquage ou de peintre.

    • Le ruban adhésif garde l'alignement de l'écran tout en vous permettant d'ouvrir le bord supérieur et d'accéder aux nappes de l'écran.

    • Ne repliez pas le ruban derrière l'écran de l'iMac, ou vous pourriez briser l'écran lorsque vous connecterez les nappes.

    Noooo!! I followed this step and promptly cracked my screen!!!! You need to be extremely careful NOT to wrap the tape around the back of the computer. These images make it look like it's wrapped around, but if you do that, you won't be able to lift the screen at all to attach the display cables. Why?!!!!!

    Mark Sandell - Réponse

    Oh no! I'm so sorry to hear this! Thank you for sharing your experience—I'm going to add a warning into the step.

    Arthur Shi -

  20. Changement bandes adhésives iMac Intel 21,5" écran Retina 4K (2017), Tester l'écran: étape 20, image 1 de 2 Changement bandes adhésives iMac Intel 21,5" écran Retina 4K (2017), Tester l'écran: étape 20, image 2 de 2
    • Voici venu le bon moment pour tester votre réparation et vérifier que votre iMac est fonctionnel avant de le refermer. Consultez les trois étapes suivantes pour reconnecter temporairement les nappes de l'écran et redémarrer votre iMac avant de retirer les films de protection des bandes adhésives.

    • Si vous avez déjà vérifié que votre iMac est opérationnel et que vous êtes prêt à le sceller de nouveau, sautez l'étape suivante.

    • Insérez la nappe d'alimentation de l'écran dans sa prise sur la carte mère.

    I am powering the unit back up to test all is working. Screen is black but fan is running loud. I’ve decoupled the power and confirmed both the display cables are connected. Note - I replaced both the HDD with a SSD as well as upgraded the RAM from 8GB to 16GB.

    Neil Harfert - Réponse

  21. Changement bandes adhésives iMac Intel 21,5" écran Retina 4K (2017): étape 21, image 1 de 3 Changement bandes adhésives iMac Intel 21,5" écran Retina 4K (2017): étape 21, image 2 de 3 Changement bandes adhésives iMac Intel 21,5" écran Retina 4K (2017): étape 21, image 3 de 3
    • Prenez une pincette ou vos doigts pour insérer délicatement le connecteur de la nappe de données de l'écran dans sa prise sur la carte mère.

    • Assurez-vous de l'enfoncer directement et en entier dans la prise.

    • Fixez le clapet de retenue sur la nappe de données de l'écran en le retournant en direction de la carte mère.

    While the previous step refers to “cables,” plural, this step suggests that only the display cable needs to be reinstalled in order to test working order. In my experience (iMac 21-1/2" Retina 4K Display, late 2015), I found that I had to also reconnect the camera/microphone cable in order for the screen to work. [6/7/21]

    Gary Heurich - Réponse

  22. Changement bandes adhésives iMac Intel 21,5" écran Retina 4K (2017): étape 22, image 1 de 2 Changement bandes adhésives iMac Intel 21,5" écran Retina 4K (2017): étape 22, image 2 de 2
    • Posez l'écran sur le boîtier arrière de l'iMac.

    • Branchez votre ordinateur, allumez-le et testez s'il fonctionne avant de recoller l'écran pour de bon. Pensez à vérifier la fonctionnalité de tous les composants que vous avez pu retirer ou débrancher.

    • Quand vous avez fini, éteignez l'iMac et débranchez le cordon d'alimentation avant de continuer.

    At this point I tested everything to make sure it worked, including the microphone. It was a bit muffled so I poked it with a pin to try and clear it. This was incredibly stupid because (a) the muffling was due to the backing which I was about to remove from the strip (b) poking with a pin broke the microphone.

    I’m not going to buy a new microphone (£72 apparently) and a new set of strips, so I’ll get an external USB microphone instead.

    But to anyone else, if the microphone sound is muffled, don’t worry!

    rjbusenet - Réponse

  23. Changement bandes adhésives iMac Intel 21,5" écran Retina 4K (2017), Sceller l'iMac: étape 23, image 1 de 3 Changement bandes adhésives iMac Intel 21,5" écran Retina 4K (2017), Sceller l'iMac: étape 23, image 2 de 3 Changement bandes adhésives iMac Intel 21,5" écran Retina 4K (2017), Sceller l'iMac: étape 23, image 3 de 3
    • Vérifiez bien que votre iMac est éteint et débranché avant de continuer.

    • Une fois que le bon fonctionnement de votre iMac est confirmé, déconnectez les nappes d'écran et abaissez soigneusement l'écran vers l'avant.

    • Décollez le film de chacune des deux bandes adhésives inférieures en attrapant les languettes bleues par le haut avec une pincette, puis en tirant dessus à la verticale.

  24. Changement bandes adhésives iMac Intel 21,5" écran Retina 4K (2017), Reconnecter les nappes de l'écran: étape 24, image 1 de 3 Changement bandes adhésives iMac Intel 21,5" écran Retina 4K (2017), Reconnecter les nappes de l'écran: étape 24, image 2 de 3 Changement bandes adhésives iMac Intel 21,5" écran Retina 4K (2017), Reconnecter les nappes de l'écran: étape 24, image 3 de 3
    • Rebranchez les nappes d'alimentation et de données de l'écran pour la dernière fois.

    • Rappelez-vous de fixer le clapet de retenue de la nappe de données de l'écran.

  25. Changement bandes adhésives iMac Intel 21,5" écran Retina 4K (2017), Finir de décoller les films de protection: étape 25, image 1 de 3 Changement bandes adhésives iMac Intel 21,5" écran Retina 4K (2017), Finir de décoller les films de protection: étape 25, image 2 de 3 Changement bandes adhésives iMac Intel 21,5" écran Retina 4K (2017), Finir de décoller les films de protection: étape 25, image 3 de 3
    Outil utilisé dans cette étape :
    Microfiber Cleaning Cloths
    $3.99
    J'achète
    • Vérifiez que la vitre juste en face de la webcam est bien exempte de poussières et autres saletés. Si nécessaire, essuyez-la avec un chiffon en microfibre avant de refermer l'écran.

    • Maintenez l'écran d'une main ou inclinez-le légèrement contre le boîtier de l'iMac pendant que vous décollez les films de protection au cours des étapes suivantes.

  26. Changement bandes adhésives iMac Intel 21,5" écran Retina 4K (2017): étape 26, image 1 de 3 Changement bandes adhésives iMac Intel 21,5" écran Retina 4K (2017): étape 26, image 2 de 3 Changement bandes adhésives iMac Intel 21,5" écran Retina 4K (2017): étape 26, image 3 de 3
    • Enlevez le film de protection de la bande 01 en tirant à la verticale sur sa languette.

  27. Changement bandes adhésives iMac Intel 21,5" écran Retina 4K (2017): étape 27, image 1 de 2 Changement bandes adhésives iMac Intel 21,5" écran Retina 4K (2017): étape 27, image 2 de 2
    • Décollez l'autre partie du film de protection de la bande 01.

  28. Changement bandes adhésives iMac Intel 21,5" écran Retina 4K (2017): étape 28, image 1 de 1
    • Répétez les étapes précédentes pour ôter les films de protection des autres bandes adhésives.

  29. Changement bandes adhésives iMac Intel 21,5" écran Retina 4K (2017): étape 29, image 1 de 3 Changement bandes adhésives iMac Intel 21,5" écran Retina 4K (2017): étape 29, image 2 de 3 Changement bandes adhésives iMac Intel 21,5" écran Retina 4K (2017): étape 29, image 3 de 3
    • Pour que l'adhésif adhère bien, posez soigneusement l'iMac sur son dos (l'écran vers le haut) et appuyez avec précaution, mais fermement, sur les quatre bords de l'écran.

    • Décollez le ruban adhésif qui fixait l'écran au boîtier arrière.

    • Au bout de 24 heures, vérifiez que l'écran de l'iMac ne s'est relâché sur aucun des côtés.

    Yo lo pongo sobre una manta con la pantalla apoyada sobre la manta.Pongo trapos o papel de cocina doblado alrededor de la pantalla y lo sujeto con pinzas de tender ropa.Lo dejo así 24 horas y queda perfecto. Saludos y gracias por el tutorial.

    JAIME GARCIA MARTINEZ - Réponse

Conclusion

Déposez vos déchets électroniques dans un point de recyclage certifié.

Votre réparation iMac Intel 21,5" écran Retina 4K (2017) ne s’est pas déroulée comme prévu ? Consultez notre Forum pour obtenir de l’aide.

45 autres ont terminé cette réparation.

Merci à ces traducteurs :

en fr

100%

Annika Faelker nous aide à réparer le monde ! Vous voulez contribuer ?
Commencez à traduire ›

Adam O'Camb

Membre depuis le 04/11/15

196 143 Réputation

416 tutoriels rédigés

10 commentaires

Merci pour l’indication du micro en bas…..

Picard - Réponse

Sorry ifixit but you made a big mistake! if you install the stripes like you the microphone quality will be very bad because the mic must be covered AROUND the holes. otherwise the mic is not shield from the inside and your voice is bad!

Simon - Réponse

HI,

How did you solve it?

Rafael -

I have spotlights bleeding from the bottom of the screen after opening. Could this be a tape issue on the screen itself?

Adam Dziuba - Réponse

Correction it’s a stage light issue for the post above. Any recs?

Adam Dziuba - Réponse

Hello Adam. Did you solve your problem? I just found a Youtube video about that. It is some kind of “dust” between the display and the glass screen and needs to be cleaned very carefully .

Rafael -

First time i see this thing about the microphone, i did the cutout.

And microphone doesn’t work anymore.

francoisvdc - Réponse

These strips are "top notch" so to speak.

Peter H - Réponse

Very good explanations, excellent !

JM Mac User - Réponse

Ajouter un commentaire

Nombre de vues :

Dernières 24 heures : 8

7 derniers jours : 49

30 derniers jours : 265

Total : 25,332