Il est possible que cette traduction ne reflète pas les dernières mises à jour du tutoriel source. Aidez à mettre à jour la traduction ou bien consultez le tutoriel source.
Introduction
Retirez le cadre avant pour accéder aux pièces internes de votre iMac.
Ce dont vous avez besoin
-
-
Desserrez l'unique vis Phillips au centre de la trappe d'accès.
-
Retirez la trappe d'accès de votre iMac.
-
-
-
Collez une ventouse sur un angle de la vitre et une autre ventouse sur l'angle opposé.
Save $15 dollars and use a plunger. Works perfectly.
Perhaps not so elegant but equally effective without any adverse effects to either... try a vacuum cleaner.
The same kind of suction cups are available from Harbor Freight Tools (Item # 62715) for $2.99 each or $5.98/pair (plus sales tax).
-
-
-
-
Soulevez délicatement la vitre de l'iMac.
The glass panel is somewhat thin and should come away quite easily without much force so be gentle.
To reinstall the glass, I lined up the bottom edge first, then pivoted the top in. The magnets pulled it quickly into place.
-
-
-
Retirez les 12 vis suivantes par lesquelles le cadre avant est fixé au boîtier arrière :
-
Huit vis Torx T8 13 mm.
-
Quatre vis Torx T8 25 mm.
I only had two 25 mm T8 Torx on my model. (The two inner orange circles as shown in the diagram.)
I don't know if this is different but i am in the process of disassembling a 24' imac emc: 2134. i have only: (2) 25 mm T8 screws the inner two on the bottom of the screen. I have (4) 13 mm t8 screws the outer most holes on the bottom and the 2 holes on the right side of the monitor above the drive entrance and the remaining holes are (6) 11 mm t8 screws
I have the same screws as ccarter on a 2211 except on the bottom row there are only 4 screws total, the longer ones go in the middle two.
My 2211 has a different screw configuration.
2 - 32mm long screws towards the middle of the bottom edge
4 - 18mm long screws (2 at the corners of the bottom edge and 2 along the right edge)
6 - 13mm screws along top and left edges
Mine is the same — two very long, four medium, and six short. Also my T9 worked better than my T8 which was a bit loose.
I have the same screws as Christian. The key is to make sure all screws are flush to the surface, so that the glass can be held up by the magnets.
On mine, for the red circles, I had the six 13mm Torx plus two 25mm Torx. It's not indicated in the picture here, but the 25mm Torx went on either side of the optical drive.
I marked next to each hole with a pencil "S, M or L" to indicate which length screw goes where. No guess work on reassembly.
-
-
-
Soulevez avec précaution le bord supérieur du cadre avant hors du boîtier arrière. Vous pouvez, pour faciliter l'opération, appuyer très délicatement sur les angles de l'écran.
-
Après avoir libéré le bord supérieur du cadre avant, faites pivoter ce dernier vers le support et sortez-le du boîtier arrière.
Looking at the meaning of the LEDS
i've got 3 LEDS on but i don't get a chime or the screen.
i am going to check the inverter voltages but can only find info for the 20" macs iMac Intel 20" EMC 2210 Power Supply Output Voltage Test
does anyone know where i can get info for the 24"
i have the same thing, 3 LEDs on but no chime and no screen.
what is the fix? and problem?
Bill -
-
-
-
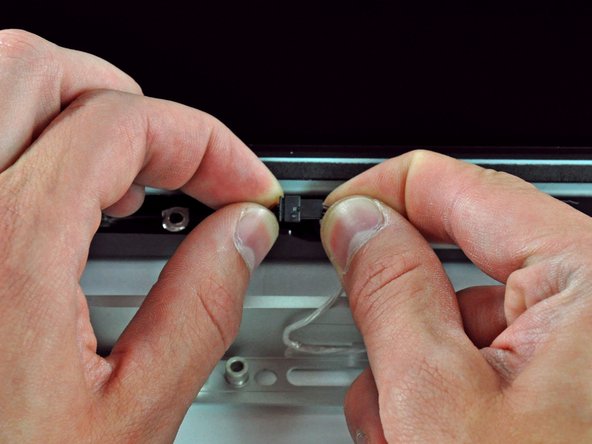
Débranchez le connecteur du câble du microphone, en retirant la bande adhésive si nécessaire.
I also skipped disconnecting the microphone cable. I have a large table and I stacked some books next to the iMac. There was plenty of cable for the bezel to fold nicely over the top of the iMac.
I used the floor instead of a table and left the cable connected.
-


Pour remonter votre appareil, suivez les mêmes instructions dans l'ordre inverse.
Pour remonter votre appareil, suivez les mêmes instructions dans l'ordre inverse.
Annulation : je n'ai pas terminé ce tutoriel.
37 autres ont terminé cette réparation.
Merci à ces traducteurs :
85%

Fabienne Detoc nous aide à réparer le monde ! Vous voulez contribuer ?
Commencez à traduire ›


Un commentaire
Te damos las gracias por tomarte el tiempo de mostrarnos tan útiles consejos, saludos!
PH2 head necessary to remove screw.
airshack - Réponse
Mine was as written, a PH1.
tpivo - Réponse