Introduction
Is your iMac’s stand suddenly unable to support the screen? Did you hear a loud “bang” and your screen dropped all the way down? Then the chances are your iMac’s hinge just gave out. More particularly, one or both of the weak plastic pieces (caps) that hold the spring under tension.
In this guide I describe a quick and dirty way to effectively fix an iMac’s broken hinge, with nothing but a pair of metal washers and some readily available home tools. The end result is probably stronger than the original plastic caps and should hold up for the rest of the iMac’s life.
I own an EMC 2639, 27” iMac , but this fix can probably be applied to similar models that use the same hinge for their stand.
DISCLAIMER! Do not start this repair before acquiring the necessary adhesive strips to put the screen back on the main body after you are done.
Ce dont vous avez besoin
-
-
Firstly, you need to access the iMac's hinge. Find the appropriate disassembly guide for your iMac. I used iFixit's guide for the logic board. You don't need to follow it exactly.
-
Speakers don't need to be removed. You can simply loosen them and carefully move them out of the way, in order to remove the necessary components.
-
The hard drive, logic board, power supply and fan need to be removed.
-
-
-
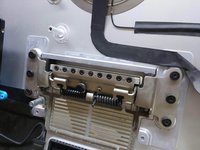
Remove the broken caps. I suggest that you replace them both, even if only one of them has broken off.
-
Take caution while unscrewing the cap's screw, since the spring is under tension. You don't want it flying to your face.
-
-
-
-
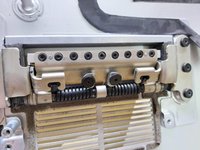
Take an M5 washer and bend a small portion of it at a 90° angle. This will act as a hook that will hold the spring in place, preventing it from slipping.
-
-
-
This step is tricky and you will probably require assistance.
-
You need to bring the screen angle all the way down. This way you'll need to exert less force against the spring, while inserting the screw.
-
Pass the screw through the washer, making sure the bent portion is facing the straight end of the spring.
-
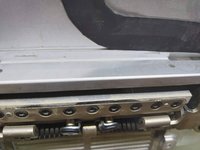
Slowly push the screw towards its threaded base. Mind the washer's orientation and be careful. If you slip, the spring can eject the screw and washer away.
-
Ensure that the screw is positioned straight over the threaded base. You don't want it to start biting its way through. It's gonna ruin the threads and you'll end with a way bigger problem than you started with.
-
Slowly start turning the screw. It's gonna be fairly difficult. Don't stop pushing the screw while screwing, unless you are sure that you've got a couple of full turns .
-
Now you can release the pressure against the screw and simply keep screwing until the washer has successfully secured the spring. Don't over-tighten.
-


To reassemble your device, follow these instructions in reverse order.
To reassemble your device, follow these instructions in reverse order.
Annulation : je n'ai pas terminé ce tutoriel.
5 autres ont terminé cette réparation.

3 commentaires
Great tutorial. This worked for me up until the final screws holding the springs, so I cheated.
Undo the 9 screws holding on the stand. Remove stand. Then undo the 6 screws holding the bracket onto the back. Remove bracket. Now you can get a vise grip or similar and turn the inner end of the spring.