Aller au contenu principal

iMac Intel 27" Retina 5K Display RAM Replacement

Ce dont vous avez besoin

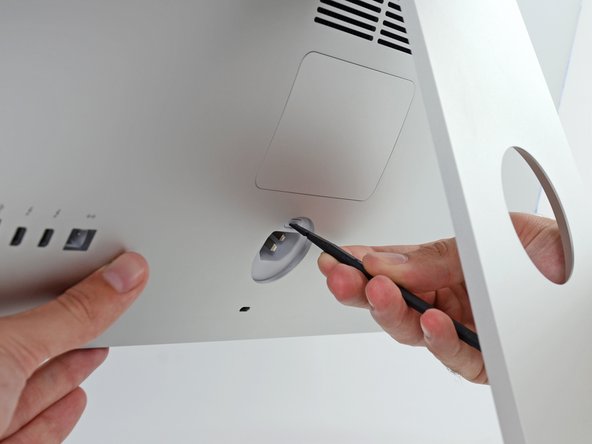
  1. iMac Intel 27" Retina 5K Display RAM Replacement, Open the RAM door: étape 1, image 1 de 2 iMac Intel 27" Retina 5K Display RAM Replacement, Open the RAM door: étape 1, image 2 de 2
    • While holding the display steady, use the flat end of a spudger to press in on the RAM door release button, located just above the power port.

    • You may have to press fairly hard—keep at it until the bottom of the door pops out about 0.25" from the rear of the iMac.

  2. iMac Intel 27" Retina 5K Display RAM Replacement, Remove the RAM door: étape 2, image 1 de 3 iMac Intel 27" Retina 5K Display RAM Replacement, Remove the RAM door: étape 2, image 2 de 3 iMac Intel 27" Retina 5K Display RAM Replacement, Remove the RAM door: étape 2, image 3 de 3
    • Pull the RAM access door off the back of the iMac.

  3. iMac Intel 27" Retina 5K Display RAM Replacement, Unlock the RAM tray: étape 3, image 1 de 3 iMac Intel 27" Retina 5K Display RAM Replacement, Unlock the RAM tray: étape 3, image 2 de 3 iMac Intel 27" Retina 5K Display RAM Replacement, Unlock the RAM tray: étape 3, image 3 de 3
    • The RAM tray is locked into its upright position with two grey tabs.

    • Use your thumbs or index fingers to unlock the tray by pushing the tabs outward, away from the RAM.

    • Pull the tabs out and down, swinging the RAM tray down to a near-horizontal position.

  4. iMac Intel 27" Retina 5K Display RAM Replacement, Remove the RAM: étape 4, image 1 de 3 iMac Intel 27" Retina 5K Display RAM Replacement, Remove the RAM: étape 4, image 2 de 3 iMac Intel 27" Retina 5K Display RAM Replacement, Remove the RAM: étape 4, image 3 de 3
    • Remove a stick of RAM by grabbing it with two hands and pulling straight out of the RAM tray.

    • RAM modules are keyed so that they can only be installed in the proper orientation. Note where the shorter section of contacts is when removing, and reinstalling, your RAM.

    • To install a new module, insert the module into the desired slot in the tray and press it firmly in place. Push the tray back up until it locks in place.

    • The RAM access door is not symmetrical. If it is not flush on both ends, try putting it in the other way.

    • Re-insert the RAM access door back into its place.

Conclusion

Take your e-waste to an R2 or e-Stewards certified recycler.

Repair didn’t go as planned? Try some basic troubleshooting, or ask our Answers community for help.

114 autres ont terminé cette réparation.

Sam Goldheart

Membre depuis le 10/18/12

465 738 Réputation

538 tutoriels rédigés

Équipe

iFixit Membre de l'équipe iFixit

Staff

135 membres

16 767 tutoriels rédigés

22 commentaires

At the end: "To reassemble your device, follow these instructions in reverse and use our adhesive strip replacement guide to reattach the display glass."

This does not make sense for a memory replacement guide.

xiepengpeng - Réponse

I made a few changes to the guide to make it more readable. Thanks for the tip!

Miroslav Djuric -

I am thinking about getting me an iMac 5K but not really interested in overpaying for my RAM - can I access all 4 slots in the newest iMac 5K so I could buy the entry level with 8GB and then upgrade it to 32GB myself?

sdjensen - Réponse

Yes, but make sure they are the same frequency so there won't be any issues. (1867)

vsomme -
Is it possible for 4GB x 2 model to add 8GB x 2 and having 24GB RAM

christmas - Réponse

Ajouter un commentaire

Nombre de vues :

Dernières 24 heures : 31

7 derniers jours : 145

30 derniers jours : 573

Total : 223,207