Cette version peut contenir des modifications incorrectes. Passez au dernier aperçu vérifié.
Ce dont vous avez besoin
-
-
Remplissez une casserole ou une poêle avec suffisamment d'eau pour immerger complètement un iOpener.
-
Faites chauffer l'eau jusqu'à ébullition. Puis éteignez le feu.
-
Placez un iOpener dans l'eau chaude pendant 2 à 3 minutes. Assurez-vous que l'iOpener est complètement immergé dans l'eau.
-
Utilisez des pinces pour extraire l'iOpener chauffé de l'eau chaude.
-
Séchez soigneusement l'iOpener avec une serviette.
-
Votre iOpener est prêt à être utilisé ! Si vous devez réchauffer l'iOpener, portez l'eau à ébullition, éteignez le feu et placez l'iOpener dans l'eau pendant 2 à 3 minutes.
-
-
-
Si la vitre de votre écran est fissurée, limitez la casse et évitez de vous blesser au cours de la réparation en collant de la bande adhésive sur la vitre.
-
Posez des bandes adhésives transparentes se chevauchant sur la vitre de l'iPad jusqu'à ce que toute la surface soit couverte.
-
Faites de votre mieux en suivant le reste des instructions du tutoriel. Toutefois, si la vitre est cassée, elle continuera à se fissurer pendant que vous travaillerez. Vous aurez besoin d'un outil en métal pour mettre les éclats de verre de côté.
-
-
-
Posez l'iOpener à plat sur le bord droit de l'iPad, en le lissant de sorte à assurer un bon contact entre la surface de l'iPad et l'iOpener.
-
Laissez le sac posé sur l'iPad pendant environ 90 secondes avant d'essayer d'ouvrir le panneau frontal.
-
-
-
Il y a un petit espace dans l'anneau adhésif de l'iPad, dans le coin supérieur droit de l'iPad à environ 2,0 pouces (~ 5 cm) du haut de l'iPad. Vous allez exploiter cette faiblesse.
-
Alignez l'outil avec le bouton du silencieux. Insérez la pointe d'un outil d'ouverture en plastique dans l'espace entre la vitre frontale et le joint en plastique. Insérez juste la pointe de l'outil d'ouverture, juste assez pour élargir la fissure.
-
-
-
-
Une fois que vous avez dépassé l'antenne Wi-Fi (à peu près 7 cm à partir du bord droit ou directement à côté du bouton home), réinsérez complètement le médiator.
-
Faites glisser le médiator vers la droite, pour décoller l'adhésif fixant l'antenne Wi-Fi à la vitre frontale.
-
L'antenne est attachée au bas de l'iPad par des vis et un câble. Au cours de cette étape, vous détachez l'antenne de la vitre frontale. Ainsi vous ne risquerez pas d'endommager l'antenne lorsque vous enlèverez le panneau.
-
-
-
Faites glisser le médiator le long du bord supérieur de l'iPad en le tirant légèrement vers l'extérieur pour contourner le support de la caméra avant.
-
L'adhésif est très épais cet endroit et vous devrez forcer un peu. Progressez soigneusement et lentement en veillant à ni glisser, ni vous blesser, ni endommager votre iPad.
-
-
-
Retirez les quatre vis cruciformes de 2,0 mm fixant l'écran LCD à la coque arrière.
-
-
-
Décollez soigneusement le cache en caoutchouc du clip métallique de retenue de la caméra et retirez-le de l'iPad 2.
-
-
Cette étape n’est pas traduite. Aidez à la traduire
-
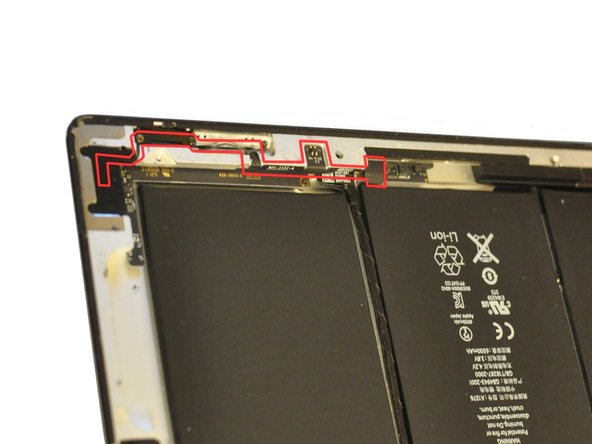
Once the LCD panel and rear camera are removed, you can begin removing the Power, Mute, Volume cable (hereafter called the PMV cable for short).
-
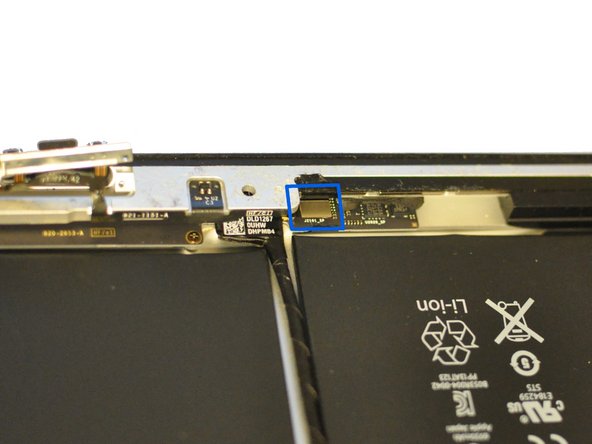
The PMV cable starts near the end of the control board cable that runs between two of the battery units, and runs in a complicated path along the side and corner of the iPad. (see photos 1 and 2)
-
The end of the PMV cable is wrapped in tape. Begin by removing this tape to expose the silver rectangular connector on the end of the cable. (see photo 3)
-
Use a plastic opening tool or small screwdriver to lift free the rectangular connector.
-
-
Cette étape n’est pas traduite. Aidez à la traduire
-
Now you must disassemble the side switches.
-
Remove the 2.1 mm Phillips screw from the volume switch mechanism.
-
Remove the two 5.0 mm Phillips screws from the mute slider mechanism.
-
If you have not already removed the rear camera, do so now.
-
-
Cette étape n’est pas traduite. Aidez à la traduire
-
Remove the two 2.5 mm Phillips screws from the back of the power switch mechanism.
-
You can then push in on the power switch (on the exterior of the iPad) to push the mechanism's internal metal plate loose.
-
You can then peel the PMV cable free from the iPad's case, working backwards from the power switch towards the mute switch.
-
Lift free the small metal frame piece supporting the mute and volume switches.
-
Note: The photo shows the mute and volume switch frame being removed before the rear camera and power switch; this is possible but it's probably best to start with the power switch first.
-
-
Cette étape n’est pas traduite. Aidez à la traduire
-
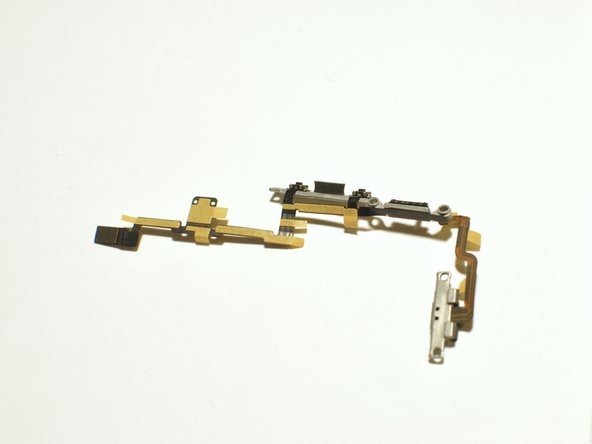
The PMV cable itself is a complicated piece with three integrated buttons and a switch slider.
-
You will need to carefully peel off the old cable free from the ipad frame and the two metal supports (one for the power switch, one for the mute and volume switches).
-
Note that each button is held in place with a tiny bit of adhesive. Use a plastic opening tool or small screwdriver to lift them free.
-
-
Cette étape n’est pas traduite. Aidez à la traduire
-
Now assemble the replacement PMV cable to the two metal brackets.
-
Each button has on its underside two tiny black plastic pegs which fit into holes in the metal frames, to ensure the proper fit. Make sure to line these up properly when attaching the cable to the metal frames. The reassembled cable should look as shown in the figures.
-
Install the new cable working from the power switch back towards the mute and volume switches and then to the cable connector, snaking the PMV cable along its complicated path.
-
The replacement part should have adhesive patches to hold the cable in place.
-
Attaching the rectangular cable connector is tricky as there is little clearance from the edge of the iPad case. It may be helpful to use a plastic opening tool to push it gently until it snaps into place.
-


Annulation : je n'ai pas terminé ce tutoriel.
114 autres ont terminé cette réparation.
6 commentaires
Hi, we have an iPad 2 in for repair and needs a new power button assembly. Thing is the ribbon is different from a standard iPad 2. There are subtle differences in the inside too. It is definitely a genuine iPad, and has same model numbers. Anyone come across this before?
Chris, I have the same problem with power ribbon cable it's not the one everyone is selling, did you manage to find a source who sold the correct part?
David -
Completed this guide thank you. Just want to point out that there are two cables for the iPad 2, making sure that you have the right one is very important. Be very careful around the camera area of the iPad too this is very tricky and there are no pictures of this part, wish I had done some now to upload for others, but I'm sure that I'll have another to do before to long and I will then. One main tip... Don't stick anything down till you've got everything secure as removing the the tape is very tricky once stuck and you don't want to be replacing this again...
Beware of fake versions of this cable 821-1151-A from many suppliers. The Hall Effect magnetic switch will then not work because the printed circuit traces on the cable are incorrect. The fake cable can be identified by an ohmmeter showing the two contacts for the Hall chip farthest from the cable edge to be shorted together.