Introduction
Utilisez ce tutoriel pour retirer et remplacer la batterie de l'iPad Pro 10,5".
Étant donné que certaines étapes de ce tutoriel peuvent vous obliger à laisser la batterie connectée à la carte mère, pour votre sécurité : laissez l'iPad allumé jusqu'à ce que la batterie soit complètement déchargée (l'iPad s'éteint tout seul) avant de suivre ce tutoriel. Une batterie lithium-ion chargée peut prendre feu et/ou exploser si elle est percée accidentellement.
Prévoyez une grande quantité d'alcool isopropylique à haute concentration (>90%) pour faciliter le retrait et le nettoyage des résidus.
Si votre batterie est gonflée, prenez les précautions appropriées.
Attention : la méthode d'isolation de la batterie décrite dans ce tutoriel peut entraîner des dommages irréversibles des broches de la batterie de la carte mère. Si vous choisissez d'isoler la batterie de cette manière, tenez compte de tous les avertissements et travaillez avec une extrême prudence. Si vous décidez de suivre le tutoriel sans isoler la batterie, évitez d'utiliser des outils métalliques, sauf en cas de nécessité absolue (comme pour retirer des vis), afin d'éviter de court-circuiter la batterie et d'endommager les composants fragiles des circuits.
Ce dont vous avez besoin
-
-
Il va peut-être falloir répéter cette procédure afin d'éviter que l'adhésif refroidisse et colle à nouveau.
-
Préparez l'iOpener et placez-le sur le bord inférieur de l'iPad pendant environ deux minutes.
-
-
-
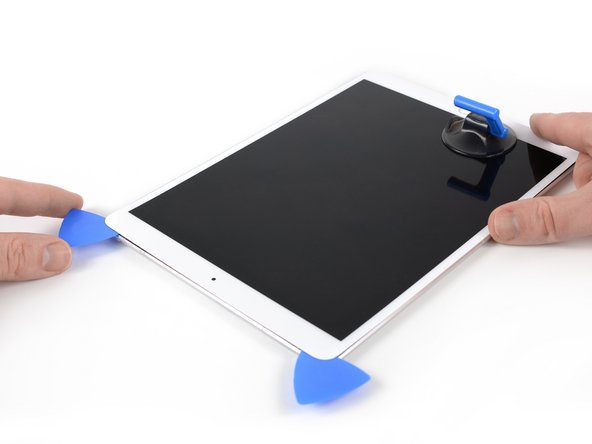
Placez une ventouse près du bouton home de l'iPad et appuyez afin d'adhérer.
-
Si vous voulez utiliser l'Anti-Clamp, un outil que nous avons conçu pour faciliter la procédure d'ouverture, suivez ce tutoriel.
-
Tirez fermement sur la ventouse afin de créer un petit espace entre la coque et l'écran.
-
Une fois que vous avez créé un espace, insérez-y un médiator.
i used a proper suction tile puller (small one from DIY store used to hold bathroom tiles) to lift the screen off after heating around the edge using a heat gun. Be careful - It didn't damage anything. The tiny suction things that come with those iPhone kits are not strong enough for this. The one in picture might be good, but looks similar to the kits ones that have key ring.
The suction cup that comes with the iPad battery replacement is plenty large enough and strong enough.
CAUTION, do not push the picks in more than a the width of the replacement screen adhesive strips. You will damage the $200 screen, maybe break the glass. The screen is multiple layers and the picks can get in-between the layers if you push too far in. I got into trouble at the lower left corner. After getting the screen loose, I found that I only need a 2-3 millimeters on the sides and bottom, and four or five millimeters in the corners.
-
-
-
Tranchez l'adhésif sous l'écran en faisant glisser le médiator le long de l'écran, jusqu'au coin inférieur gauche.
-
Laissez le médiator en place pour éviter que l'adhésif colle à nouveau.
-
-
-
Chauffez le bord gauche de l'iPad pendant deux minutes, ou moins, si l'écran devient trop chaud et que vous ne pouvez plus le toucher sans vous brûlez.
-
Si nécessaire, réchauffez votre iOpener quelques secondes. Faites attention à ne pas trop chauffer l'iOpener, il risquerait d'éclater.
-
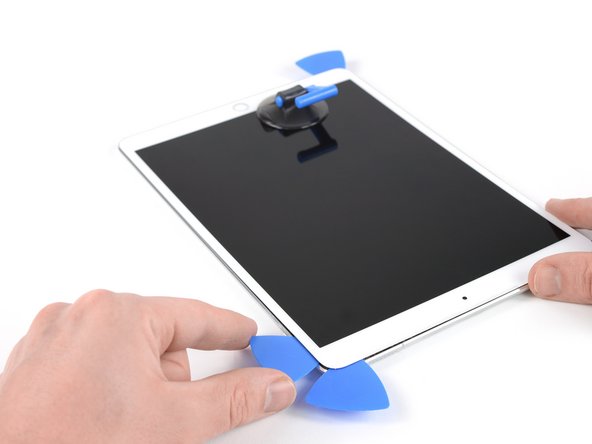
Insérez un autre médiator dans le coin inférieur gauche.
-
Faites glisser le médiator le long du côté gauche afin de décoller l'adhésif.
-
Laissez le médiator en place dans le coin supérieur gauche afin d'éviter que l'adhésif colle à nouveau.
-
-
-
Chauffez le dernier côté (droit) de l'iPad pendant environ deux minutes ou jusqu'à ce qu'il soit légèrement trop chaud au toucher.
-
Insérez le quatrième médiator dans le coin supérieur droit de l'iPad.
-
Faites-le glisser tout le long du côté droit afin de couper l'adhésif.
-
Faites glisser le médiator autour du coin inférieur droit (après l'avoir refait chauffé si nécessaire) et tranchez les restes d'adhésif du côté inférieur de l'iPad. Cependant, arrêtez-vous quand vous atteignez le bouton home.
We must be very careful when we are prying left and right size bezel to peel off the screen as there very little gap between edges and LCD. Slightly inside push can crack LCD. We need to pay full care and raising edges very very slowly.
-
-
-
Insérez un cinquième médiator près de la caméra frontale (mais pas directement dessus).
-
Tournez légèrement le médiator afin de séparer l'écran du reste de l'iPad.
-
Si nécessaire, n'hésitez pas à refaire chauffer et/ou couper l'adhésif qui empêche l'écran de se détacher.
Be very gentle when twisting. My screen broke in this step. I would not twist it but try to remove glue further as there is a aluminium support of the screen in the wide area beneath the light sensors and there is glue on that also preventing in easy lifting the screen. Just be careful not to damage the light sensors and camera.
-
-
-
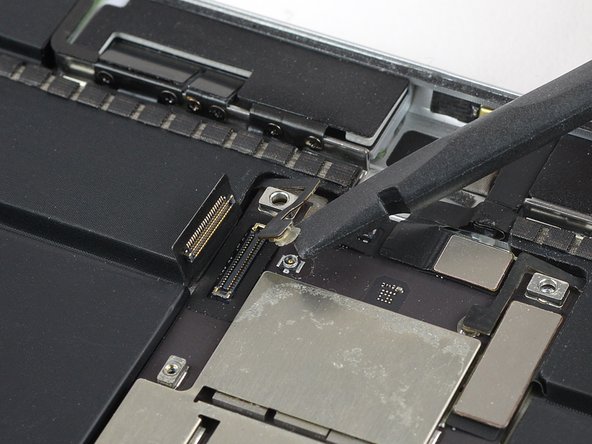
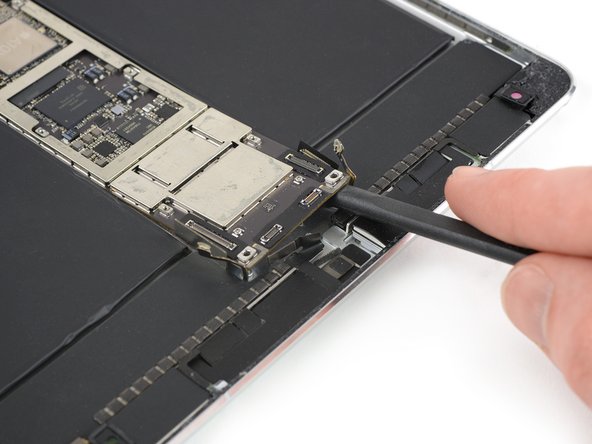
Soulevez l'écran par son bord supérieur et faites-le glisser délicatement vers le haut (vers la caméra frontale et la prise jack), jusqu'à ce que la vis fixant le connecteur d'alimentation de la batterie apparaisse.
How do you go about getting to this battery connector as it is covered by a large metal shield above the logic board, if you do not disconnect the battery you risk frying the back light.
The metal shield is not relevant for this. You can leave it in place or remove it if it comes of. Once the screw of the plate is removed you will be able to lift the print a little bit and put someting between the battery connector and the board connector. The connector is beneath the print. Look further on to see a deck card is used for this.
-
-
This picture looks nothing like my A2152 battery connector. I can’t really tell what is happening here.
-
-
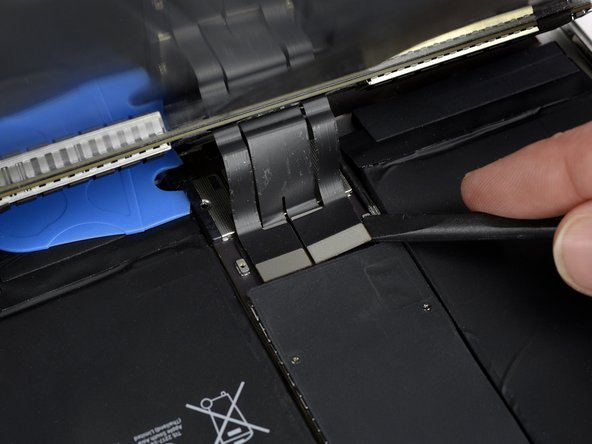
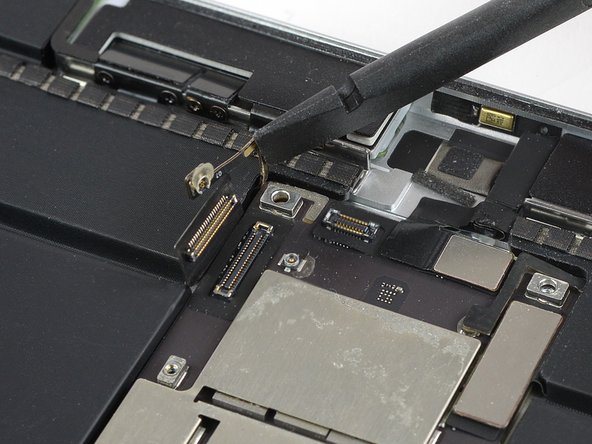
Pour déconnecter la batterie, glissez une dent d'un médiator pour isoler la batterie ou la pointe d'un médiator d'ouverture sous le connecteur d'alimentation de la batterie, afin de vous assurer que le circuit d'alimentation est déconnecté.
-
Laissez le médiator en place pendant que vous effectuez la réparation.
I found it very hard to fit something under the battery power connector. I did not have a battery blocker, so I tried a playing card. I was not able to slide it between the springs. The section of the battery power connector, above the cantilever springs, did not seem to want to give at all, like in the picture above. If other people had success, I would love to hear how.
I didn’t have success either, but i kept myself grounded, and avoided battery contact as much as possible.
I used a playing card cut to shape. I had to make a couple, to try a few times.. It does go in eventually. Not deep, but enough to break connection. You can test by trying to switch on iPad.
It took some time but I was able to get it under the back part and slide it forward.
You must disconnect the battery before plugging the new screen. I think i didn't break the circuit in first attempt and shorted the screen, the result was half of the screen didn't work. I used a playing card. Second attempt was successful with new screen.
I believe I have a good solution to this problem. I was dissatisfied with the thickness of the battery blocker, or even a thin guitar pick, for that matter; both required force and I feared bending the springs or leaving the connection intact.
What worked for me was cutting a small strip of non-conductive, static-proof film (the kind that RAM and other sensitive components come in). There was every reason to trust in its non-conductivity but just to be sure, I used a VOM to test; its resistance was out of the VOMs range, meaning that its conductivity was nil. I used a spudger to gently lift the logic board off of the battery contacts and slid the non-conductive strip in between; went without a hitch.
When reassembling, I laid the strip on the battery contacts, laid the logic board on top, installed it, connected the display panel and gently drew the slip out and installed the battery screw. Worked like a charm.
These are some extremely misleading set of instructions and picture. Much better if you have the battery discharged, so don't need to worry about blocking the connector. But DO NOT force anything in the through the socket and certainly do not try to bend up the soldered cover, as it appears to be happening in the picture. You will break the connector, most likely resulting in ipad shutting down every 3 minutes from the notorious "thermal sensor missing" panic system crash.
-
-
-
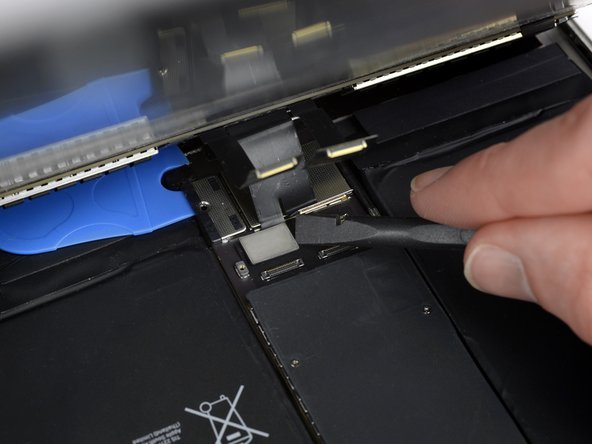
Soulevez lentement l'écran par son bord supérieur, en faisant attention à ne pas endommager les nappes.
-
Enlevez les deux vis cruciformes de 1,3 mm qui maintiennent le cache du connecteur de l'écran.
-
Enlevez le cache du connecteur de l'écran.
Here it is very precocious steps to do. Flx cables to connectors are small in size and we cannot lift the display vertically. Therefore, we may struggle to unscrew the metal shield. We need to use smaller size of philip screw driver or place vertically the display to create enough gap between philip screw driver and the cover bracket. Similarly, when we are replacing new display we need to be carefully connect four flex cable with connectors with logic board.
agree, with re-assembly very tiny screws and awkward positioning, the back two cables pop off if not careful.
I did this step using just the tip of the PH000 screwdriver, it made it much easier to get my hands into the small space, the replacement screen from ifixit had tighter cables that I was not comfortable stretching out to go to a 90* angle to screw back on. Make sure your tip is magnetized for best results :)!
Meaning no disrespect for this excellent guide, I found this photo to be a bit misleading; at least in my case. It clearly shows about 90˚ between the case and the display. I tested the limits with the one I was repairing and could find no way to raise the display far enough to clear a screwdriver without jeopardizing the cables. I resorted to the same solution that Amber Wooldridge discovered; using a PH000 bit and hand-tightening. I had a tiny needle-nosed plier that I used to tighten them a bit (but very gently).
-
-
-
Avec la spatule, soulevez-les et débranchez-les.
I went to replace the LCD assembly on an ipad Air 3, and one of the flex cables on the new LCD assembly broke in half. The flex cables on the old assembly work well and are intact. Is it possible to transfer the old flex cable(s) to the new assembly, or can I solder the broken pieces of the new flex cable together? I have also contacted the part supplier about this and am awaiting a response.
-
-
-
-
Enlevez l'ensemble écran.
Definitely test your iPad’s functions before sealing it up. I needed to reopen the display to reconnect the display connectors in order to have the display functioning properly. As a result, the adhesive strips did not work as well and I needed to tape some of the edges closed with a small section of strong clear packing tape.
I stuck the adhesive to the chassis first. That was messy because the plastic that covers the adhesive seems to be for screen side first. So you end up exposing both sides and those collect dust. I now realise you're supposed to put the adhesive on screen first. Not sure if it would have made much difference in the outcome (mine screen is not stuck in some places).
I found this out too. I had two sealing kits and they were both meant to be fixed on the screen first. I did not managed to get the screen to stick with the body as well. Now used some B6000 glue in addition.
agrior -
-
-
-
Utilisez un tournevis cruciforme pour retirer les dix vis fixant le blindage électromagnétique (EMI) :
-
Huit vis de 1,3 mm
-
Deux vis légèrement plus longues
The top two screws are longer than the rest on my iPad. Be careful to put them back in the right spots.
-
-
-
Appliquez un iOpener chauffé sur le blindage EMI pour détendre l'adhésif en dessous. Laissez l'iOpener agir pendant au moins deux minutes.
-
-
-
Utilisez l'extrémité plate d'une spatule pour soulever le blindage EMI, en commençant par le bord supérieur près de la caméra frontale.
-
Continuez à soulever soigneusement le blindage EMI jusqu'à ce que vous puissiez le retirer.
The two screws adjacent to the camera location are slightly longer! Make sure you don’t mix them up with the other eight, as shorter ones will not work in this location.
Thanks! I’ve updated the step with your tip!
-
-
-
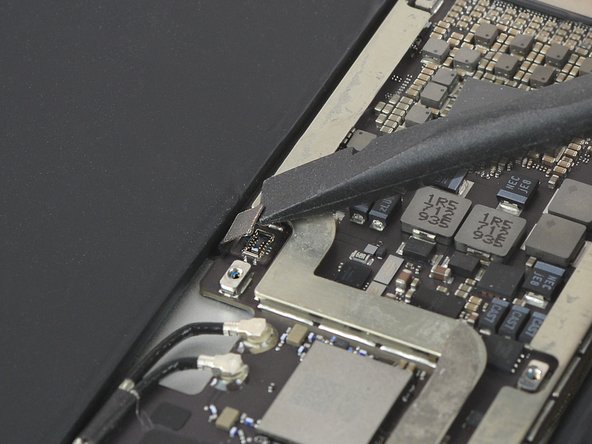
Utilisez l'arrête d'une spatule (spudger) pour faire levier et déconnecter la nappe d'interconnexion gauche ainsi que le câble d'antenne. Repliez-les délicatement pour les écarter.
wo finde ich das AntennenKabel , das ist abgerissen ?
Wo finde ich das Antennenkabel rechts und links das ist bei mir abgerissen ?
We also have no antenna cable as shown…
I think you need to assume that there is glue present and apply heat anyway. In my case the cable was not glued to the board but the connector was. So when I tried to gently lever the connector up, the cable ripped off the connector.
If you look at the picture shown in step 21, you can actually see the glue on the connector.
The left and right small antenna connectors are extremely delicate! They can crack if bent back too much and it's difficult to avoid bending them too much when removing and re-installing the logic board. This will cause the cellular radio and GPS to be inoperable. To be safe, remove antenna assembly (not shown in this guide) prior to removing the logic board.
To add to my comment, I'm actually working to replace the left and right small antenna connectors due to me breaking them. I'd recommend removing the top left and right speakers and just fully removing the two antenna connectors prior to removing the logic board. You do not need to fully remove the cellular antenna assemblies, just unscrew the plate/connector (with annoying perpendicular screws too) that cover the other ends of the small antenna connectors (easy to figure out once you remove the speakers).
To remove the speakers remove 3 screws, then just pry carefully (they have adhesive tape holding them down).
-
-
-
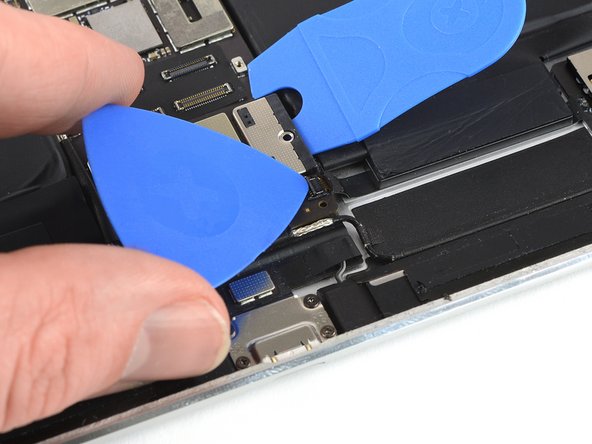
Retirez le médiator du connecteur d'alimentation de la batterie.
-
Glissez un côté du médiator sous le connecteur d'alimentation de la batterie, et assurez-vous qu'il ne recouvre pas le connecteur ZIF du tiroir de la nappe de la carte SIM.
What should I do to block the battery instead?
"The battery isolation pick or battery blocker is an outdated way of isolating the battery, as you risk damaging the battery pins underneath the logic board."
As the previous comment says, if this is an "outdated way" then what is the up to date way?
-
-
-
Utilisez un médiator pour relever le clapet de verrouillage du connecteur ZIF.
-
Utilisez une pincette pour retirer et déconnecter la nappe du tiroir de la carte SIM.
I don't have this connector on my 10.5 Pro. Maybe this is only for equipment with cellular. This needs to be confirmed by an expert.
-
-
-
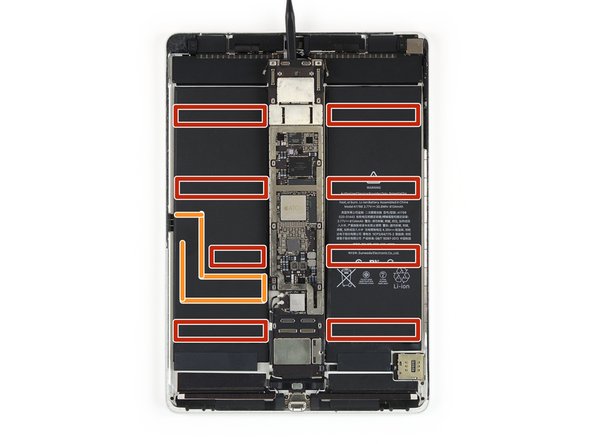
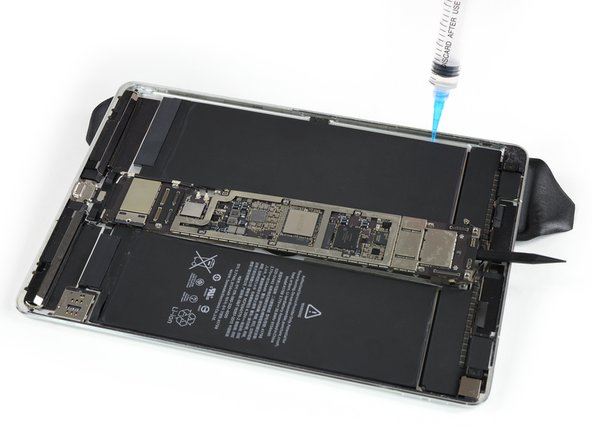
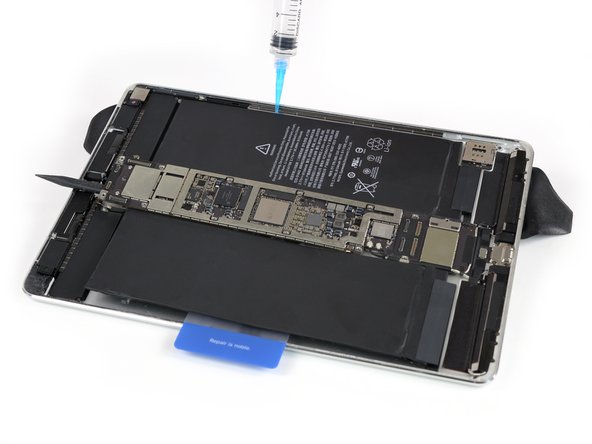
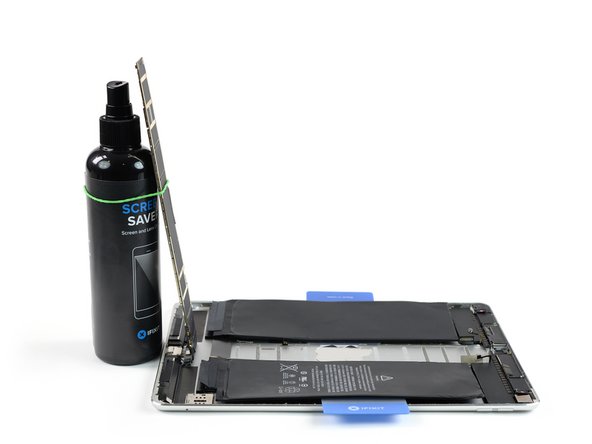
Appliquez un peu de solvant sous la batterie aux trois points distincts où se trouvent les bandes adhésives plus longues. N'appliquez le solvant que point par point et non dans un mouvement continu.
-
Laisser le solvant pénétrer pendant plusieurs minutes pour aider à ramollir l'adhésif.
-
-
-
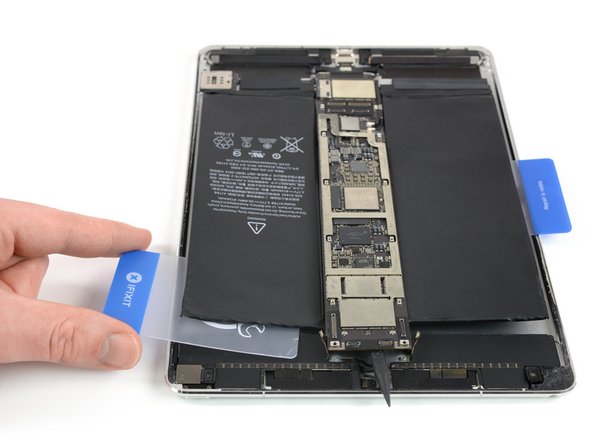
Retirez l'iOpener pour que l'iPad repose à plat et faites-le pivoter pour que la prise casque soit face à vous.
-
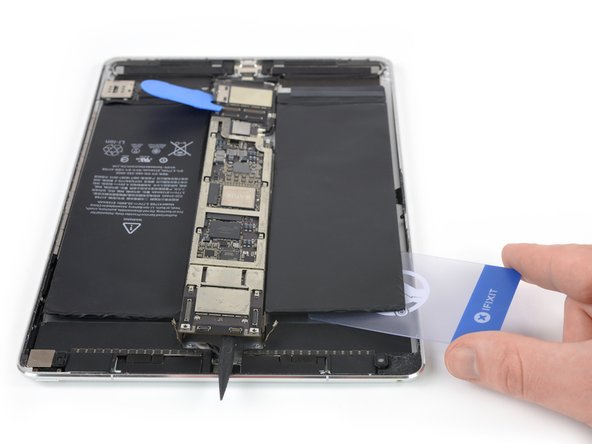
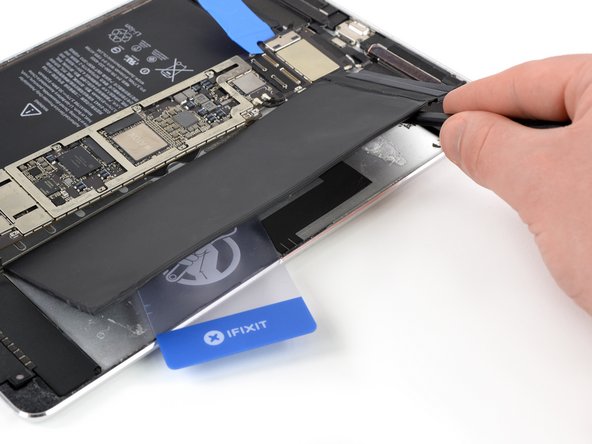
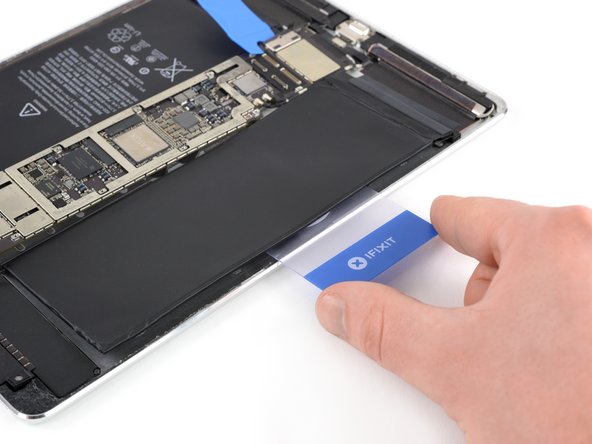
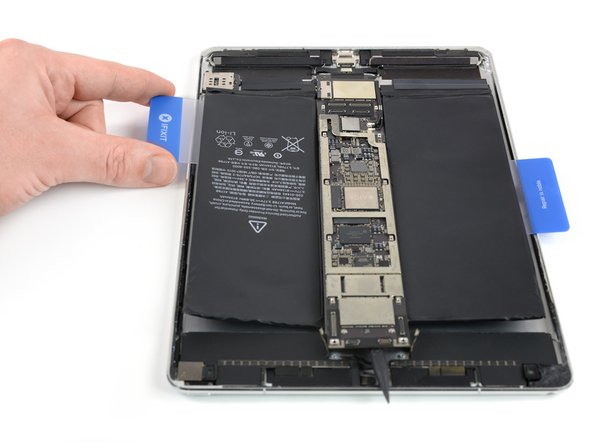
Insérez une carte en plastique sous la cellule de la batterie, en commençant près du coin extérieur.
-
Remuez la carte d'un côté à l'autre et poussez-la sous la batterie pour décoller l'adhésif en dessous.
-
-
-
Insérez délicatement une spatule sous la batterie aux mêmes endroits que les connecteurs de l'écran. Vous devrez peut-être réappliquer un iOpener ou un dissolvant d'adhésif.
-
Soulevez la batterie à l'aide de la spatule et coupez l'adhésif restant.
-
Soulevez la batterie avec la spatule pour vous assurer que tout l'adhésif est décollé.
-
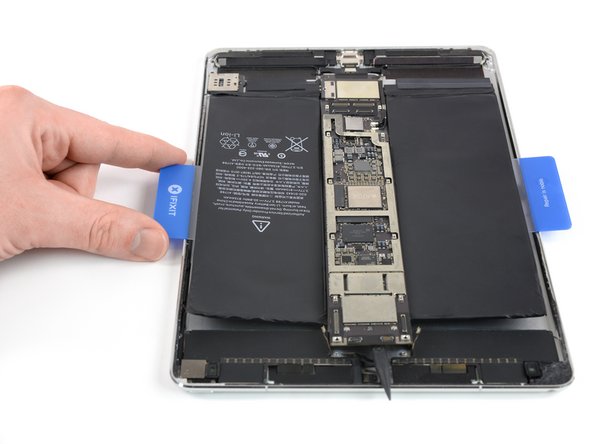
Placez la carte en plastique sous le centre de la cellule de la batterie et laissez-l'y pour empêcher l'adhésif de recoller.
-
-
-
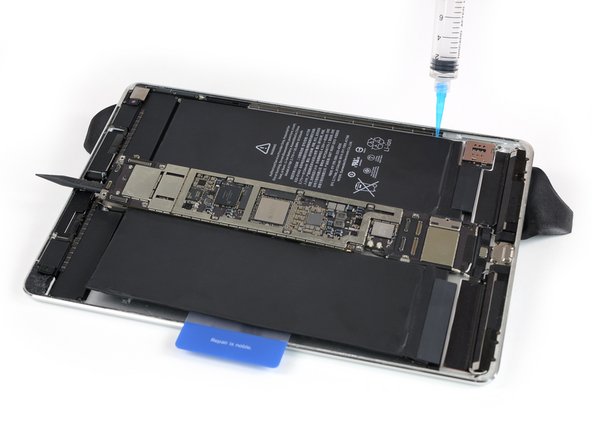
Élevez le côté droit de l'iPad (bord long, le plus proche de la caméra arrière) en plaçant un iOpener en dessous, de sorte que l'iPad repose en biais.
-
Appliquez un peu de solvant sous la batterie aux deux emplacements des bandes adhésives les plus à gauche.
-
-
-
Continuez à appliquer séparément le solvant aux deux emplacements restants de la bande adhésive. Laissez pénétrer pendant plusieurs minutes pour aider à ramollir l'adhésif.
-
-
-
Retirez l'iOpener pour que l'iPad repose à plat et faites-le pivoter pour que la prise casque soit face à vous.
-
Insérez une carte en plastique sous la cellule de la batterie, en commençant près du coin extérieur.
-
Remuez la carte d'un côté à l'autre et poussez-la sous la batterie pour décoller l'adhésif en dessous.
-
Faites glisser la carte en plastique vers le bord inférieur de l'iPad afin de couper tout l'adhésif sous cette cellule de la batterie.
-
-
-
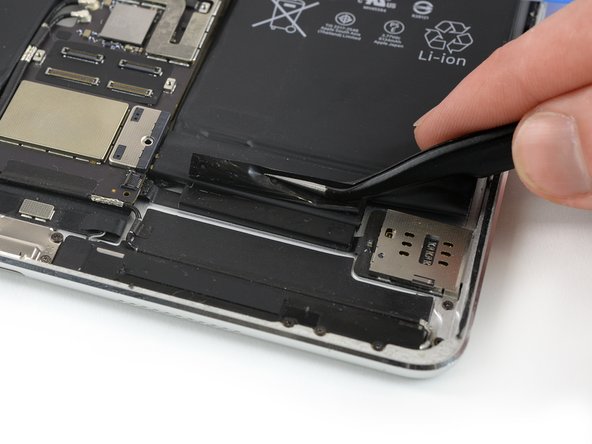
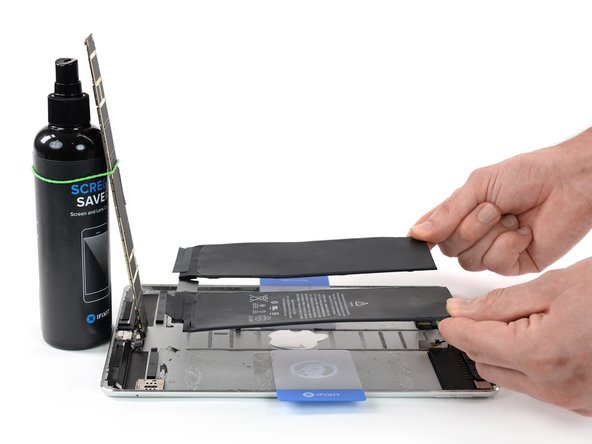
Utilisez une pincette pour décoller les parties restantes de la bande adhésive.
-
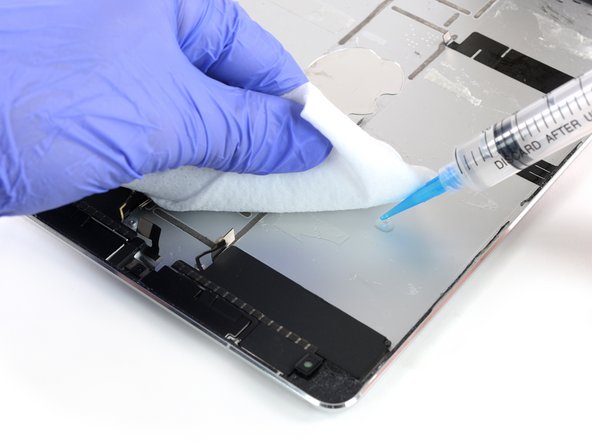
Nettoyez les zones d'adhérence avec de l'alcool isopropylique et un chiffon non pelucheux avant d'installer une nouvelle batterie, afin de vous assurer que la nouvelle batterie s'adapte et que le nouvel adhésif s'adhère correctement.
After a successful battery replacement we ran into an issue where the iPad Pro would crash once or twice a day. I made sure to calibrate the battery per repair instructions but that didn’t fix the issue. I got it resolved after backing up the iPad and then putting it into DFU mode through iTunes and installed a fresh copy of iPadOS and then restore from backup. That fixed the issue of iPad crashing. Hope this helps if you run into a similar issue.
-


Comparez votre nouvelle pièce de rechange à la pièce d'origine. Il se peut que vous deviez transférer les composants restants ou retirer les adhésifs de la nouvelle pièce avant de l'installer.
Pour réassembler votre appareil, suivez ces instructions en ordre inverse.
Si possible, allumez votre iPad et testez votre réparation avant de refermer la tablette.
Pour une performance optimale, calibrez votre batterie nouvellement installée après avoir terminé ce tutoriel : chargez-la à 100% et continuez à la charger pendant au moins 2 heures supplémentaires. Utilisez ensuite votre appareil jusqu'à ce qu'il s'éteigne en raison d'une batterie faible. Enfin, rechargez-la sans interruption jusqu'à 100 %.
Apportez vos déchets électroniques à un centre de collecte agréé.
La réparation ne s’est pas déroulée comme prévu ? Consultez notre Forum pour obtenir de l’aide au diagnostic.
Annulation : je n'ai pas terminé ce tutoriel.
47 autres ont terminé cette réparation.
Merci à ces traducteurs :
100%


Ces traducteurs nous aident réparer le monde ! Vous voulez contribuer ?
Commencez à traduire ›


12 commentaires
If you say the “the battery isolation method in this guide is outdated” then what is the correct way to isolate the battery?!?! The rest of the guide makes no mention of the correct/prefered method of isolating the battery.
How is it that the author took the time to update the guide with that message but failed to mention what should be done instead
Good point! We are currently still researching a more reliable alternative to the battery isolation procedure. As of now, the battery blocker method still works—it just has substantial dangers. This is especially true for iPad Pros, where the Logic Board is adhered to the frame. I’ve reworded the warnings to reflect this.
Hi can you advise please? In step 25 the SIM card tray flex cable is disconnected, no problem apart from i don’t have a SIM card tray flex cable in the A1701 that i’m repairing!! Urgent assistance required please. Regards R
You have the Wi-Fi model, which will look slightly different and have different procedures compared to the cellular model. You can skip the SIM flex cable step.
Ich habe diese Antennenkabel defekt wo bekomme ich sie oder für was sind die ?
hi
I fixed my battery according to the guide.
I have two problem
1. battery screw not able screw back in. but I am able to turn on iPad.
2. after turning on I am not able to unlock because on the keypad 1, 2, 3, these keys not responding to the touch. all other keys are touch responsive.
kindly help me with these two issues.
many thanks
I just finished following this guide, thank you so much for writing it!
I know that 18 of the 43 involve dealing with glue, but JEEZ that’s still underselling how much glue is in this thing.
The iOpener worked surprisingly well for removing the display. But the iFixit adhesive remover was not effective for removing the old battery. After 5 minutes, the solvent only ate around the edges of the adhesive strips and made a huge gooey mess with the center still sticky. After 10 minutes the glue had already re-adhered. I recommend anyone reading this try heat first, and see whether that works for you.
FWIW, I skipped the steps with the battery blocker since there doesn’t seems to be consensus on how to do it safely. I just made sure the battery was completely dead so the backlight couldn’t turn on and fry anything even if it wanted to.
Either way, after about 3 hours start to finish including cleanup (man there was a lot of cleanup) I’m very happy to say that I have a new battery and everything is working perfectly!!
thanks for the guide, after fighting against the glue, and sweeting like i was running a marathon i just replaced the stupid battery, the only problem, its that the top right speaker sounds baad, like its loose or something, and its weird, because i never touch it, ill try to open it tomorrow and see what's the problem
The guide should include a warning not to clean the glue around the edges of the screen after opening. Or, at least not use any solvent. Any liquid you use will leak in between the digitizer and LCD, hence ruining your display. Another comment though, why the battery I bought like two weeks ago is made in May of 2019?
I was lucky enough to take off the adhesive from the Logic board and the battery without using any solvents and used just my hair dryer. You definitely need to be patient with the process and not force it. Putting the new battery back on, as well as putting back on the display, and camera was super quick. Those darn new screen adhesives are a pain to put on but once the screen sits flush with the body, it was totally worth it. Think I spend about an hour and a half total. Battery isolation with the little pick did help out and felt safe having it in place throughout the repair process. Having the locations of where the battery adhesives were located, as well as the Smart connector was super clutch! I appreciate the disclaimers and warnings all throughout the repair guide.
Just to provide some failing experience and heads-up: My LCD screen has cracks and flickering after the battery replacement. I think it’s because when removing the screen I used the suction cup too frequently and added too much pressure to the screen when using it. Try to use the iOpener and the pick for most of the time for removing the screen.