Aller au contenu principal

iPad Pro 9.7" Opening Procedure

Conditions préalables uniquement
Ce tutoriel est uniquement destiné à être utilisé comme prérequis d'autres tutoriels. Il ne se suffit pas à lui-même.

Ce dont vous avez besoin

  1. iPad Pro 9.7" Opening Procedure, iPad Pro 9.7" Opening Procedure: étape 1, image 1 de 3 iPad Pro 9.7" Opening Procedure, iPad Pro 9.7" Opening Procedure: étape 1, image 2 de 3 iPad Pro 9.7" Opening Procedure, iPad Pro 9.7" Opening Procedure: étape 1, image 3 de 3
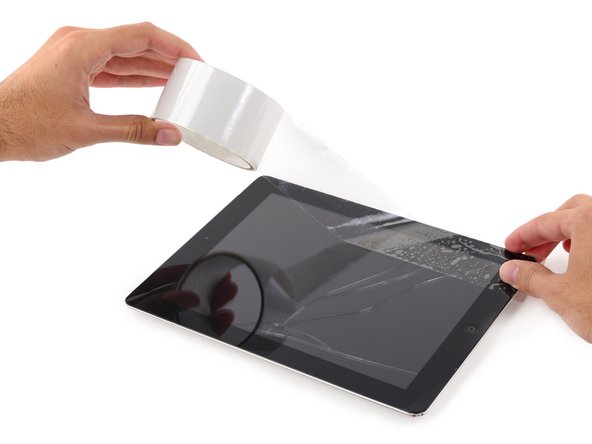
    • If your display glass is cracked, keep further breakage contained and prevent bodily harm during your repair by taping the glass.

    • Lay overlapping strips of clear packing tape over the iPad's display until the whole face is covered.

    • This will keep glass shards contained and provide structural integrity when prying and lifting the display.

    • Do your best to follow the rest of the guide as described. However, once the glass is broken, it will likely continue to crack as you work, and you may need to use a metal prying tool to scoop the glass out.

    • Wear safety glasses to protect your eyes, and be careful not to damage the LCD screen.

  2. iPad Pro 9.7" Opening Procedure: étape 2, image 1 de 1
    • The following steps involve using an iOpener to soften the adhesive holding the front panel assembly in place. When using the iOpener, be sure to heat it in the microwave for no more than 30 seconds.

    • Handling it by the tabs on either end, place a heated iOpener over the top edge of the iPad.

    • Let the iOpener sit on the iPad for two minutes to soften the adhesive securing the front panel to the rest of the iPad.

  3. iPad Pro 9.7" Opening Procedure: étape 3, image 1 de 3 iPad Pro 9.7" Opening Procedure: étape 3, image 2 de 3 iPad Pro 9.7" Opening Procedure: étape 3, image 3 de 3
    • While the iPad looks uniform from the outside, there are delicate components under certain portions of the front glass. To avoid damage, only heat and pry in the areas described in each step.

    • As you follow the directions, take special care to avoid prying in the following areas:

    • Home Button

    • Front Facing Camera

    • Main Camera

  4. iPad Pro 9.7" Opening Procedure: étape 4, image 1 de 2 iPad Pro 9.7" Opening Procedure: étape 4, image 2 de 2
    • Place a suction cup over the iPad's front-facing camera and press down to create a seal.

    • To get the most leverage, place the suction cup as close to the edge as possible without going past the edge of the display.

  5. iPad Pro 9.7" Opening Procedure: étape 5, image 1 de 3 iPad Pro 9.7" Opening Procedure: étape 5, image 2 de 3 iPad Pro 9.7" Opening Procedure: étape 5, image 3 de 3
    • Firmly pull up on the suction cup to create a small gap between the front panel and the rear case.

    • Do not pull too hard or you may shatter the glass.

    • Once you've opened a sufficient gap, insert an opening pick into the gap to prevent the adhesive from resealing.

  6. iPad Pro 9.7" Opening Procedure: étape 6, image 1 de 3 iPad Pro 9.7" Opening Procedure: étape 6, image 2 de 3 iPad Pro 9.7" Opening Procedure: étape 6, image 3 de 3
    • Slide the pick along the edge of the display, towards the headphone jack.

    • If there is still a considerable amount of resistance when sliding the opening pick, repeat the iOpener heating procedure and apply additional heat.

    • Don't insert the pick past the bezel into the display area, or you will damage it.

    • A good rule of thumb is to never insert the opening pick more than a quarter inch into the iPad.

  7. iPad Pro 9.7" Opening Procedure: étape 7, image 1 de 2 iPad Pro 9.7" Opening Procedure: étape 7, image 2 de 2
    • Insert a second opening pick by the front-facing camera.

  8. iPad Pro 9.7" Opening Procedure: étape 8, image 1 de 3 iPad Pro 9.7" Opening Procedure: étape 8, image 2 de 3 iPad Pro 9.7" Opening Procedure: étape 8, image 3 de 3
    • Slide the second pick along the top edge of the iPad, towards the Sleep/Wake Button.

  9. iPad Pro 9.7" Opening Procedure: étape 9, image 1 de 2 iPad Pro 9.7" Opening Procedure: étape 9, image 2 de 2
    • Insert a third pick by the front-facing camera.

  10. iPad Pro 9.7" Opening Procedure: étape 10, image 1 de 3 iPad Pro 9.7" Opening Procedure: étape 10, image 2 de 3 iPad Pro 9.7" Opening Procedure: étape 10, image 3 de 3
    • Bring the right opening pick down and around the top right corner of the iPad.

  11. iPad Pro 9.7" Opening Procedure: étape 11, image 1 de 3 iPad Pro 9.7" Opening Procedure: étape 11, image 2 de 3 iPad Pro 9.7" Opening Procedure: étape 11, image 3 de 3
    • Bring the left opening pick around the top left corner of the tablet.

  12. iPad Pro 9.7" Opening Procedure: étape 12, image 1 de 1
    • Reheat the iOpener and lay it over the right edge of the display to loosen the adhesive underneath.

  13. iPad Pro 9.7" Opening Procedure: étape 13, image 1 de 3 iPad Pro 9.7" Opening Procedure: étape 13, image 2 de 3 iPad Pro 9.7" Opening Procedure: étape 13, image 3 de 3
    • Slide the right opening pick roughly halfway down the display.

  14. iPad Pro 9.7" Opening Procedure: étape 14, image 1 de 1
    • Reheat the iOpener and apply heat to the left side of the iPad.

  15. iPad Pro 9.7" Opening Procedure: étape 15, image 1 de 3 iPad Pro 9.7" Opening Procedure: étape 15, image 2 de 3 iPad Pro 9.7" Opening Procedure: étape 15, image 3 de 3
    • Slide the left-hand opening pick about halfway down the edge of the display.

  16. iPad Pro 9.7" Opening Procedure: étape 16, image 1 de 3 iPad Pro 9.7" Opening Procedure: étape 16, image 2 de 3 iPad Pro 9.7" Opening Procedure: étape 16, image 3 de 3
    • Slide the opposite opening pick down to the bottom right corner of the iPad.

    • If necessary, reheat the adhesive on the right edge to loosen the display assembly.

  17. iPad Pro 9.7" Opening Procedure: étape 17, image 1 de 3 iPad Pro 9.7" Opening Procedure: étape 17, image 2 de 3 iPad Pro 9.7" Opening Procedure: étape 17, image 3 de 3
    • Slide the left-hand opening pick down the edge of the display until you reach the corner.

  18. iPad Pro 9.7" Opening Procedure: étape 18, image 1 de 1
    • Use the iOpener to apply heat to the bottom edge of the iPad.

  19. iPad Pro 9.7" Opening Procedure: étape 19, image 1 de 3 iPad Pro 9.7" Opening Procedure: étape 19, image 2 de 3 iPad Pro 9.7" Opening Procedure: étape 19, image 3 de 3
    • Bring the right-hand opening pick around the bottom corner of the iPad.

  20. iPad Pro 9.7" Opening Procedure: étape 20, image 1 de 3 iPad Pro 9.7" Opening Procedure: étape 20, image 2 de 3 iPad Pro 9.7" Opening Procedure: étape 20, image 3 de 3
    • Repeat for the left-hand pick.

    • Reheat and reapply the iOpener as needed.

  21. iPad Pro 9.7" Opening Procedure: étape 21, image 1 de 2 iPad Pro 9.7" Opening Procedure: étape 21, image 2 de 2
    • Remove the right-hand opening pick at the bottom of the iPad.

  22. iPad Pro 9.7" Opening Procedure: étape 22, image 1 de 3 iPad Pro 9.7" Opening Procedure: étape 22, image 2 de 3 iPad Pro 9.7" Opening Procedure: étape 22, image 3 de 3
    • Slide the left-hand opening pick along the bottom edge of the display, then remove it from the bottom right corner of the iPad.

    • Be very careful to not insert the pick more than a quarter inch into the display to avoid damaging the Home Button and display cables underneath.

Conclusion

To reassemble your device, follow these instructions in reverse order.

Arthur Shi

Membre depuis le 01/03/18

252 468 Réputation

526 tutoriels rédigés

Équipe

iFixit Membre de l'équipe iFixit

Staff

135 membres

16 757 tutoriels rédigés

0 commentaires

Ajouter un commentaire

Nombre de vues :

Dernières 24 heures : 0

7 derniers jours : 0

30 derniers jours : 0

Total : 154