Aller au contenu principal

iPad mini 4 LTE Battery Connector Replacement

Conditions préalables uniquement
Ce tutoriel est uniquement destiné à être utilisé comme prérequis d'autres tutoriels. Il ne se suffit pas à lui-même.

Ce dont vous avez besoin

  1. iPad mini 4 LTE Battery Connector Replacement, Battery Connector: étape 1, image 1 de 1
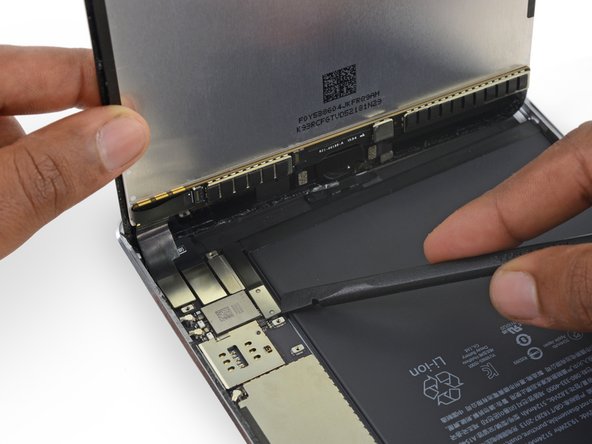
    • To avoid stressing any cables, hold the display assembly perpendicular to the body of the iPad until it is disconnected.

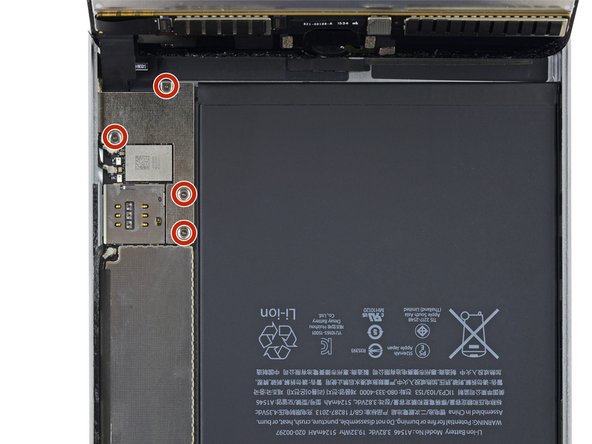
    • Remove the four 1.2 mm Phillips screws over the battery/display connector bracket.

  2. iPad mini 4 LTE Battery Connector Replacement: étape 2, image 1 de 1
    • Remove the battery/display cable bracket.

  3. iPad mini 4 LTE Battery Connector Replacement: étape 3, image 1 de 2 iPad mini 4 LTE Battery Connector Replacement: étape 3, image 2 de 2
    • When disconnecting any press connectors from the logic board, be sure to lift the connector straight up to avoid ripping the socket off the board.

    • Use the flat tip of a spudger to disconnect the battery connector from its socket on the logic board.

    • Bend the battery connector ribbon cable up slightly to prevent it from making contact and powering on the iPad.

Conclusion

To reassemble your device, follow these instructions in reverse order.
Evan Noronha

Membre depuis le 02/05/15

223 466 Réputation

168 tutoriels rédigés

0 commentaires

Ajouter un commentaire

Nombre de vues :

Dernières 24 heures : 0

7 derniers jours : 0

30 derniers jours : 0

Total : 201