Aller au contenu principal

iPhone 4S Power button Replacement

Tutoriel Archivé
Ce tutoriel est conservé uniquement à des fins de suivis historiques. Utilisez la version actuelle du tutoriel pour effectuer votre réparation.

Ce dont vous avez besoin

  1. iPhone 4S Power button Replacement, Rear Panel-Opening the Phone: étape 1, image 1 de 1
    • *Power off your phone before you start repairing

    • Remove the two small screws next to the dock connector

  2. iPhone 4S Power button Replacement, Take the Rear Panel off: étape 2, image 1 de 1
    • Use both thumbs to push the rear panel toward the top edge of the iPhone.

  3. iPhone 4S Power button Replacement: étape 3, image 1 de 1
    • Carefully pull the rear panel away from the iPhone. Be careful not to break the clips that attach it to the phone.

  4. iPhone 4S Power button Replacement: étape 4, image 1 de 1
    • Remove the two screws securing the battery connector to the logic board

    • detach the battery connector from the socket, then lift the bottom side of the connector and by placing the head of the tool in the middle of the speaker and the metal connector.

  5. iPhone 4S Power button Replacement: étape 5, image 1 de 1
    • Use the head of your tool to carefully pull up the pressure contact which is located underneath the battery.

    • don't rip the battery connector socket on the logic board, this is an essential part of the iPhone connected by four soldered points.

  6. iPhone 4S Power button Replacement: étape 6, image 1 de 1
    • Unscrew the two screws securing the dock connector cable cover.

    • Once completed, Remove the metal dock connector cable cover and place it on a safe area.

  7. iPhone 4S Power button Replacement: étape 7, image 1 de 1
    • Use the head of your tool to remove the dock cable up from its socket on the logic board.

  8. iPhone 4S Power button Replacement: étape 8, image 1 de 1
    • Once pulled up, Peel the dock connector cable off the logic board

  9. iPhone 4S Power button Replacement: étape 9, image 1 de 1
    • Unplug the cellular antenna cable out from under the metal fingers attached to the logic board and place it on the same side as the doc connector cable

  10. iPhone 4S Power button Replacement: étape 10, image 1 de 1
    • Take out four screws securing the cable cover to the logic board (the screws highlighted)

  11. iPhone 4S Power button Replacement: étape 11, image 1 de 1
    • Use the head of your tool to take off the cable cover tabs out of their slots.

    • Once completed, take off the cable cover from its edge nearest the top and remove it and put it in a safe place.

  12. iPhone 4S Power button Replacement: étape 12, image 1 de 1
    • Use the head of your tool to take off the camera connector to the logic board

    • The camera is now safe to remove, put it in a safe place

  13. iPhone 4S Power button Replacement: étape 13, image 1 de 2 iPhone 4S Power button Replacement: étape 13, image 2 de 2
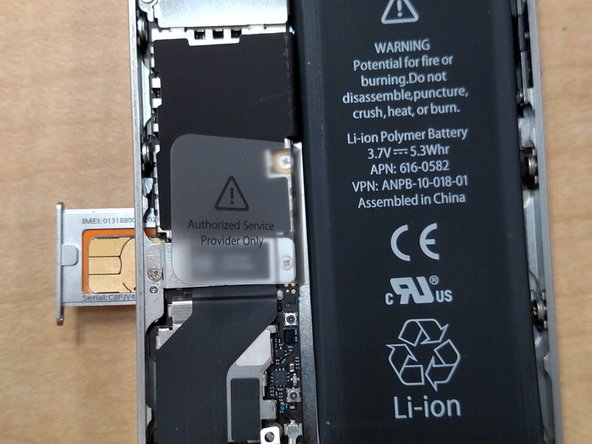
    • Use a paper clip to eject the sim card and put it in a safe place

  14. iPhone 4S Power button Replacement: étape 14, image 1 de 1
    • Take off the five labeled connectors

  15. iPhone 4S Power button Replacement: étape 15, image 1 de 1
    • Remove the highlighted screw

  16. iPhone 4S Power button Replacement: étape 16, image 1 de 1
    • Pry up the small grounding clip with the head of your tool and then remove it and put it in a safe place

  17. iPhone 4S Power button Replacement: étape 17, image 1 de 1
    • Remove the highlighted screw

  18. iPhone 4S Power button Replacement: étape 18, image 1 de 1
    • Disconnect the wifi connector highlighted with the head of your tool

  19. iPhone 4S Power button Replacement: étape 19, image 1 de 1
    • Peel up the piece of black tape

    • Remove the screw holding in the logic board

  20. iPhone 4S Power button Replacement: étape 20, image 1 de 1
    • Remove the selected screws

  21. iPhone 4S Power button Replacement: étape 21, image 1 de 1
    • Lift the logic board from the side that has the speaker

    • Remove the logic board.

  22. iPhone 4S Power button Replacement: étape 22, image 1 de 1
    • Take out the two screws keeping the lock button in place

  23. iPhone 4S Power button Replacement: étape 23, image 1 de 1
    Outil utilisé dans cette étape :
    Tweezers
    $4.99
    J'achète
    • Once done, remove the power button with either tweezers or a sharp object

Conclusion

To reassemble your device, follow these instructions in reverse order.

6 autres ont terminé cette réparation.

Miles

Membre depuis le 05/26/15

371 Réputation

1 tutoriel rédigé

0 commentaires

Ajouter un commentaire

Nombre de vues :

Dernières 24 heures : 0

7 derniers jours : 1

30 derniers jours : 11

Total : 2,422