Aller au contenu principal
Pour réparer ensemble - Je crée un compte

iPhone 5s, 5c, and SE Battery Adhesive Strips Replacement

Ce dont vous avez besoin

  1. iPhone 5s, 5c, and SE Battery Adhesive Strips Replacement, iPhone 5s/5c/SE Battery Adhesive Strips: étape 1, image 1 de 1
    • Before installing new adhesive strips, temporarily connect your new battery and check its alignment in the iPhone.

    • If everything looks good, disconnect the battery and remove it.

    Demander à FixBot

    Ajouter un commentaire

  2. iPhone 5s, 5c, and SE Battery Adhesive Strips Replacement: étape 2, image 1 de 3 iPhone 5s, 5c, and SE Battery Adhesive Strips Replacement: étape 2, image 2 de 3 iPhone 5s, 5c, and SE Battery Adhesive Strips Replacement: étape 2, image 3 de 3
    • Peel off the large blue film liner and remove it from the adhesive strips completely.

    • Take care not to accidentally touch the adhesive strips after this step. The adhesive is good for one use. If it sticks to your finger or another surface accidentally, it must be discarded and replaced.

    • The blue film sometimes has a defect that prevents it from peeling off, and the strips have to be discarded and replaced.

    • If this happens to you and you got your strips from iFixit, contact us here and we'll send you a replacement on the double.

    • In the meantime, you can temporarily reassemble your iPhone with a bit of double-sided tape to hold the battery.

    Demander à FixBot

    Ajouter un commentaire

  3. iPhone 5s, 5c, and SE Battery Adhesive Strips Replacement: étape 3, image 1 de 2 iPhone 5s, 5c, and SE Battery Adhesive Strips Replacement: étape 3, image 2 de 2
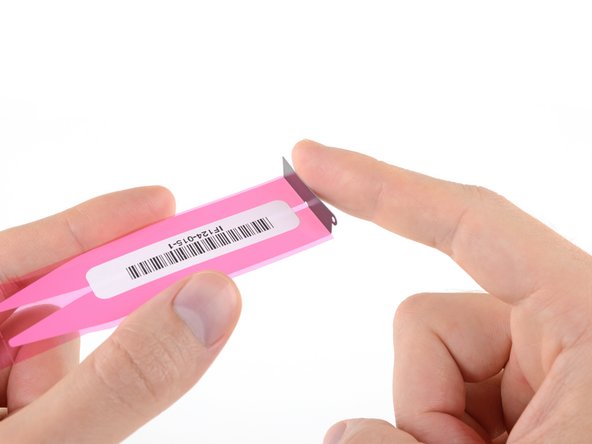
    • With the exposed adhesive facing down, fold the black tab up at a 90° angle.

    Demander à FixBot

    Ajouter un commentaire

  4. iPhone 5s, 5c, and SE Battery Adhesive Strips Replacement: étape 4, image 1 de 3 iPhone 5s, 5c, and SE Battery Adhesive Strips Replacement: étape 4, image 2 de 3 iPhone 5s, 5c, and SE Battery Adhesive Strips Replacement: étape 4, image 3 de 3
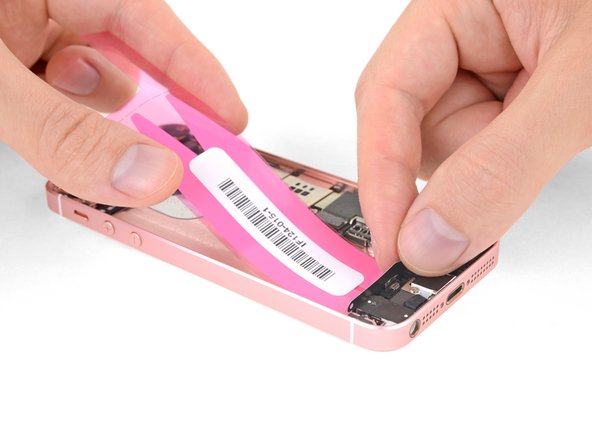
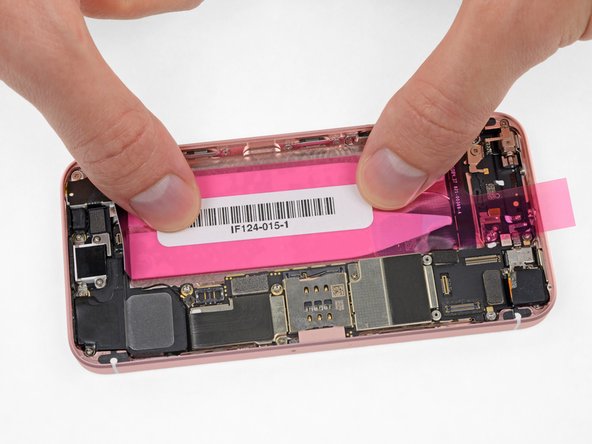
    • With the exposed adhesive facing down, carefully align the strips into your iPhone's rear case.

    • Position the black tab very close to, but not quite touching, the black plastic speaker housing on the bottom right.

    • Set the adhesive strips into the rear case and allow them to stick.

    Demander à FixBot

    Ajouter un commentaire

  5. iPhone 5s, 5c, and SE Battery Adhesive Strips Replacement: étape 5, image 1 de 3 iPhone 5s, 5c, and SE Battery Adhesive Strips Replacement: étape 5, image 2 de 3 iPhone 5s, 5c, and SE Battery Adhesive Strips Replacement: étape 5, image 3 de 3
    • Press down on each strip to fully adhere it to the rear case, starting from the middle and working outward towards each end.

    Demander à FixBot

    Ajouter un commentaire

  6. iPhone 5s, 5c, and SE Battery Adhesive Strips Replacement: étape 6, image 1 de 3 iPhone 5s, 5c, and SE Battery Adhesive Strips Replacement: étape 6, image 2 de 3 iPhone 5s, 5c, and SE Battery Adhesive Strips Replacement: étape 6, image 3 de 3
    • Peel away the large pink film liner and remove it completely.

    Demander à FixBot

    Ajouter un commentaire

  7. iPhone 5s, 5c, and SE Battery Adhesive Strips Replacement: étape 7, image 1 de 3 iPhone 5s, 5c, and SE Battery Adhesive Strips Replacement: étape 7, image 2 de 3 iPhone 5s, 5c, and SE Battery Adhesive Strips Replacement: étape 7, image 3 de 3
    • Without sticking the battery down, lower its connector into the iPhone and align it to its socket on the logic board.

    • Connect the battery.

    Demander à FixBot

    Ajouter un commentaire

  8. iPhone 5s, 5c, and SE Battery Adhesive Strips Replacement: étape 8, image 1 de 2 iPhone 5s, 5c, and SE Battery Adhesive Strips Replacement: étape 8, image 2 de 2
    • Once the battery sticks, you can't reposition or remove it without destroying the adhesive strips and starting over.

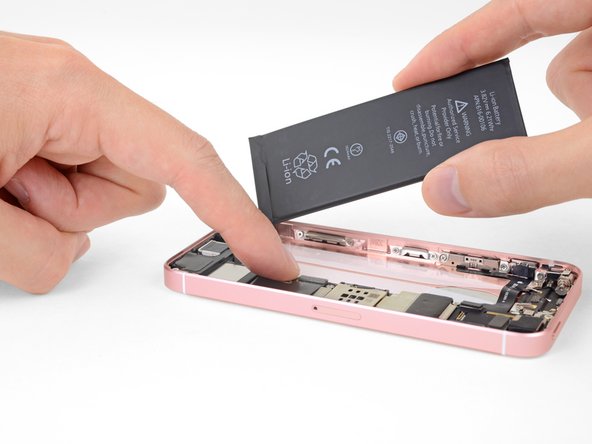
    • Carefully position the battery and set it into the iPhone.

    • Leave a small gap (about 2 mm) between the lower edge of the battery and the speaker. This will make it easier to fold down the black tab in a later step.

    Demander à FixBot

    Ajouter un commentaire

  9. iPhone 5s, 5c, and SE Battery Adhesive Strips Replacement: étape 9, image 1 de 2 iPhone 5s, 5c, and SE Battery Adhesive Strips Replacement: étape 9, image 2 de 2
    • Press the battery firmly into place.

    Demander à FixBot

    Ajouter un commentaire

  10. iPhone 5s, 5c, and SE Battery Adhesive Strips Replacement: étape 10, image 1 de 3 iPhone 5s, 5c, and SE Battery Adhesive Strips Replacement: étape 10, image 2 de 3 iPhone 5s, 5c, and SE Battery Adhesive Strips Replacement: étape 10, image 3 de 3
    Outil utilisé dans cette étape :
    Tweezers
    $4.99
    • Use the flat end of your spudger or blunt tweezers to fold the black tab downward, tucking it between the lower edge of the battery and the components lining the bottom edge of the iPhone.

    • Be extremely careful not to poke the battery with any sharp tools during this step. Accidentally puncturing a lithium-ion battery can cause a dangerous fire.

    Demander à FixBot

    Ajouter un commentaire

  11. iPhone 5s, 5c, and SE Battery Adhesive Strips Replacement: étape 11, image 1 de 1
    • Be sure to disconnect the battery again before reassembling your iPhone.

    • Working on your phone with the battery connected can destroy sensitive components.

    Demander à FixBot

    Ajouter un commentaire

Conclusion

To reassemble your iPhone, return to the guide you used to remove the battery and follow the steps in reverse order.

Remember to take your old battery to an R2 or e-Stewards certified recycler.

Annulation : je n'ai pas terminé ce tutoriel.

242 autres ont terminé cette réparation.

Jeff Suovanen

Membre depuis le 08/06/13

453 350 Réputation

259 tutoriels rédigés

Équipe

iFixit Membre de l'équipe iFixit

Staff

122 membres

27 514 tutoriels rédigés

4 commentaires de tutoriel

Call me crazy, but can’t I just use a thin strip of blu-tack?

domarius - Réponse Partager

Maybe, but the adhesive strips are designed to be very strong and very thin, and reasonably heat-resistant. This keeps the battery secure even if you shake the phone (or take it jogging), and it won’t come loose if the phone gets hot. The thin profile also means the battery has room to expand slightly without contacting or putting pressure on the display. Considering how cheap the strips are vs. the cost of the expensive phone you are repairing, I tend to err in favor of putting it back together the way it’s designed. But, your phone, your choice!

Jeff Suovanen - Réponse Partager

All worked well except removing one of the adhesive strips. I used a “Bed Buddy” microwavable heat pack to warm the phone as directed and it worked fine. So far I’m pleased. Now comes the re-assembly challenge.

Curtis Potter - Réponse Partager

Use this iFixit video guide for applying the adhesive instead IMO—many people will tell you to apply it to the battery itself instead of the bottom of the case:

https://www.youtube.com/watch?v=Xthi6DOx...

At least you have options now. :)

Ze Bra - Réponse Partager

Ajouter un commentaire

Nombre de vues :

Dernières 24 heures : 8

7 derniers jours : 41

30 derniers jours : 209

Total : 71,478