Ce dont vous avez besoin
-
Cette étape n’est pas traduite. Aidez à la traduire
-
Our favorite nanoscopic slice of Apple is back and has some fun features packed inside.
-
1.54-inch multi-touch display
-
240 x 240 pixel resolution
-
Built-in Accelerometer
-
Stock Nike+ Compatibility
-
Rechargeable Lithium-Ion battery with up to 24 hours of music playback
-
8 GB or 16 GB internal storage
-
-
Cette étape n’est pas traduite. Aidez à la traduire
-
Not much has changed in terms of packaging. The Nano is still encased in its own cube of self-indulgence.
-
A quick glance at the model number shows us that much like its sibling before it, it still carries the identification of Model A1366.
-
A little sleuthing shows that any difference in part numbers is only a matter of different Nano colors. This one, MC689, is blue; MC688 is silver, yadda yadda...
-
-
Cette étape n’est pas traduite. Aidez à la traduire
-
"Bill, they're so cute! Can we get one??" - "You know, Mary, those things will grow up some day—and they require a lot of responsibility."
-
Like most siamese twins, the 6th and 7th Generation share the same physical qualities but differ in personalities.
-
Can you guess which is which? We'll give you a hint: The 7th Generation Nano is not red....
-
-
Cette étape n’est pas traduite. Aidez à la traduire
-
United they shall stand. Oh joy! iPod Nano family reunion (from left to right):
-
Nano 1st Generation
-
Nano 2nd Generation
-
Nano 3rd Generation
-
Nano 4th Generation
-
Nano 5th Generation
-
Nano 6th Generation
-
Nano 7th Generation
-
-
Cette étape n’est pas traduite. Aidez à la traduire
-
No screws? Have no fear! *trumpet sound* Our trusty heat gun is here to save the day!
-
BLAMO! WHAMMO! Take that you malicious front glass! Your days of providing high quality entertainment to the citizens of Earth are numbered! Surrender now or taste defeat at the hands of our sidekick, Plastic Opening tool!
-
-
-
Cette étape n’est pas traduite. Aidez à la traduire
-
Screws? Ha! So you thought we would be unprepared? Guess again 7th Generation Nano...feel the mighty torque of our Phillips screwdriver!
-
The EMI shield that protects the Nano's logic board is easily removed.
-
-
Cette étape n’est pas traduite. Aidez à la traduire
-
Removing the display requires disconnecting a few additional connectors.
-
You have displayed your last day, oh dear Nano display! (At least until we put you back together. We'll be gentle; we promise.)
-
-
Cette étape n’est pas traduite. Aidez à la traduire
-
To the front, to the back, to the front, to the back. Nn ss, nn ss, nn ss.
-
Just like last year, The 1.54" LCD screen is equipped with multi-touch, and we are still perplexed as to why you would need two fingers for this device.
-
The display is still the same 240x240 pixel display and remains inseparably bonded to the front glass.
-
-
Cette étape n’est pas traduite. Aidez à la traduire
-
A few more screws and a connector attempt to block our path.
-
Ha! Hath thou never heard the battle cry of the cursed 54 Bit Driver Kit and Plastic Opening Tools!
-
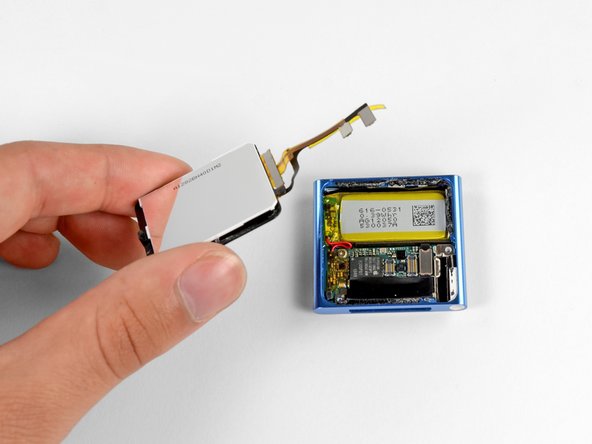
With a little wiggling, the battery and logic board come free, though soldered together.
-
-
Cette étape n’est pas traduite. Aidez à la traduire
-
Main integrated circuits:
-
Apple 339S0104 YGC7 1046 K4X51323PI YRJ180A2 ARM N3ODPQ1 1049
-
337S3907 1031 A 04 640102
-
SanDisk 05010 008G 1222DCQ1Z6
-
Apple 338S0783-B1 11068HDR
-
0650 D4JU 041
-
Apple 339S0853 C0YV1042 TWN
-
-
Cette étape n’est pas traduite. Aidez à la traduire
-
Some more screws come out and the clip is removed from the outer case.
-
Yes little Nano, try grabbing onto our pockets, belts, and pants now!
-
-
Cette étape n’est pas traduite. Aidez à la traduire
-
We begin prying the headphone jack ribbon cable assembly from the inner case. Unfortunately, what seems to be an entire bottle of glue slows our process.
-
With the assembly away from the case, the volume buttons are free for removal.
-
The glue is gone, and the last of our plastic opening tool duties are done.
-
-
Cette étape n’est pas traduite. Aidez à la traduire
-
The ribbon cable is finally freed and we take some time to observe it.
-
All three button sensors (sleep, volume up, and volume down) are all connected to the headphone jack ribbon cable. This will make it tough to replace individual components.
-
-
Cette étape n’est pas traduite. Aidez à la traduire
-
Recruiting the help of our spudger and our precision tweezer set, we remove the remaining gallons of glue from inside the nano's case.
-
-
Cette étape n’est pas traduite. Aidez à la traduire
-
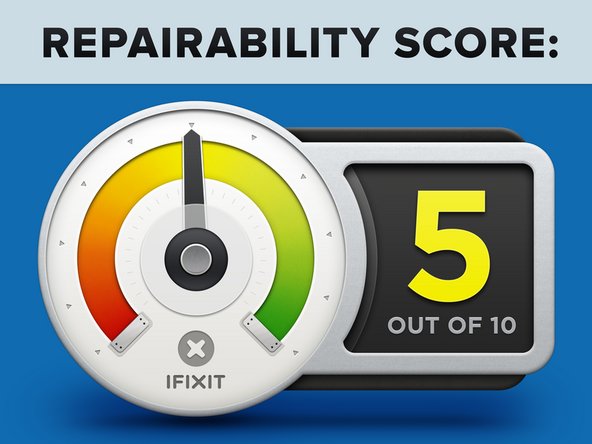
iPod Nano 7th Generation Repairability Score: 5 out of 10 (10 is easiest to repair)
-
Good: Once the display is removed, the rest of the disassembly is relatively straightforward.
-
Good: The ribbon cable connectors make it easy to disconnect the display and headphone jack from the logic board.
-
Neutral: The headphone jack and volume buttons are attached to the same ribbon cable and must be replaced at the same time.
-
Bad: Getting the display off of the device requires the use of a heat gun, as there is a lot of adhesive holding it in place.
-
Bad: The battery is soldered to the logic board, making replacement of a single component more cumbersome.
-


2 commentaires
After opening the iPod Nano 6th gen and trying to fix the power-button issue (a very common problem, seen all the YouTube movies about it) I have put together the device. Unfortunately it won't power up anymore, at least the screen is not working or the device is not recharging anymore. Either way, be careful, after disassembling this device might not work anymore. Delicate parts are in place. Good luck with the teardowns.
Hi Bas Flipsen!
Please bear in mind that this is a teardown, not a repair guide, we have actual step-by-step guides for this device on the device page. For a button replacement, you can follow the headphone jack assembly guide!