Introduction
Utilisez ce tutoriel pour remplacer la batterie. Avertissement : ce tutoriel nécessite de souder.
Ce dont vous avez besoin
-
-
Le pistolet à air chaud réglé sur minimum, commencez à chauffer la partie inférieure du touch près du bouton home.
-
-
-
Insérez le bord d'un outil d'ouverture pour iPod entre le panneau frontal en verre et le cache en plastique près du bouton home.
-
Soulevez le bord inférieur du panneau frontal vers le haut, en prenant soin de ne pas plier excessivement la vitre.
There should be (in general) better notes about the reassembly process. Getting the thing glued back in is WAY harder than just "reverse this step." Getting it to sit flush with any kind of adhesion is pretty difficult. No real advice other than make sure the edges of the metal thing at the top of the back of the digitizer are in the right slots and use judiciously placed pieces of 3M 300LSE adhesive.
I actually just figured it out. I had the ribbon cable for the digitizer running under the LCD and that wasn't allowing the LCD to sit down far enough. By re-folding the digitizer cable so it was triple-folded (when you do it you'll see what I mean) and only under the glass where there is no LCD, you'll get the glass to sit right.
I'm havin' problems with mine... hum, the front panel broke and i don't know where can i buy a new one. Can you help me?! Detail, the Touch screen still working... the external screen is broken, but the internal is ok...
EBay mate sells plenty
Greg W -
Glue is under the black part of the glass, not under the clear part of the glass.
The Glue is mostly around the top and bottom about 1/2 inch in or so, around both left and right edges the strip of glue is very thin about 1/8 inch or so.
I had success with heat and sliding the tool or pick up and down the side where there is less glue until it started separating being careful that I was between front glass panel and the black plastic bezel.
Take a look at the post What parts to move from the broken screen?
That will give you some advice as to what to move over from the broken screen, metal bracket, home button and small sponge spacer on the tip of the digitizer connector. Also how important it is to use new adhesive. If after assembling the screen bulges on one side (top or bottom) take the time to dissasemble and check that everything is in place (flat) and like jonathan writes, the digitizer cable is folded.
-
-
-
Décollez avec précaution le dessus de l'ensemble panneau frontal de l'adhésif le fixant au touch, en tenant compte de la petite nappe de la vitre tactile, qui relie les deux composants.
The LCD cable which attaches to the logic board, is, indeed, very short. When reassembling the iPod, you may only be able to leave a small crack between the glass and the body to allow for enough space to reattach this cable. A plastic opening tool works well, but be warned: it takes quite a bit of patience.
Indeed the LCD cable which attaches to the logic board is short and I spent a good 30 minutes trying to get it to seat. When I finally did I realized I broke the right side and that is why my display is not working now. When they say difficult, they mean difficult - I have experience with electronics and I recommend you first practice on an older unit if you can.
Before i do this repair, does my screen have to be all together. Because my iPod got cracked a while ago, so do i have to buy a new screen so i can put the jack in? Also what goes first in the process when doing both of those things ?
Reconnecting the data cable is actually pretty easy. Just hold your screen at a 90 degree angle and put it on your underlying surface (and not on the back part of your ipod). Then just use the opening tool to reconnect the cable. The cable is long enough. If you connected it properly try pushing the home button on the back part (not the actual button). If done properly, your screen should light up. (if not try again to connect the cable) Then just fold the screen onto the back part without lifting it. The cable disconnects very easily.
-
-
-
Retirez les huit vis cruciformes #00 suivantes :
-
Une vis cruciforme de 3,5 mm
-
Deux vis cruciformes de 3,0 mm
-
Une vis cruciforme de 2,3 mm
-
Une vis cruciforme de 2,4 mm
-
Trois vis cruciformes de 2,0 mm
The antenna cable will almost always stick to the digitzer and often the glass is broken there. You can use a knife to pick out broken glass around the edges elsewhere but use ONLY PLASTIC tool to separate the antenna cable from the old digitzer. This cable is very thin and a metal tool can easily cut the cable which you cannot then repair but must buy a replacement.
If you are removing broken glass be sure to recover the steel plate glued to the top of glass as well as the home button at the bottom of the assembly.
This steel plate or bracket has been discussed many times here. My best experience is to NOT move it to a new screen. Without the bracket and using enough adhesive in fact brings the new screen closer to the chassis and a snugger fit. Read more here: What parts to move from the broken screen?
asle -
Notice, in the image the switch for the home button has a tiny sub-1mm dot in the center of it. When I reassembled the home button did not work. That tiny cylinder of material had been knocked off the switch. A rounded probe could still activate the switch, but the flat metal plate on the home button could not. Fortunately, I was working on a white cloth, and a careful search turned up the tiny cylinder. I was able to reattach it and repair the home button.
I would like to add that the tiny cylinder is 0.65mm in diameter and 0.20mm high. I was able to successfully reattach it using a thick cyanoacrylate. You must be careful not to foul the switch's membrane with too much glue. I would suggest using fine point tweezers and a metal probe to apply the tiny dot of glue. You need a steady hand for this.
ciradrak -
-
-
-
Utilisez le bord d'un outil d'ouverture pour iPod pour retirer le mince cache en acier de la caméra arrière.
-
Retirez le cache en acier de l'iPod.
Be sure to get the tool down deep when removing the rear camera. If not, you can accidentally snag the mid-section of the camera and it will come apart -- and you'll end up buying a replacement.
I have snagged that part of the camera several times. Easy to fix with super-glue along the edges of the cover. Works great. Sometimes no matter how carefully you pry up it falls apart.
asle -
This metal plate fits under plastic near RHS edge, and other side drops between the camera and a circuit board - to refit, you may need to loosen a nearby screw to allow you to move the circuit board a little to let this metal plate clip onto the side of the camera.
I had to press down hard with a plastic tool to get this metal plate to clip on.
Don't forget to re-tighten it later (I forgot).
A strip metallic cover, glued to display isn't mentioned in this guide.
Note that most new front panels are going without this part and you would need to remount it.
what exactly is the copper tape for that sits over the backplate that covers the rear camera? it gives me trouble every time.
The copper is important for heat dispensing. It has nothing to do with grounding or signal. In worst case if it is torn the Touch could get hotter but should work. If it is torn I usually just lift up one part and move it so it is in contact with the other copper part.
asle -
I just replaced the screen and rear cam on my 4th gen. The camera does not work??? Any ideas????????
Maybe the rear camera connection got loose when you lifted up the logic board in top to replace the digitizer. I would open it again and check the connection to the rear camera. Hope you fix it!
asle -
-
-
-
Insérez le bord d'un outil d'ouverture pour iPod sous la plaque médiane en acier près du coin inférieur gauche du touch.
-
Faites leveir vers le haut pour séparer la plaque de l'adhésif la fixant au boîtier intérieur en plastique.
-
Si la plaque est toujours attachée à la carte mère, réchauffez cette zone pour ramollir l'adhésif, puis séparez la plaque de la carte mère à l'aide de l'outil d'ouverture.
-
Ici une nappe très mince relie les boutons de volume et de marche à la carte mère. Essayez de contourner cette zone comme sur la photo, afin de ne pas déchirer la nappe. Assurez-vous de maintenir cette nappe enfoncée lorsque vous soulevez la plaque. Elle pourrait coller à la plaque en raison de la colle et est extrêmement fragile.
-
Il y a également de l'adhésif dans la zone indiquée en rouge.
I couldn't get a spudger in-between this space, so I went to the side where the three screws were on the left hand side and worked my way towards the bottom to separate the glue...
The power and volume wire on the logic board were covered with adhesive. Be careful! While trying to remove the steel mid plane I found that the adhesive will rip the ribbon!
Here is where you take it easy. Two things can be broken here.
-Use time to carefully separate the bottom left part of the midplane. It sticks to the speaker which you tear the speaker leads if you are to hasty to lift it up. And remember the mid plane must not be bended up here since it needs to be 100% aligned so the new digitizer does not bulge here when in place.
- The second picture. The black visible adhesive sticks to the volume cable. Use time to carefully separate the mid plane here so the cable is not ripped when you lift up the midplane. Pry a plastic tool like the picture or/and a spudger slowly in until you see/feel the midplane loosening. A broken volume cable is no fun.
That small ribbon cable ripped, be sure to really watch this - look at the second picture in this step and try to make sure you understand where it is on the board under it.
This was difficult during both disassembly and reassembly. I used a thin guitar pick to separate the ribbon cable by the volume buttons from the steel midplane. Reassembly was tough because I didn't have the ipod dock connector seated correctly, AND more importantly, the speaker has a part that needs to be inserted into a black part on TOP of the dock connector-- it looks almost like a tiny air duct that has a foam gasket around it.
I was able to replace the home button ribbon cable without having to fully remove the steel mid plane. It lifted up enough from the iPod's body that I was able to slip the ribbon in around the support it sticks to and hold it in place until the adhesive set.
Much simpler, and didn't cause any problems -- the mid plane didn't deform, and snapped right back into place.
Thanks for the guide.
Unfortunately there was so much glue on the tiny power/volume button ribbon cable that any attempt at removing the steel cover plate would eventually rip that cable at the 4 solder joints. A picture of that cable would help tearing down more securely.
Is there a way to repair the torn ribbon cable or should I consider my iPod as dead now?
-
-
-
Inclinez légèrement la plaque médiane en acier pour la déloger de la coque arrière.
-
Soulevez la plaque médiane en acier de l'étui arrière et retirez le morceau de ruban en cuivre collé à la caméra arrière.
I was able to stop at step 8 for the battery replacement.
Once you remove the metal shield, desolder the 3 leads. Then use your heat gun to warm the battery. Use plastic pry tool between copper backing and battery and separate them (two adhesive strips on the sides of the battery). Once done with this, you can snake the battery ribbon cable from between the logic board and aluminum casing. Not as easily, but still very doable, snake the new battery ribbon back through the same slot; solder 3 points and reassemble. Much easier than removing the entire board. Good luck!
Oh also, not mentioned in this guide - there is a plastic/silicon substance covering the 3 leads. Prior to desoldering remove this as much as possible with metal or plastic spudger (if metal, be sure not to bridge the connections).
I stopped dismantling here as well and was able to replace the battery and everything works on the ipod. tricky parts for me were the copper adhesive on the rear camera and getting the data display cable reconnected
I used plenty of heat first heating the ipod in an industrial oven to about 150 F and then as needed heating a heat gun.
dhawke -
what do you do if you break the copper connector to the camera?
The copper tape is mainly for heat dispersion. Without the copper tape it should work anyway but I would just lift up and move one part of the tape so that it is in contact with the other part when you put it together.
asle -
justinallison1, From what I understand, it is ok if that copper tape rips. In fact, I have seen people remove it completely. If it rips, just try and have the 2 pieces touching. (This is what I have researched and done myself with no negative results.
after removed the steel mid plate, does anybody measure the battery voltage? I measured the battery voltage is only 0.3V. is it normal? I de-soldered the battery three points and measured the battery voltage 3.8V. So It looks like battery is OK. The logic board has problem. So I connected external power source 3.7V and maximum current 50mA to the battery B+ and B-. I found the power source dropped to only 1.65V and 50mA. Could I say logic board has problem?
-
-
-
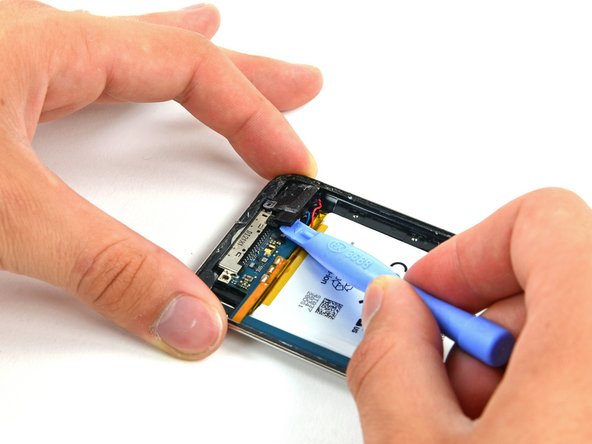
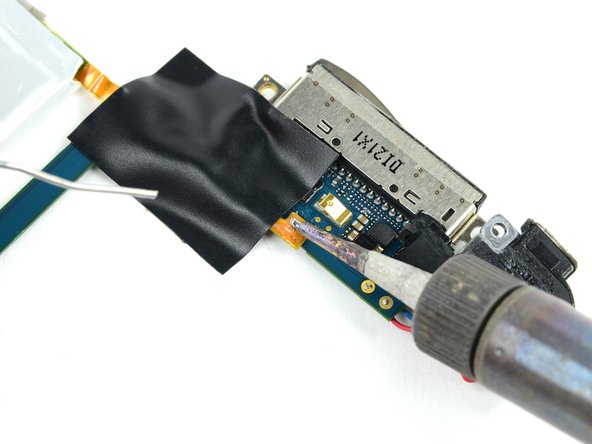
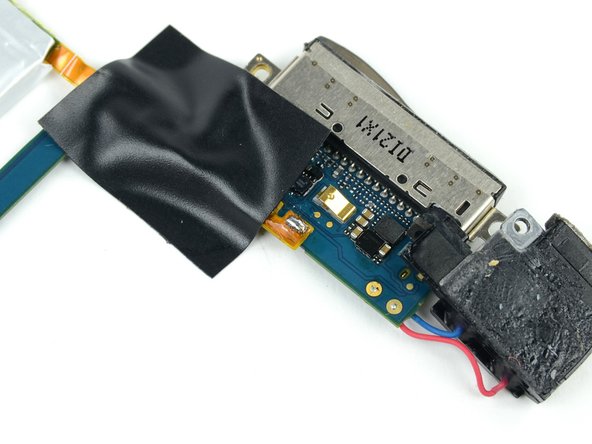
Utilisez un outil d'ouverture pour iPod afin d'extraire le connecteur de la prise casque de sa prise sur la carte mère.
I was able to ply the battery out slowly, without removing the logic board because the battery was so swollen. Just started by prying it out using the side of the case, not the logic board, and it peeled out slowly. As mentioned further down in the instructions, the copper flashing had to be pushed back into shape. The battery unsoldered easily, lifting as described. Just slip the flexible conductor from the battery out from under the logic board.
It powers up without a battery if you need to get data off the iPod.
-
-
-
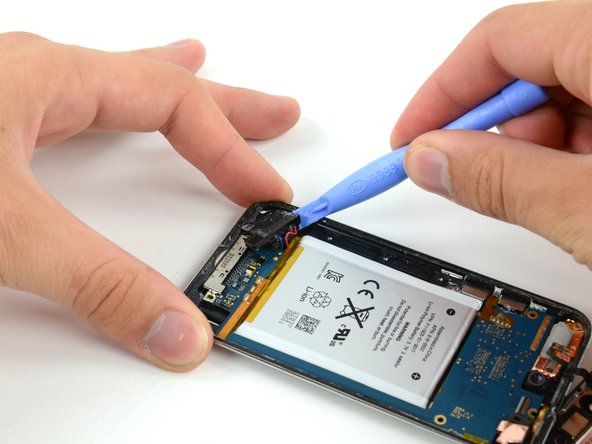
Retirez la seule vis cruciforme de 2,6 mm fixant l'ensemble prise casque à la coque arrière.
-
-
-
-
Utilisez un outil d'ouverture pour iPod afin de soulever doucement le bord de la prise casque le plus proche de la batterie hors de son emplacement.
-
Retirez la prise casque de son emplacement dans la coque arrière.
-
-
-
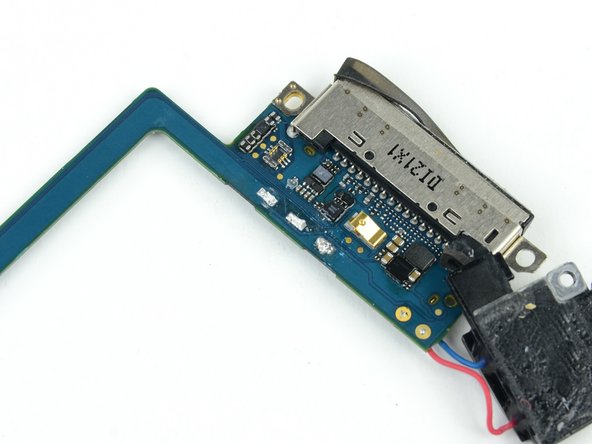
Retirez les trois vis suivantes près du bord supérieur de la carte mère :
-
Une vis cruciforme de 2,0 mm
-
Deux vis cruciformes de 2,3 mm
Can you use the same colour coding as with The above sizes? [HvL]
These colors are too close together.. One red, two yellow.. Please.
Thanks for the comment! I adjusted that step, should be much easier to see now.
If you're ever having trouble seeing screw markers or other small details on a step, you can always view a larger version of the image with the "View Huge" link on the top left corner of the image.
Can someone explain what the copper/ribbon is that the lower yellow marked screw goes through is for? Perhaps only heat dissipation? The ipod I have was given to me with much of the glass smashed and picked out, so some of this is just missing. Obviously I can't put it back...
-
-
-
Utilisez le bord d'un outil d'ouverture pour iPod pour éloigner, et non enlever, délicatement sur la caméra arrière la caméra arrière de l'étui arrière.
When you insert your tool to remove the rear camera make sure you have the tip all the way in. You can accidentally grab the middle of the camera assembly and it will come apart - and you'll have to replace the entire camera.
hi! i accidentally cut the copper adhesive on rear camera, and now it doesn't work: i start the app "camera" and it opens but still close the lens... can i fix it ? if yes, how? thanks
-
-
-
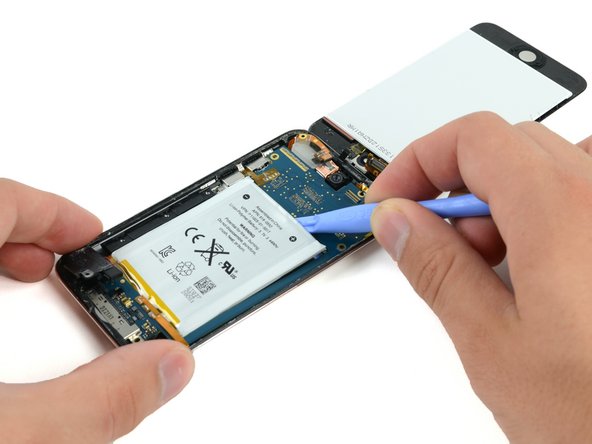
Utilisez un outil d'ouverture pour iPod pour relever légèrement le bord de la carte mère à côté de la batterie de façon à la saisir de votre autre main.
-
Soyez très prudent de ne pas soulever trop, car la nappe de gestion du volume est toujours connectée et se déchire très facilement.
-
En soulevant délicatement la carte mère d'une main, utilisez un outil d'ouverture pour iPod pour soulever la carte mère près du ruban de cuivre sur le bord supérieur de la carte mère.
-
La carte mère sera soulevée de manière adéquate lorsque le dernier connecteur de l'ensemble écran ne sera plus en contact avec le bord supérieur de la coque arrière.
Use extreme caution when lifting the board. There are 2 ribbon cables that are extremely fragile, 1 connecting the rear facing camera and another connects the volume controller flex on the logic board.
Adding to Evon's comment:
BEFORE YOU LIFT UP THAT BOARD...
Use your plastic pry tool and make sure the flex cable, between the board and power button is not on top of the board. Take your time because even the slightest snag can tear that flex cable which leads to de-soldering/soldering the battery & flex cable.
Once the board is lifted the first time I usually put a piece of Kapton tape over that area of the cable in case it has to be pulled up again.
Can you explain this in a little more detail?
I have done a dozen or more iPod screens without any issue. I have one here now that does nothing. Just a black screen. It won't even take a charge.
Should I simply desolder those pads and then resolder? Sort of like unplugging and replugging to reset something?
Thanks!
Rene
Ciao dopo aver seguito il tuo aiuto per come cambiare la batteria io ho rimontato tutto ma la barra di sblocco non scorre più o i comandi in quella altezza del touch , tutto il resto funziona perfettamente.Dove potrei aver sbagliato?
Potete aiutarmi grazie
I was so so so so careful when lifting the logic board past the flex cable on the power button. Before final assembly, plugged it all in to test and it booted OK. LCD and Digitizer worked. Went to power it off and found the power button wouldn't work. Sure enough, the tiny (<0.5mm) strip of copper in that power flex cable had torn right through. About to pitch this rotten, stinking thing across the back yard into the trees. I've spent 5 hours of my life fixing this today! Aaargh!!!!!
-
-
-
Avec un outil d'ouverture en plastique, retirez délicatement le haut-parleur de l'iPod hors de sa emplacement dans la coque extérieure.
-
Laissez le haut-parleur reposer au-dessus de la batterie afin que vous puissiez procéder à l'installation de la batterie.
-
-
-
Avec un outil d'ouverture en plastique, appuyez avec précaution sur le connecteur de dock de son emplacement dans la coque extérieure. Faites uniformément dans chaque coin jusqu'à ce que le connecteur sorte.
Existe cola embaixo do conector, por isso, a dificuldade em retirá-lo. Eu aconselho, um pequeno aquecimento com a pistola de calor, na parte traseira da carcaça, antes de tentar a remoção do conector.
For Step 17, just slip a length of waxed dental floss under the top left and right corners of the battery, slowly slide down the back of the battery with a sawing motion. All the adhesive will be seperated w/out any risk of bending the board or puncturing the battery. Charging port will now be easily removed.
-
-
-
Une fois que tout l'adhésif sous l'ensemble carte mère/batterie est décollé, soulevez-le depuis le côté et faites-le soigneusement pivoter pour accéder au dessous de la batterie.
-
-
-
Saisissez la protection en cuivre collée sous la batterie d'une main tout en tenant fermement la batterie de l'autre.
-
Décollez soigneusement la protection en cuivre de la batterie.
-
-
-
Commencez à l'extérieur de la nappe de la batterie. Chauffez le point de soudure le plus à l'extérieur tout en faisant délicatement levier sous la nappe pour l'enlever de la carte. Répétez ce processus pour chacun des deux points restants, en partant de l'extérieur.
READ ALL THE STEPS BEFORE YOU BEGIN
1. Do NOT use a metal spudger for this.
2. Cover surrounding components with Kapton tape.
3. Optional (if you found this tutorial and are replacing the volume/power flex cable and your battery is good) Cover two of the three leads with Kapton tape to avoid shorting a good battery.
6. Set your temperature on your soldering iron with a flat chisel tip.
7. Apply a little flux to a copper soldering braid.
8. Place the copper braid on the contact that you want to de-solder - you may need to lightly hold it steady with your thumb in place.
9. From the bottom of the cable very gently push up with your index finger.
10. With your other hand, the one with your iron, gently press down to melt the solder, as soon as the solder melts use your index finger to gently push the cable up so as to disconnect the cable from the solder pad. Wait about 15 seconds for the solder to cool.
11. Insert a piece of kapton tape between the cable and solder pad.
12. Repeat steps 7-12 for the remaining two contacts.
FLUX WARNING:
If using flux, be sure to use 94%+ alcohol (once the battery is disconnected completely) to clean off any remaining flux. Don't try cleaning flux off until the battery is removed to avoid pushing debris between contacts and onto other components that will cause a short.
Rule of thumb, if power is flowing through a logic board don't apply alcohol or try to clean it. Always remove the power source then thoroughly clean. Pushing around small metal particles in alcohol while a device is "hot" is the fastest way to cause a short or electrical arching.
I followed what another user had suggested and didn't remove the logic board - it worked well and I managed to do it easily enough. However, when trying to remove the solder and cable from the battery terminals (it was really tricky) I think I may have pulled the pad off. I put my iPod back together anyway but now it won't boot, show up in iTunes when it's plugged in or (in fact) do anything. Could the possible loss of the middle terminal be the root of these problems?
-
-
-
Ensuite, utilisez la panne d'un fer à souder pour aplatir la soudure sur les points de soudure de la carte mère. Les images montrent «avant» et «après».
Hello, I have pulled the middle pad off my iPod 4th Generation how can i repair this?
I did the same thing and accidentally pulled the middle battery pad from the logic board. I know that I am supposed to gently remove the 'laquer' or 'shellac' covering around the area of the pad in order to expose the copper circuit underneath. I am just not sure which circuit I should be working with. A good closeup of the area to work on would be greatly apreciated.
ALF -
Best plan is to take it to Apple store.
-
-
-
Posez la nouvelle batterie à sa place et alignez le contact éloigné avec le point de soudure extérieur. Utilisez un petit morceau de ruban adhésif isolant pour maintenir la nappe contre les points de soudure.
-
Placez le morceau de ruban isolant sur l'extrémité de la nappe de la batterie pour couvrir deux des points de soudure et maintenir les contacts contre la carte mère.
-
Chauffez le contact le plus à droite jusqu'à ce que la soudure en dessous fonde, puis appliquez une petite quantité de soudure sur le contact, laissez-lui le temps de circuler à travers les deux trous de la nappe et jusqu'à la carte mère.
-
Dès que la soudure a coulé dans le joint, retirez à la fois la soudure et la panne.
-
-
-
Déplacez le morceau de ruban adhésif isolant afin qu'il ne couvre plus les deux autres fils. Si vous êtes satisfait de la position de la nappe par rapport aux points de soudure sur la carte, procédez. Sinon, dessoudez la première connexion et réessayez.
-
Soudez les deux points restants de la carte mère, en évitant de surchauffer le nappe et la carte.
Apple hold their customers in low regard. “Value for money” is beyond their imagination, no more than vulgar expression!
-


Pour réassembler votre appareil, suivez ces instructions dans l'ordre inverse.
Pour réassembler votre appareil, suivez ces instructions dans l'ordre inverse.
Annulation : je n'ai pas terminé ce tutoriel.
208 autres ont terminé cette réparation.
Merci à ces traducteurs :
100%

Ces traducteurs nous aident réparer le monde ! Vous voulez contribuer ?
Commencez à traduire ›

43 commentaires
Did it! Now screen is a bit funky when I press on the sides of the iPod. Although all seems good :)
Thanks iFixit!
I had a similar problem when pressing on the center button. Turns out it was too much solder on the battery connector. I had to disassemble again and used some solder wick to lower the solder blobs. I suspect that the back plate must not be completely flat for you.
I followed this guide to the letter but the new battery only has half a charge and will not take a charge when plugged in. Any thoughts?
To clarify, does the battery show as charging when plugged in? If so, will it go from no/low charge back up to half charge? If this is the case, I would contact whoever sold you the battery and ask for a replacement.
For those using rework stations, what temperatures are recommended for the iron & hot air blower?
The following temperatures worked well for me:
150ºC hot air for softening adhesives.
290ºC for removing old solder.
Make sure to add liquid flux before removing all traces of old solder, & clean all surfaces.
Apply new flux to both sides of Kapton cables as well as the board. Set your iron temperature acording to the recommended setting for your ROHS electronics solder.
*DO NOT USE NON ROHS or lead bearing solder*
*DO NOT USE plumbing or acid core solder as this will destroy your electronics*
To anybody who gets a white screen when trying to power on the device, all that is needed is a forced restart, just hold the home and power buttons until you get the apple logo
Invaluable. especially re screw lengths-though how you tell a 2.3mm screw from a 2.4mm screw is a bit of a poser. Unsoldering the battery before folding the logic board out of the way worked for me. Unsoldering the old battery connections was difficult, though, as the battery fitted had the connections apparently covered in plastic. Didn't find any problems using leaded solder - certainly in UK it is allowed for repair work.
I was a complete and total newbie. I replaced the battery and the screen with this tutorial. I accidentally missed a screw and I think that is why my volume down button didn't make it out alive but that was my only casualty. As I have never soldered before I watched a youtube video on soldering tips first and that helped my confidence. Overall it was very stressful but I have kids too which added to that, but it was a success! Thanks for this very detailed awesome guide!
I just did this with (relative) ease, but I turned it back on yesterday and have had it plugged in the whole time, and it WILL NOT charge! It being my first ipod repair there were a number of casualties, but nothing I considered to be life or death...
1) internal speaker wire got sliced somehow, not even sure how...
2) ribbon cable to volume control completely separated (again, not even sure how)
How does the battery even get power? It's just soldered to the logic board....does electricity just go through the soldering/ribbon cable into/out of the battery?
Hello, first of all, congratulations on the great guide!
I`d like to give a hint. You don`t NEED to go through all the steps to change the battery. You can skip STEPS 16 to 23. You don`t need to actually remove the logic board to change the battery. Just desolder the connections and pass the riboon below the board. That`ll save some time.
Another hint is BE CAREFUL with the heat gun. I used it too much and I think that I`ve damaged something. But it was my fault =[
Great guide, thanks!!
after i have change a battery a have lost touch on the corner of the screen, tyhere is a way to fixc that or i have to change the sreen and lcd.
I did the same thing and accidentally pulled the middle battery pad from the logic board. I know that I am supposed to gently remove the 'laquer' or 'shellac' covering around the area of the pad in order to expose the copper circuit underneath. I am just not sure which circuit I should be working with. A good closeup of the area to work on would be greatly apreciated.
I broke unfortunately my iPod touch when I tried to replace the battery. I didn't have the specific tools to open it so I damaged it when opening it. I bought Samsung phone next week to replace my iPod, it's easy to change battery to it.. no more integrated batteries!
Completed battery replacement over two days. Everything is working. The carefully worded procedure, although sufficient, is not for the faint of heart! Patience is paramount. Adhesive, 'foam rubber' seals, silicone over battery pads, and odd-shaped speaker and other components provided added challenge for me. I made good use of additional items: 7X fine tip tweezers, Exacto knife, plastic dental pick, additional tiny screwdriver, solder wick, Kapton tape to provide extra layer of insulation over new battery pads, and OptiVisor to accommodate my 66 yr old eyesight. Without these instructions, the battery replacement would have been near impossible. Thanks.
I replace the battery and it worked but a few days later it stopped working, open it up and I messed up the FTC connector, now need to replace FTC connector and the flex cable, help please how to do it?
Thank you for the guide!
My ipod ran through the washing machine and the dryer, the battery appeared to be unable to charge. So I changed it with the guide.
I was able to change the battery at the step 17, I skipped the step 13 and 15, and I could have skipped 9 to 11 with the headphone jack.
It was not easy to pry the different parts and to seat back the LCD cable at the end, be patient!
Well I amimpressed even a begginers hands and a good mind can build and repair there own once you have the tools and in some cases the right tools are the right wrong tools improvise and thismi pod pid pods pide pode poa pia ND THANK YOU ON MY NEW JOB I NOW REPAIR AND IX ALL KINDS OF EQUIPMENT
is the best tutorial on subjects on these
Yes I accomplished this but it was difficult. Really wish Apple was a bit nicer about designing these things. I found that using a heating pad worked really well a loosening up the adhesive. I felt it was a bit safer than the heat gun approach less likely to have overheating issues.
I follow the guide to replace battery and it work. Had some what of a time removing the battery because the adhesive was adhering strongly, but finally it separated from the housing. Desoldering and resoldering and the reassembling went well.
So now I have my ipod back . Thanks for the wonderful guide.
Hello, I have a 4 gen iPod touch 32 GB, I need to repair BUT I dropped three screws in the vent by my desk and can NOT find them. FAT Fingers VERY SMALL screws. Where can you find these ? They are
One 2.3 mm Phillips screw
One 2.4 mm Phillips screw
One 2.0 mm Phillips screw
Thank you for your valuable time and Info. Have A Blessed Day. Regards'
Hello, I have a 4 gen iPod touch 32 gb, I need to repair BUT I dropped three screws in the vent by my desk and can NOT find them. FAT Finger's Very SMALL Screws!!!!!!! Very Old House! They are
One 2.3 mm Phillips screw
One 2.4 mm Phillips screw
One 2.0 mm Phillips screw
Where can I find these? Do these come in a pack? Thank you for your valuable time. Have A Blessed Day. Regards'
I ended up breaking the board at 18... I think this step could be skipped... I think one could unsolder the ports after 17. Remove the battery, install, the battery en resolder after that point... Thanks anyways...
Hi, I have replaced the battery, at first, the spare shiiii...ty battery was weird and only charged to 50% then it never charged until it ran out of any charge.
then after detaching the shiiii...ty battery, in the middle of the process I accidentally broke the "volume" and "touch screen" flat cable, and lost all the mini screws.
fortunately, the main board was intact and i connected it to a very ordinary 3.7 V-4000 mAh lipo battery and it work perfect!! (naturally it does not fit in the casing anymore!)
sometime i detach the LCD panel and I use it only as a very powerful and compact music player!
My advice ~ {{{{{{{{{ Don't waste your money on the "Original" shiiii...ty spare batteries, you can buy an ion-battery as cheap as a few bucks in any capacity }}}}}}}}}}}}}
Thanks! I replaced the battery successfully- Great instructions-
However- Can anyone tell me how I killed Wifi?
Lol-
Who ever thought integrated batteries were a good idea should be punched.
Good, it is called very complicate !!! Apple does all to make it nearly impossible to change the battery. But I did it !!! I am happy. It took me about 6 hours an d at the end I missed the instruction how to glue all together again.? I fortunately bought the set for it together with the battery. But cleaning all from the old glue took half of the time. Thank you for the good step by step instruction.
I’m new to the fixing products industry and i was just wondering as to why you have to take all the logic board and headphone jack out etc because i thought that all you had to do was to open up the device and use the pull tabs to release the battery, or is this just on the more recent devices.
Hello, I replaced the battery of my 4th generation iPod touch with that of another exactly identical iPod. Since then, the screen always shows the red battery icon with the lightning bolt symbol. What should I do?
You can skip steps 18-23 by desoldering the 3 battery connections and unsticking the old battery from the copper film that is stuck to the backplate with an opening tool at step 17. The battery will curl but this isn’t a problem so long as you don’t bend it too far. Slide the old battery out from under the logic board. Use the opening tool to smooth down the copper film if it has lifted by pressing down firmly and pushing the blade from centre to outer edge. Slide the new battery beneath the logic board and wrap the ribbon over the top. Solder up and reassemble.
do I have to use a heat gun
Fabiola Winfield - Réponse
yes it is crucial
ben folks -
but u can use a hair dryer on warm
ben folks -
I didn't use a heat gun but this was due to the glass being rather shattered and not just cracked in the corner. The rule of thumb might be to not use excessive force, if you see that you need to use the heat gun or a blow dryer as someone suggested. I also wanted to point out the the adhesive strip just around the edges was exposed and it is rather strong so I was able to pull it around part of the edge which actually helped the glass disengage.
nirv -
Hi, thanks to this tutorial achieves replace my iPod battery to 100%, it was difficult, so thanks iFixit!
The only problem I had was with the iFixit screwdriver disappointed me greatly, as it can not remove the screws with the screwdriver.
A tip for those who first make repairs before starting the disarmament carefully read through the tutorial to not make a mistake that could damage your iPod and do not forget to place pieces in a safe place so they are not lost.
Greetings from Guatemala
Alfonso.
Alfonso Espinoza - Réponse
well then u suck
ben folks -
Be careful with the heat gun!! Don`t use it too much. You can melt something inside, specially when you`re closing the iPod.
Luiz R - Réponse
No man you can use a blow dryer!
Colton B - Réponse
Would a heat bead bag be safer option to weaken the adhesive?
Angus McLauchlan - Réponse
I had success with as low as 80°C using a hair dryer to melt the adhesive, I kept track of it with a meat thermometer. The battery says it's rated only up to 60°C...
micahvanderhill - Réponse
I got through all the parts to take the wifi antenna out!! But, I'm having a hard time putting the stuff back!!
~Palm head~ But thank you ifixit for the great and awesome directions, I understand clearly!! Thank you very much
Kaiden - Réponse
A hairdryer perfectly does the job. I’d recommend heating the bottom for 20 seconds, then attempt at inserting a plastic pick between the glass and the chassis. If it doesn’t work, reapply some heat in 10 seconds intervals until the glue gives in. You shouldn’t have to exert lots of force to release the adhesive, heat should do the job.
Then apply some heat to the top of the screen to release the remaining adhesive. Opening is straightforward. Just beware of the ultra little slack of the short yet fragile flexible digitizer cable.
Olivier Biot - Réponse
Thanks for the tip!
Sean - Lua Tech -