Aller au contenu principal

iRobot Roomba 880 Bumper Sensors Replacement

Ce dont vous avez besoin

  1. iRobot Roomba 880 Bumper Sensors Replacement, Bumper Sensors: étape 1, image 1 de 2 iRobot Roomba 880 Bumper Sensors Replacement, Bumper Sensors: étape 1, image 2 de 2
    • Flip your Roomba over so the wheels are facing up.

    • Using a Phillips #2 screwdriver, remove the side brush and place off to the side. There will be a 10mm screw that remains in the brush.

  2. iRobot Roomba 880 Bumper Sensors Replacement: étape 2, image 1 de 3 iRobot Roomba 880 Bumper Sensors Replacement: étape 2, image 2 de 3 iRobot Roomba 880 Bumper Sensors Replacement: étape 2, image 3 de 3
    • Remove the battery panel and 10mm screws with a Phillips #2 driver and then take the battery out of the device.

  3. iRobot Roomba 880 Bumper Sensors Replacement: étape 3, image 1 de 1
    • Remove the two 10mm screws holding the back plate in place using a Phillips #2 screwdriver, and then remove the plate from the device.

  4. iRobot Roomba 880 Bumper Sensors Replacement: étape 4, image 1 de 3 iRobot Roomba 880 Bumper Sensors Replacement: étape 4, image 2 de 3 iRobot Roomba 880 Bumper Sensors Replacement: étape 4, image 3 de 3
    • Using a Phillips #1 screwdriver, remove the ten 10mm screws that hold the bumper in place.

  5. iRobot Roomba 880 Bumper Sensors Replacement: étape 5, image 1 de 1
    • Flip your Roomba over so you are looking at the face of your device.

    • Using a plastic opening tool, pry the face plate off of the Roomba.

    • While prying the the face plate off of the Roomba, do so gently. Do not force the plate off as this could result in broken pieces.

  6. iRobot Roomba 880 Bumper Sensors Replacement: étape 6, image 1 de 2 iRobot Roomba 880 Bumper Sensors Replacement: étape 6, image 2 de 2
    • Remove the white cover that protects the motherboard.

    • Remove the black circular face plate from your device. It is snapped in place, but you can gently pop it off.

  7. iRobot Roomba 880 Bumper Sensors Replacement: étape 7, image 1 de 2 iRobot Roomba 880 Bumper Sensors Replacement: étape 7, image 2 de 2
    • Using a Phillips #0 screwdriver, remove the six 10mm screws holding the black panel in place.

  8. iRobot Roomba 880 Bumper Sensors Replacement: étape 8, image 1 de 2 iRobot Roomba 880 Bumper Sensors Replacement: étape 8, image 2 de 2
    • Remove the two plastic coverings that further protect the motherboard.

  9. iRobot Roomba 880 Bumper Sensors Replacement: étape 9, image 1 de 2 iRobot Roomba 880 Bumper Sensors Replacement: étape 9, image 2 de 2
    • This next step will require some force as the cables are securely connected to the motherboard at this time.

    • Remove the two cables that connect the bumper and sensors from the motherboard.

    • As you can see in the photo, the cable and the location of where it goes on the motherboard are marked with their respective shapes.

    • Fully disengage the bumper, along with the skinny IR sensor track from the main part of the device.

    • The sensor track is hidden underneath the bumper, but it connected with several wires.

  10. iRobot Roomba 880 Bumper Sensors Replacement: étape 10, image 1 de 3 iRobot Roomba 880 Bumper Sensors Replacement: étape 10, image 2 de 3 iRobot Roomba 880 Bumper Sensors Replacement: étape 10, image 3 de 3
    • Rotate the device 180 degrees so you are looking at the other side.

    • Remove the cables that are holding this part of the motherboard in place.

    • This might require a bit of tugging. We recommend gently wiggling the cable at the base, to help loosen the hold.

  11. iRobot Roomba 880 Bumper Sensors Replacement: étape 11, image 1 de 3 iRobot Roomba 880 Bumper Sensors Replacement: étape 11, image 2 de 3 iRobot Roomba 880 Bumper Sensors Replacement: étape 11, image 3 de 3
    • Remove the 6 bumper sensors from the side of your device.

    • This will require some tugging as the sensors are securely situated in the device currently. We recommend using a spudger if they are particularly difficult.

    • You might need to cut the tape that is currently holding several sets of bumper sensor wires together. It might be helpful to tape the new sensor wires back together when putting your device back together.

    • As you can see in the third photo the cable from the bumper sensor was originally connected to the motherboard.

  12. iRobot Roomba 880 Bumper Sensors Replacement: étape 12, image 1 de 1
    • Now you can easily snap the 6 replacement bumper sensors into the device, and begin the reassembly.

Conclusion

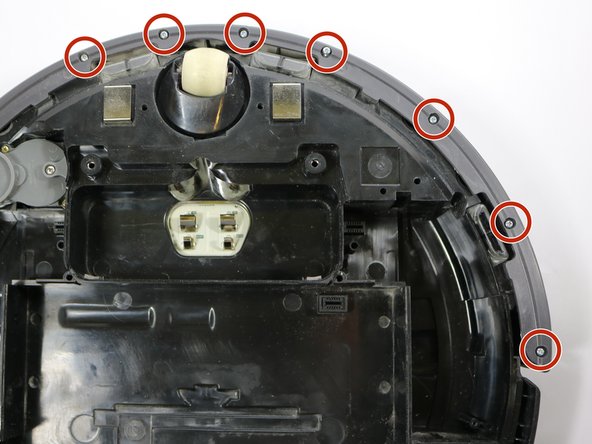
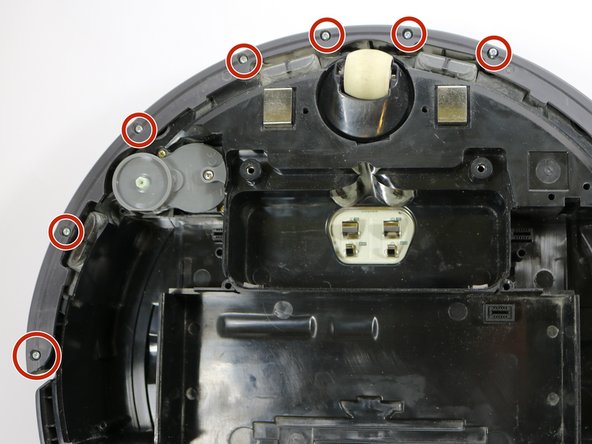
To reassemble your device, follow these instructions in reverse order.

8 autres ont terminé cette réparation.

Frances Belcher

Membre depuis le 04/18/17

420 Réputation

2 tutoriels rédigés

Équipe

Cal Poly, Team S17-G4, Banghart Spring 2017 Membre de l'équipe Cal Poly, Team S17-G4, Banghart Spring 2017

CPSU-BANGHART-S17S17G4

5 membres

5 tutoriels rédigés

3 commentaires

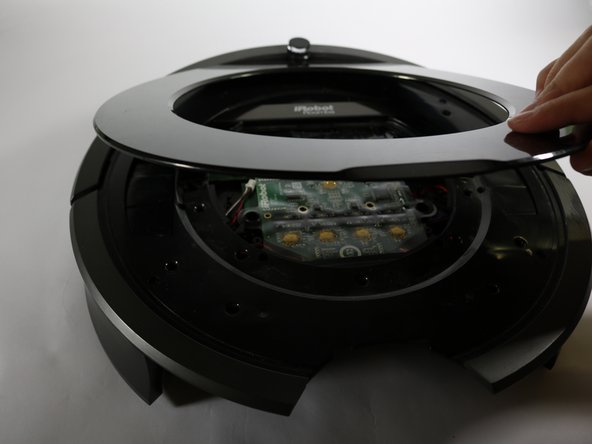
Great tutorial! I was lucky to only need to follow directions to the point of removing the bumper, just enough to reposition the metal tension springy thing in front. Obviously, I’m a neophyte and need easy to understand, illustrated content to accomplish anything mechanical. You provided everything necessary to get my Roomba back to work. Thank you!

Kip Facebook - Réponse

Im a 14 year old and i had a roomba 530 with a error 9 and i fixed it i love these things there so cool it just takes a long time to fix but it was worth it!

LakeM0nst3r - Réponse

just followed this guide and it was easy and replaced all the censors and it still says error 6. any ideas?

Master tyyoda - Réponse

Ajouter un commentaire

Nombre de vues :

Dernières 24 heures : 3

7 derniers jours : 17

30 derniers jours : 54

Total : 11,429