Aller au contenu principal

iRobot Roomba 980 Rear Wheels

Ce dont vous avez besoin

  1. iRobot Roomba 980 Rear Wheels, Battery: étape 1, image 1 de 1
    • Flip over the device and remove the two 11.5 mm screws using the Phillips #1 screwdriver.

  2. iRobot Roomba 980 Rear Wheels: étape 2, image 1 de 2 iRobot Roomba 980 Rear Wheels: étape 2, image 2 de 2
    • Unscrew the back plate using a Phillips #1 screwdriver.

    • Carefully lift the panel up once the screws are removed.

  3. iRobot Roomba 980 Rear Wheels: étape 3, image 1 de 2 iRobot Roomba 980 Rear Wheels: étape 3, image 2 de 2
    • With both hands, grab the two black tabs on each end of the battery.

    • Pull the tabs upwards to remove the battery.

  4. iRobot Roomba 980 Rear Wheels, Rear Wheels: étape 4, image 1 de 2 iRobot Roomba 980 Rear Wheels, Rear Wheels: étape 4, image 2 de 2
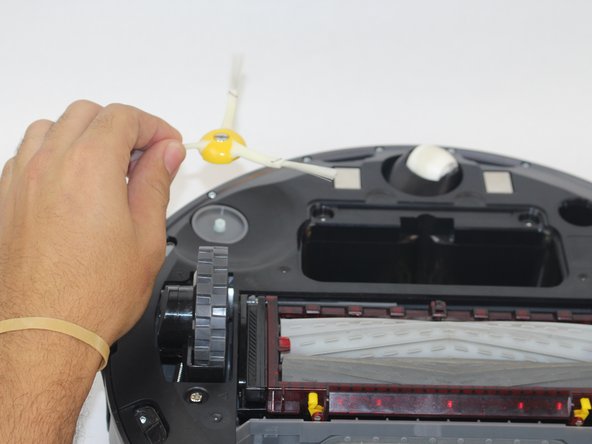
    • Loosen the screw on the side brush.

    • Lift the side brush from the device.

  5. iRobot Roomba 980 Rear Wheels: étape 5, image 1 de 2 iRobot Roomba 980 Rear Wheels: étape 5, image 2 de 2
    • Unscrew the (2) 11.5mm screws using the Phillips #1 screwdriver.

    • Carefully remove the plate by lifting it off of the device.

  6. iRobot Roomba 980 Rear Wheels: étape 6, image 1 de 2 iRobot Roomba 980 Rear Wheels: étape 6, image 2 de 2
    • Removing the brush module may ease the removal of the wheel module

    • Locate the (3) 15.8mm gold Phillips #1 screws and unscrew them.

    • Lift the wheel module removing it from the vacuum.

    • Remove the other wheel by repeating these steps.

Conclusion

To reassemble your device, follow these instructions in reverse order.

4 autres ont terminé cette réparation.

Équipe

USF Tampa, Team S14-G2, Boczar Fall 2017 Membre de l'équipe USF Tampa, Team S14-G2, Boczar Fall 2017

USFT-BOCZAR-F17S14G2

4 membres

5 tutoriels rédigés

0 commentaires

Ajouter un commentaire

Nombre de vues :

Dernières 24 heures : 1

7 derniers jours : 2

30 derniers jours : 10

Total : 3,137