Aller au contenu principal

jp.ik Leap T304 Battery Replacement Replacement

Ce dont vous avez besoin

  1. jp.ik Leap T304 Battery Replacement Replacement, Rear Cover: étape 1, image 1 de 1
    • First ensure your laptop is turned off and check if you have the necessary tools

  2. jp.ik Leap T304 Battery Replacement Replacement: étape 2, image 1 de 2 jp.ik Leap T304 Battery Replacement Replacement: étape 2, image 2 de 2
    • All screws are identified by circles. Pay special attention to the yellow circles, as the rubber feet hide screws.

  3. jp.ik Leap T304 Battery Replacement Replacement: étape 3, image 1 de 3 jp.ik Leap T304 Battery Replacement Replacement: étape 3, image 2 de 3 jp.ik Leap T304 Battery Replacement Replacement: étape 3, image 3 de 3
    • With the opening tool, remove a rubber foot.

    • For this action you will have to exert some force, because the foot is glued with a resistant glue.

  4. jp.ik Leap T304 Battery Replacement Replacement: étape 4, image 1 de 1
    • Remove all screws with a Philips screwdriver PH1

    • All screws are the same so don't worry about identifying them.

  5. jp.ik Leap T304 Battery Replacement Replacement: étape 5, image 1 de 3 jp.ik Leap T304 Battery Replacement Replacement: étape 5, image 2 de 3 jp.ik Leap T304 Battery Replacement Replacement: étape 5, image 3 de 3
    • With the plastic tool, insert between the plastics and gently pry open.

    • With your fingers continue to force open the bottom cover on the side indicated in the figure.

    • You will feel and hear several clicks, perfectly normal, nothing is breaking. Remove the cover completely.

  6. jp.ik Leap T304 Battery Replacement Replacement: étape 6, image 1 de 1
    • Finally, we have the laptop open and ready to replace most of its components. Look elsewhere on how to replace a component.

    • To close the laptop just follow this guide in reverse.

  7. jp.ik Leap T304 Battery Replacement Replacement, Battery Replacement or Removal: étape 7, image 1 de 1
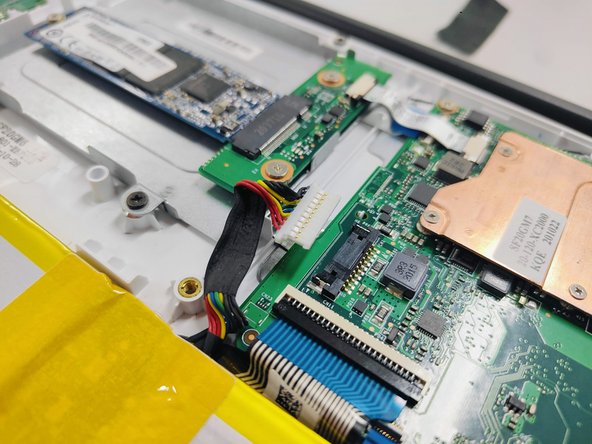
    • Be careful to don't touch if not necessary any electrical part of the product and insure you're properly grounding.

  8. jp.ik Leap T304 Battery Replacement Replacement: étape 8, image 1 de 1
    • Remove mylers shown in the picture.

    • Save them for battery assembly steps

  9. jp.ik Leap T304 Battery Replacement Replacement: étape 9, image 1 de 2 jp.ik Leap T304 Battery Replacement Replacement: étape 9, image 2 de 2
    • Disconnect the cable marked in the figure gently, pulling it out of the connector.

  10. jp.ik Leap T304 Battery Replacement Replacement: étape 10, image 1 de 2 jp.ik Leap T304 Battery Replacement Replacement: étape 10, image 2 de 2
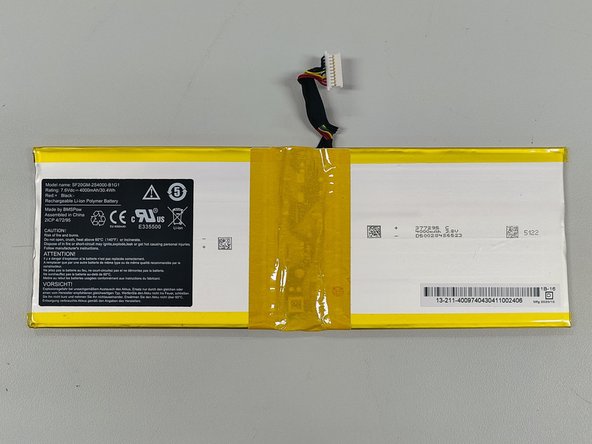
    • Gently remove the battery.

    • CAUTION!!

    • Some products may have this battery fixed with double-sided adhesive tape. In these cases, use a wide spatula to remove the battery without bending it.

    • SAFETY WARNING!

    • Never bend or puncture the battery. Danger of explosion. If you detect a swollen or damaged battery, handle it with extreme care and place it in a protective container.

Conclusion

To reassemble your device, follow these instructions in reverse order.

Une autre personne a terminé cette réparation.

Nelson Oliveira

Membre depuis le 02/03/23

741 Réputation

4 tutoriels rédigés

Équipe

jp.ik Membre de l'équipe jp.ik

Business

2 membres

14 tutoriels rédigés

0 commentaires

Ajouter un commentaire

Nombre de vues :

Dernières 24 heures : 0

7 derniers jours : 4

30 derniers jours : 29

Total : 310