Aller au contenu principal

Remplacement de l'ensemble écran du MacBook Pro 13" deux ports Thunderbolt 2019

Info : Vous modifiez un tutoriel prérequis. Toutes les modifications apportées affecteront le tutoriel qui comprend ces étapes.

Anglais
Français

Traduction de l’étape 4

Étape 4
MacBook Pro 13" Two Thunderbolt Ports 2019 Display Assembly Replacement: étape 0, image 1 de 3 MacBook Pro 13" Two Thunderbolt Ports 2019 Display Assembly Replacement: étape 0, image 2 de 3 MacBook Pro 13" Two Thunderbolt Ports 2019 Display Assembly Replacement: étape 0, image 3 de 3
  • Keep a firm grip on both the screen and main body of the MacBook Pro. Either half can fall unexpectedly during this step.

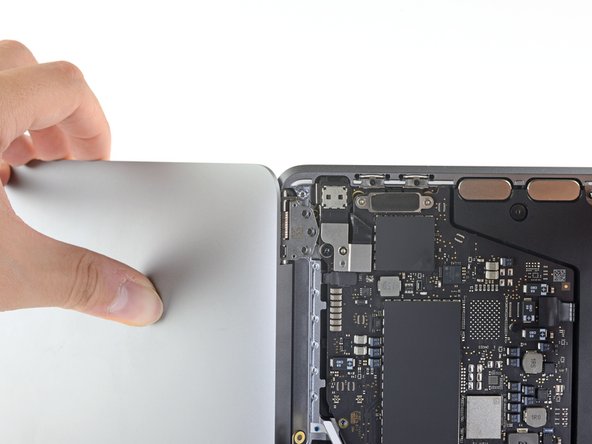
  • Push both halves of the MacBook Pro together so that the hinge brackets can be lifted clear of their recesses in the chassis.

  • Push the main body of the MacBook Pro away from you while pulling the screen toward you to separate it.

  • Remove the display/screen assembly, being careful not to snag it on any cables.

Tenez fermement les deux parties de votre MacBook Pro. L'une d'elles pourrait tomber de façon imprévue au cours de la procédure.

Maintenez les deux moitiés du MacBook Pro ensemble pour pouvoir retirer les charnières de leur logement dans le châssis, sans accroc.

Éloignez la partie clavier du MacBook Pro tout en tirant l'écran vers vous pour les séparer.

Ôtez l'ensemble écran en veillant à ce que rien ne reste accroché aux nappes.

Vos contributions sont faites dans le cadre de la licence open source Creative Commons.