Aller au contenu principal

Retrait de l'écran

Info : Vous modifiez actuellement une condition préalable du tutoriel que vous venez de consulter. Toutes les modifications affecteront les 5 tutoriels qui comprennent cette étape.

Anglais
Français

Traduction de l’étape 6

Étape 6
Screen Removal, Insert an opening pick: étape 0, image 1 de 3 Screen Removal, Insert an opening pick: étape 0, image 2 de 3 Screen Removal, Insert an opening pick: étape 0, image 3 de 3
Insert an opening pick
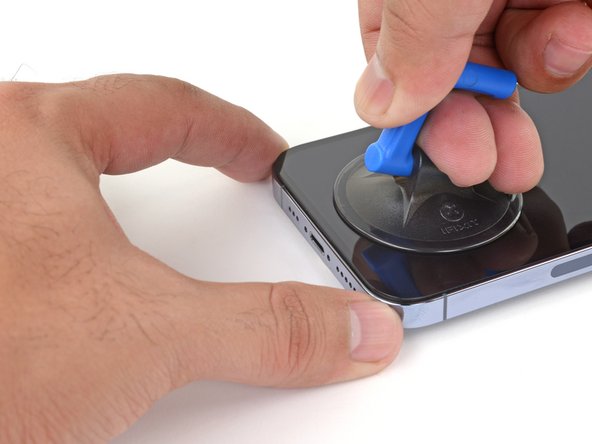
  • Apply a suction handle to the bottom edge of the phone, while avoiding the very edge of the glass.

  • Pull up on the suction cup with firm, constant pressure to create a slight gap between the screen and the frame.

  • Insert an opening pick into the gap under the screen's plastic bezel.

  • The watertight adhesive holding the screen in place is very strong; creating this initial gap takes a significant amount of force. If you're having a hard time opening a gap, apply more heat, and gently rock the screen up and down to weaken the adhesive until you create enough of a gap to insert your tool.

Posez une ventouse sur le bord inférieur du téléphone, en évitant le bord du verre.

Tirez sur la ventouse en exerçant une pression ferme et constante pour créer un léger espace entre l'écran et le châssis.

Insérez un médiator dans l'espace situé sous le châssis en plastique de l'écran.

L'adhésif étanche qui maintient l'écran en place est très puissant ; il faut une force considérable pour créer cet espace initial. Si vous avez du mal à l'ouvrir, appliquez plus de chaleur et remuez délicatement l'écran de haut en bas pour affaiblir l'adhésif, jusqu'à ce que vous ayez ouvert un espace suffisant pour insérer votre outil.

Vos contributions sont faites dans le cadre de la licence open source Creative Commons.