Aller au contenu principal

velocity micro tablet T301 Screen Display. Replacement

Ce dont vous avez besoin

  1. velocity micro tablet T301 Screen Display. Replacement, Screen Display.: étape 1, image 1 de 1
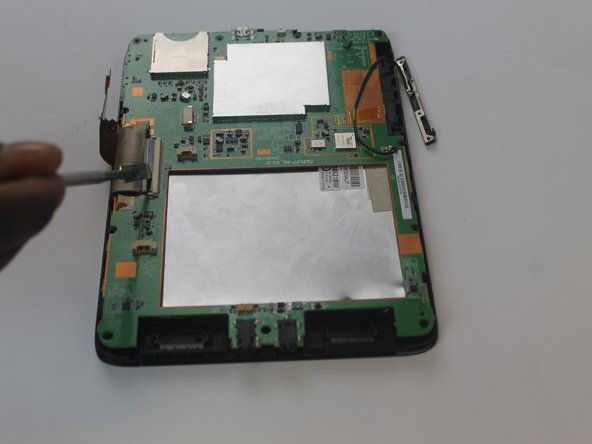
    • Insert the plastic opening tool in the SD port. The edge point should be pointed towards the rear panel.

  2. velocity micro tablet T301 Screen Display. Replacement: étape 2, image 1 de 1
    • Insert a small opening tool between the rear panel and the tablet.

  3. velocity micro tablet T301 Screen Display. Replacement: étape 3, image 1 de 1
    • The large opening tool is not needed any more.

  4. velocity micro tablet T301 Screen Display. Replacement: étape 4, image 1 de 2 velocity micro tablet T301 Screen Display. Replacement: étape 4, image 2 de 2
    • Move the small tool opener around the rear panel to free the 12 edges.

  5. velocity micro tablet T301 Screen Display. Replacement: étape 5, image 1 de 1
    • Using PH0 Phillips Driver, remove the 4 Screws in the Metal part.

  6. velocity micro tablet T301 Screen Display. Replacement: étape 6, image 1 de 1
    • Using a plastic Spudger remove the battery connector.

  7. velocity micro tablet T301 Screen Display. Replacement: étape 7, image 1 de 1
    • Using PH0 Phillips Driver, remove the 12 Screws in the cover.

  8. velocity micro tablet T301 Screen Display. Replacement: étape 8, image 1 de 1
    • Place a metal Spudger between the tablet and the back cover.

  9. velocity micro tablet T301 Screen Display. Replacement: étape 9, image 1 de 1
    • Move the spudger around the tablet to release the clips attached to the tablet.

  10. velocity micro tablet T301 Screen Display. Replacement: étape 10, image 1 de 1
    • Use a plastic spudger to release the connection between the speakers and the motherboard as shown in the picture.

  11. velocity micro tablet T301 Screen Display. Replacement: étape 11, image 1 de 1
    • Using a metal spudger to remove the top plug connector from the motherboard.

  12. velocity micro tablet T301 Screen Display. Replacement: étape 12, image 1 de 2 velocity micro tablet T301 Screen Display. Replacement: étape 12, image 2 de 2
    • Use a metal spudger to remove both screen cable connectors.

  13. velocity micro tablet T301 Screen Display. Replacement: étape 13, image 1 de 1
    • use openning tools to remove the motherboard.

  14. velocity micro tablet T301 Screen Display. Replacement: étape 14, image 1 de 1
    • Remove the motherboard cover to reach in the screen display.

Conclusion

To reassemble your device, follow these instructions in reverse order.

James Napoleon

Membre depuis le 10/05/16

101 Réputation

1 tutoriel rédigé

Équipe

USF Tampa, Team 1-6, Cagle Fall 2016 Membre de l'équipe USF Tampa, Team 1-6, Cagle Fall 2016

USFT-CAGLE-F16S1G6

3 membres

5 tutoriels rédigés

0 commentaires

Ajouter un commentaire

Nombre de vues :

Dernières 24 heures : 0

7 derniers jours : 0

30 derniers jours : 5

Total : 74