Aller au contenu principal

Ce dont vous avez besoin

Cette vue éclatée n'est pas un tutoriel de réparation. Pour réparer votre Echo Dot 4. Generation, utilisez notre manuel de réparation.

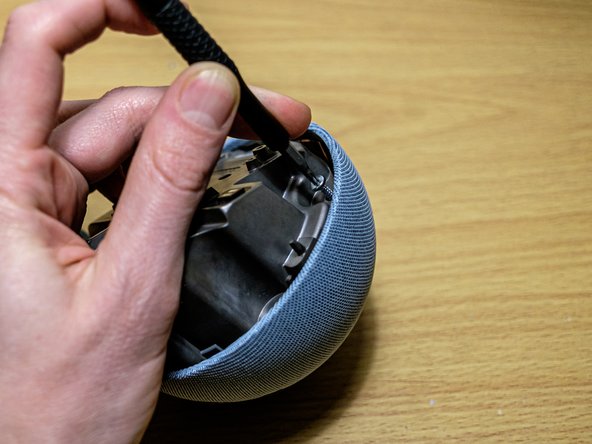
  1. Echo Dot 4th Generation Teardown, Open the bottom: étape 1, image 1 de 3 Echo Dot 4th Generation Teardown, Open the bottom: étape 1, image 2 de 3 Echo Dot 4th Generation Teardown, Open the bottom: étape 1, image 3 de 3
    • Get under the bottom layer with something thin and pull it off. You might need to use quite a force as it's glued pretty well.

  2. Echo Dot 4th Generation Teardown, Loosen screws: étape 2, image 1 de 2 Echo Dot 4th Generation Teardown, Loosen screws: étape 2, image 2 de 2
    • Take the screws out with torx 6. A T5 might work as well.

  3. Echo Dot 4th Generation Teardown, Open it: étape 3, image 1 de 3 Echo Dot 4th Generation Teardown, Open it: étape 3, image 2 de 3 Echo Dot 4th Generation Teardown, Open it: étape 3, image 3 de 3
    • Open the device.

    • The top part is housing the speaker with all boards and components.

  4. Echo Dot 4th Generation Teardown, Take out the mainboard screws: étape 4, image 1 de 1
    • Take out the mainboard screws with a torx 5.

  5. Echo Dot 4th Generation Teardown, Lift the mainboard.: étape 5, image 1 de 3 Echo Dot 4th Generation Teardown, Lift the mainboard.: étape 5, image 2 de 3 Echo Dot 4th Generation Teardown, Lift the mainboard.: étape 5, image 3 de 3
    • Be careful by lifting the mainboard. The LED panel and the control board are still connected.

    • Open it from the side on the volume up button.

  6. Echo Dot 4th Generation Teardown, Unplug the connectors: étape 6, image 1 de 3 Echo Dot 4th Generation Teardown, Unplug the connectors: étape 6, image 2 de 3 Echo Dot 4th Generation Teardown, Unplug the connectors: étape 6, image 3 de 3
    • Take a spudger and lift the connector off. Careful! It opens from the oppesite site the the cable is going in.

  7. Echo Dot 4th Generation Teardown, Place the mainboard aside: étape 7, image 1 de 1
    • Best place is in the bottom part where it originaly sits.

  8. Echo Dot 4th Generation Teardown, Take out the speaker: étape 8, image 1 de 3 Echo Dot 4th Generation Teardown, Take out the speaker: étape 8, image 2 de 3 Echo Dot 4th Generation Teardown, Take out the speaker: étape 8, image 3 de 3
    • Open the four torx 8 screws.

    • Lift the speaker outside the speaker grill.

  9. Echo Dot 4th Generation Teardown, LED Panel: étape 9, image 1 de 3 Echo Dot 4th Generation Teardown, LED Panel: étape 9, image 2 de 3 Echo Dot 4th Generation Teardown, LED Panel: étape 9, image 3 de 3
    • Carefully pull the partially glued connector cable off.

    • Use a torx 6 or 5 to take out the two screws.

  10. Echo Dot 4th Generation Teardown, Take LED panel out: étape 10, image 1 de 2 Echo Dot 4th Generation Teardown, Take LED panel out: étape 10, image 2 de 2
    • Pull it in the direction of the arrows to take the panel out.

  11. Echo Dot 4th Generation Teardown, Take out screws of control board: étape 11, image 1 de 2 Echo Dot 4th Generation Teardown, Take out screws of control board: étape 11, image 2 de 2
    • Loosen the four screws.

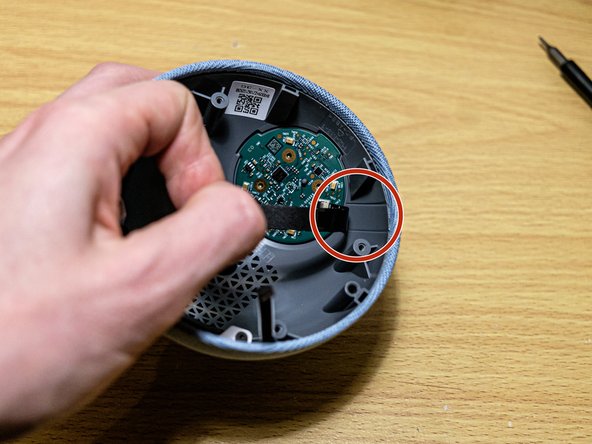
  12. Echo Dot 4th Generation Teardown, Loosen glued cable: étape 12, image 1 de 2 Echo Dot 4th Generation Teardown, Loosen glued cable: étape 12, image 2 de 2
    • Pull of the glued connector cable.

  13. Echo Dot 4th Generation Teardown, Take off the cable: étape 13, image 1 de 3 Echo Dot 4th Generation Teardown, Take off the cable: étape 13, image 2 de 3 Echo Dot 4th Generation Teardown, Take off the cable: étape 13, image 3 de 3
    • Lift the lock, which is again on the opposite side of the cable.

    • Beware pulling the cable out. Don't pull it up, pull it as low as you can. See the arrow.

    • Remember how the board is placed because there isn't much of a difference.

  14. Echo Dot 4th Generation Teardown, Lift the controller board: étape 14, image 1 de 3 Echo Dot 4th Generation Teardown, Lift the controller board: étape 14, image 2 de 3 Echo Dot 4th Generation Teardown, Lift the controller board: étape 14, image 3 de 3
    • As the controller board sits quite tight better use the flat side of a spudger to lift it off.

    • Use the leverage effect.

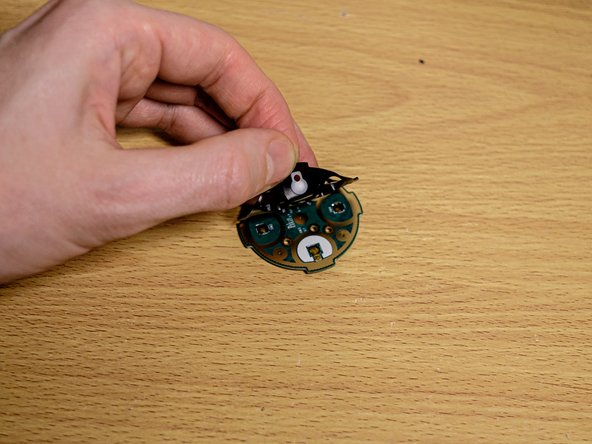
  15. Echo Dot 4th Generation Teardown, Closer look: étape 15, image 1 de 3 Echo Dot 4th Generation Teardown, Closer look: étape 15, image 2 de 3 Echo Dot 4th Generation Teardown, Closer look: étape 15, image 3 de 3
    • Thats the controller board.

    • On the other sid are the buttons. Remove the rubber cap.

  16. Echo Dot 4th Generation Teardown, Screws of the device: étape 16, image 1 de 1
    • The device uses three types of screws.

Simeon

Membre depuis le 02/03/22

512 Réputation

2 tutoriels rédigés

0 commentaires

Ajouter un commentaire

Nombre de vues :

Dernières 24 heures : 5

7 derniers jours : 40

30 derniers jours : 163

Total : 5,675