Aller au contenu principal

Ce dont vous avez besoin

Cette vue éclatée n'est pas un tutoriel de réparation. Pour réparer votre Scotch TL901, utilisez notre manuel de réparation.

  1. Scotch TL901 Teardown, The Laminator: étape 1, image 1 de 1
    • The Scotch TL901 Laminator

  2. Scotch TL901 Teardown, Unscrewing the Case: étape 2, image 1 de 1
    • Using a small Phillips screwdriver, remove the screws from the bottom of the plastic case.

    • Rubber feet in the four corners must be removed first to gain access to the screws underneath. A sticker may also be covering the middle screw on the left.

  3. Scotch TL901 Teardown, The Opened Laminator: étape 3, image 1 de 1
    • Pull off the silver plastic cover and gain access to the internal components.

    • The rollers, motor, circuit board, and LEDs are all visible now.

  4. Scotch TL901 Teardown, The Circuit Board: étape 4, image 1 de 1
    • First unplug all three wire headers connected to the circuit board.

    • Unscrew the two screws holding down the circuit board by its corners and remove the board from the laminator.

  5. Scotch TL901 Teardown, The Spring: étape 5, image 1 de 1
    • Unhook the spring from the plastic surrounding the motor.

  6. Scotch TL901 Teardown, The Rollers: étape 6, image 1 de 1
    • Hold the roller enclosure from both sides, indicated by the markers, and pull upwards and slightly out.

    • Free access to the motor and rollers is now possible.

  7. Scotch TL901 Teardown, The Motor: étape 7, image 1 de 1
    • Remove the motor from the rollers by unscrewing the three screws holding them together.

  8. Scotch TL901 Teardown, The Sensor: étape 8, image 1 de 1
    • Remove the sensor from the roller enclosure by unscrewing the two spring-loaded screws.

  9. Scotch TL901 Teardown, The Other Side: étape 9, image 1 de 1
    • Unscrew the two screws and the bar on the other.

  10. Scotch TL901 Teardown, The Gears: étape 10, image 1 de 1
    • Pull the black washers sideways off the metal rod of the roller.

    • Pull the gears off.

  11. Scotch TL901 Teardown, The Disassembled Rollers: étape 11, image 1 de 2 Scotch TL901 Teardown, The Disassembled Rollers: étape 11, image 2 de 2
    • With the gears off, the plastic panel falls off and the rollers come out of the enclosure.

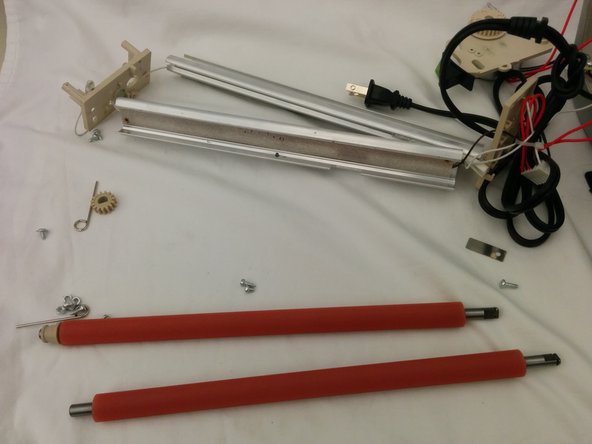
    • The laminator is now disassembled.

Calvin Xu

Membre depuis le 04/18/13

202 Réputation

1 tutoriel rédigé

Équipe

F14BraunReverseEng Membre de l'équipe F14BraunReverseEng

Community

2 membres

8 tutoriels rédigés

16 commentaires

Why is the screw on the left side so hard to get out?

Teri L Geist - Réponse

Thank you..

Putting it back together is more of a challenge.

Frank - Réponse

You're right Frank. For me, getting it to stay together after the tear down and reassembly required superglue and two extra screws. ;) But at least it's working again. Thanks for the great instructions.

pjcall975 - Réponse

Thank you! Just needed to open and remove a jam. Followed your guide and all is well.

KQuinn

Kate Quinn - Réponse

Thank you for posting these instructions. I was able to remove a quarter that got trapped inside.

seanretzloff - Réponse

Ajouter un commentaire

Nombre de vues :

Dernières 24 heures : 6

7 derniers jours : 41

30 derniers jours : 165

Total : 29,180