Aller au contenu principal

Ce dont vous avez besoin

Cette vue éclatée n'est pas un tutoriel de réparation. Pour réparer votre Sony Ericsson K750i, utilisez notre manuel de réparation.

  1. Sony Ericsson K750i Teardown, Battery Cover: étape 1, image 1 de 1
    • Remove the battery cover.

    • Press down firmly with your thumb and slide the cover back.

  2. Sony Ericsson K750i Teardown, Back Casing: étape 2, image 1 de 1
    • Remove two Phillips #0 screws from the battery chamber.

    • Remove two Torx T6 screws from the battery chamber.

  3. Sony Ericsson K750i Teardown: étape 3, image 1 de 1
    • Gently pry off the back casing.

    • Work an opening tool around the entire seam before attempting to pull off the casing. This action will reduce the chance of cracking the casing.

  4. Sony Ericsson K750i Teardown: étape 4, image 1 de 1
    • Remove the casing to expose the camera's components.

  5. Sony Ericsson K750i Teardown, Keypad: étape 5, image 1 de 1
    • Gently pry open the front casing by working an opening tool along the entire seam.

  6. Sony Ericsson K750i Teardown: étape 6, image 1 de 1
    • Remove the front casing by gently lifting it from the phone.

    • Be careful not to pull off any other delicate pieces.

  7. Sony Ericsson K750i Teardown: étape 7, image 1 de 2 Sony Ericsson K750i Teardown: étape 7, image 2 de 2
    • Remove the keypad.

    • The LCD screen is very fragile. Be careful not to catch the keypad on it while removing.

  8. Sony Ericsson K750i Teardown, LCD Screen: étape 8, image 1 de 1
    • Remove the screws holding the screen in place.

  9. Sony Ericsson K750i Teardown: étape 9, image 1 de 1
    • Gently lift the base of the keypad to remove it.

  10. Sony Ericsson K750i Teardown: étape 10, image 1 de 1
    • Gently pull up the green film, avoiding the joystick.

    • The LCD screen will be attached to this film and come off with it.

  11. Sony Ericsson K750i Teardown, Sony Ericsson K750i Teardown: étape 11, image 1 de 1
    • Remove the back cover from the phone.

    • Gently slide the ribbon out of its connection.

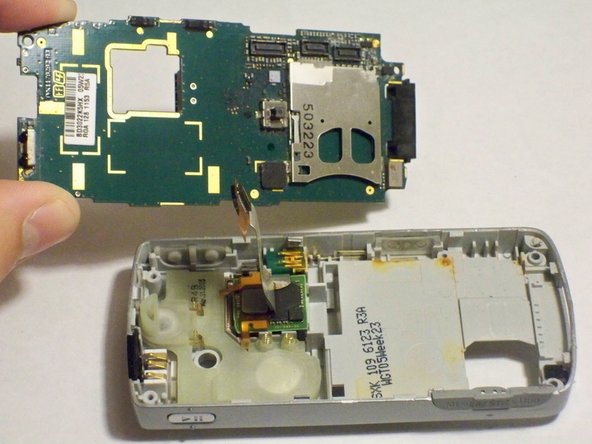
  12. Sony Ericsson K750i Teardown: étape 12, image 1 de 2 Sony Ericsson K750i Teardown: étape 12, image 2 de 2
    • Lift the motherboard out of the phone.

    • The ribbon is fragile so work the motherboard off around the ribbon to prevent damage.

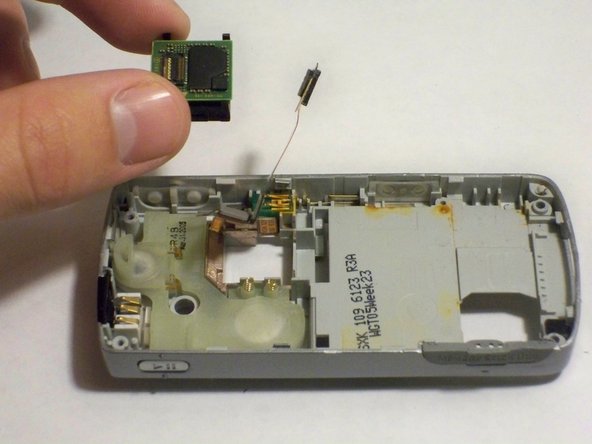
  13. Sony Ericsson K750i Teardown: étape 13, image 1 de 2 Sony Ericsson K750i Teardown: étape 13, image 2 de 2
    • Pry off the microchip that is located below the ribbon.

  14. Sony Ericsson K750i Teardown: étape 14, image 1 de 2 Sony Ericsson K750i Teardown: étape 14, image 2 de 2
    • Lift out the plastic support to complete the teardown.

Abby Evers

Membre depuis le 10/04/11

202 Réputation

6 tutoriels rédigés

Équipe

UW Stout, Team 1-6, Zhou Fall 2011 Membre de l'équipe UW Stout, Team 1-6, Zhou Fall 2011

UWSTOUT-ZHOU-F11S1G6

4 membres

12 tutoriels rédigés

Un commentaire

Ajouter un commentaire

Nombre de vues :

Dernières 24 heures : 1

7 derniers jours : 4

30 derniers jours : 21

Total : 12,439