Aller au contenu principal

Ce dont vous avez besoin

Cette vue éclatée n'est pas un tutoriel de réparation. Pour réparer votre Soundcore Liberty Air 2, utilisez notre manuel de réparation.

  1. Soundcore Liberty Air 2 charging case Teardown, Opening the charging case: étape 1, image 1 de 1
    • Jimmy a pick between the inner and outer casing as depicted on the picture. Carefully use it as a bit of a lever to lift the inner casing a little. A sturdier item is required.

    • There are no wires or other components (besides the magnets) between inner and outer casing, so do not worry if you jam it in too deep.

  2. Soundcore Liberty Air 2 charging case Teardown, Seperating the inner case from the outer case: étape 2, image 1 de 3 Soundcore Liberty Air 2 charging case Teardown, Seperating the inner case from the outer case: étape 2, image 2 de 3 Soundcore Liberty Air 2 charging case Teardown, Seperating the inner case from the outer case: étape 2, image 3 de 3
    • Once loosened a little, you can use the holes (as marked on the image) next to the magnets and the outer case as a lever to lift the inner case out of the outer case. You should be able to to fully seperate outer and inner case.

    • Be careful around the magnets as they can loosen when wedging a pick in the case. They can easily be glued back on however.

  3. Soundcore Liberty Air 2 charging case Teardown, Remove screws of the bottom circuit: étape 3, image 1 de 1
    • Remove the two screws of the bottom print plate using a phillips #00 screwdriver

  4. Soundcore Liberty Air 2 charging case Teardown, Remove connections of the bottom circuit: étape 4, image 1 de 3 Soundcore Liberty Air 2 charging case Teardown, Remove connections of the bottom circuit: étape 4, image 2 de 3 Soundcore Liberty Air 2 charging case Teardown, Remove connections of the bottom circuit: étape 4, image 3 de 3
    • Lift the black plates and remove the connection to the LED (small one with black end) and the connection to the main circuit (big one with blue end) using tweezers

  5. Soundcore Liberty Air 2 charging case Teardown, Remove the bottom circuit from the inner case: étape 5, image 1 de 1
    • Remove the circuit board by placing a spudger or pick between the circuit board and casing and lifting the circuit board free from the case

    • In this step, it is easy to lose the rubber filling where the charging pins to charge the earbuds penetrate the case

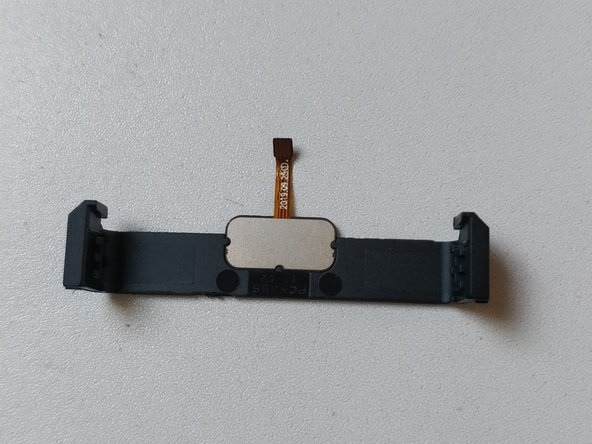
  6. Soundcore Liberty Air 2 charging case Teardown, Remove the LED indicator strip: étape 6, image 1 de 2 Soundcore Liberty Air 2 charging case Teardown, Remove the LED indicator strip: étape 6, image 2 de 2
    • You can easily remove the LED strip by wedging a pick between one of the sides of the strip and lift it out of the case

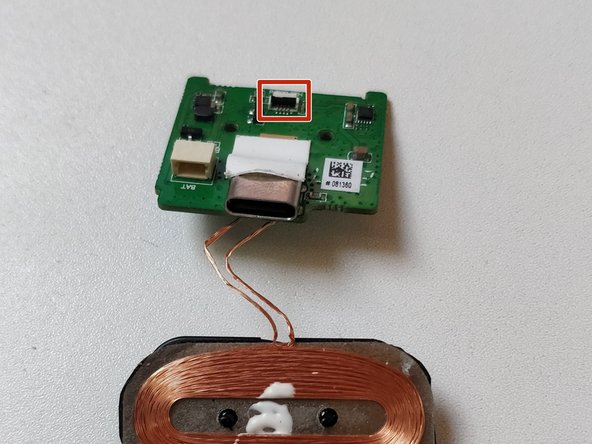
  7. Soundcore Liberty Air 2 charging case Teardown, Remove the wireless charging coil: étape 7, image 1 de 2 Soundcore Liberty Air 2 charging case Teardown, Remove the wireless charging coil: étape 7, image 2 de 2
    • This one easily slides downwards. Just apply some gentle lever action with a pick, tweezer or spudger

    • When removing, be carefull not to remove it too far outwards, as the copper wires connecting the coil to the main circuit are not too long. You might damage the copper wires.

  8. Soundcore Liberty Air 2 charging case Teardown, Remove battery connector from main circuit board: étape 8, image 1 de 1
    • Remove the battery connector from the main circuit board using a spudger or a pick

    • You can loosen it by alternately lifting the connector head at the left and right side.

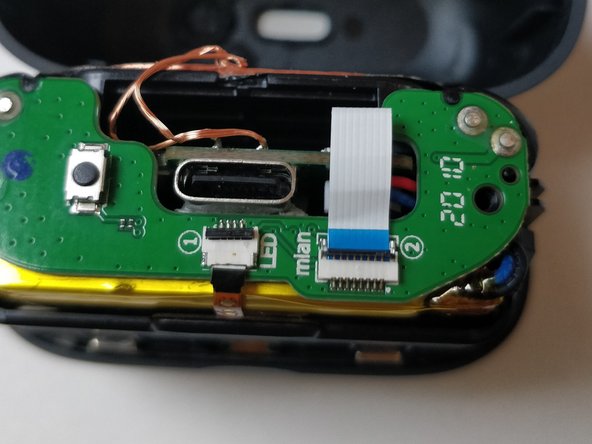
  9. Soundcore Liberty Air 2 charging case Teardown, Remove the main circuit board: étape 9, image 1 de 3 Soundcore Liberty Air 2 charging case Teardown, Remove the main circuit board: étape 9, image 2 de 3 Soundcore Liberty Air 2 charging case Teardown, Remove the main circuit board: étape 9, image 3 de 3
    • Remove the two phillips #00 screws from the main circuit board

    • There is a connector cable that needs to be removed from the print plate. This can be removed by gently pulling out the main circuit board from the inner case

    • When putting the main circuit board back in the case, it might be little tricky to connect to the print plate due to limited space. Do not forget to lift the black plate at the connector port and closing the black plate after it is connected.

  10. Soundcore Liberty Air 2 charging case Teardown, Finished: étape 10, image 1 de 1
    • I did not remove the battery. It was connected to the case with adhesive tape

    • To put the phone back together, simply follow the steps in the reverse order.

Michiel Mariën

Membre depuis le 08/19/21

181 Réputation

1 tutoriel rédigé

8 commentaires

Thanks I just took apart and began to charge again

D

Iron D - Réponse

This helped me fix my Liberty air pro 2 case. I think most likely the battery connector was lose. Maybe it was caused by the case falling.

King of Corinth - Réponse

I wasn't as lucky. I couldn't find anything wrong, that is, loose or damaged. Reassembly didn't help. But I appreciate your clear guide.

Morey Altman - Réponse

Please can you help me one of my ear plugs is not connecting to the phone

Tanko Nazir - Réponse

Have you tried the earplugs pairing mode? Put the earplugs in the charging case and keep the button at the bottom of the case pressed in. This should start pairing mode.

Michiel Mariën - Réponse

Ajouter un commentaire

Nombre de vues :

Dernières 24 heures : 11

7 derniers jours : 82

30 derniers jours : 439

Total : 6,659