Aller au contenu principal

Ce dont vous avez besoin

Cette vue éclatée n'est pas un tutoriel de réparation. Pour réparer votre Hp Pavilion dv9363ea, utilisez notre manuel de réparation.

  1. hp laptop dv9000 serie dv9363ea Teardown, hp laptop dv9000 serie dv9363ea Teardown: étape 1, image 1 de 2 hp laptop dv9000 serie dv9363ea Teardown, hp laptop dv9000 serie dv9363ea Teardown: étape 1, image 2 de 2
    • first of all, if you start to work on your laptop make a plane of the screws. Use an magnetic project board. or just paper and tape and draw the plan.

    • remove the battery, and the 3 panels.

  2. hp laptop dv9000 serie dv9363ea Teardown: étape 2, image 1 de 2 hp laptop dv9000 serie dv9363ea Teardown: étape 2, image 2 de 2
    • remove the RAM and the HDD.

    • to remove the hdd just lift it up. ( its an sata hdd but they use an IDE adapter.

  3. hp laptop dv9000 serie dv9363ea Teardown: étape 3, image 1 de 1
    • remove the wifi pci-e card and the antennas.

    • it will come out of the screw sockets when you remove the srews.

  4. hp laptop dv9000 serie dv9363ea Teardown: étape 4, image 1 de 3 hp laptop dv9000 serie dv9363ea Teardown: étape 4, image 2 de 3 hp laptop dv9000 serie dv9363ea Teardown: étape 4, image 3 de 3
    • now we will remove the dvd rw drive.

    • first remove the screw at the back of the laptop (bottom) see first picture

    • than use a spudger to slide the dvd drive away of the laptop.

  5. hp laptop dv9000 serie dv9363ea Teardown: étape 5, image 1 de 3 hp laptop dv9000 serie dv9363ea Teardown: étape 5, image 2 de 3 hp laptop dv9000 serie dv9363ea Teardown: étape 5, image 3 de 3
    • in this step we will remove the keyboard.

    • there are 10 screws to remove in total. 1 screw on the botoom plate , 6 screws in the battery compartment and 3 under the grey plastic board above the keyboard.

    • first remove the black screw on the bottom , it's next to the screw of the dvd drive.

    • than remove the 6 grey little screws of the battery compartment.

    • then remove the grey plastic board above the keyboard. see picture 3, to be continued in the next step

  6. hp laptop dv9000 serie dv9363ea Teardown: étape 6, image 1 de 3 hp laptop dv9000 serie dv9363ea Teardown: étape 6, image 2 de 3 hp laptop dv9000 serie dv9363ea Teardown: étape 6, image 3 de 3
    • if you remove the grey plastic board be carefull for the wire and socket

    • than remove the other screws from the keyboard. see picture 2

    • now you can remove the keyboard.

  7. hp laptop dv9000 serie dv9363ea Teardown: étape 7, image 1 de 3 hp laptop dv9000 serie dv9363ea Teardown: étape 7, image 2 de 3 hp laptop dv9000 serie dv9363ea Teardown: étape 7, image 3 de 3
    • remove the rest of the screws of the bottom plate.

    • like i said before, make a plan of the screws and parts. it's easier to put it back together

  8. hp laptop dv9000 serie dv9363ea Teardown: étape 8, image 1 de 3 hp laptop dv9000 serie dv9363ea Teardown: étape 8, image 2 de 3 hp laptop dv9000 serie dv9363ea Teardown: étape 8, image 3 de 3
    • now remove all the other screws on the upper case. (under the keyboard)

    • also remove the cables/wires.

    • the power board is in the left upper corner. be carefull with the sockets.

    • some wires are taped or glued so be carefull.

  9. hp laptop dv9000 serie dv9363ea Teardown: étape 9, image 1 de 2 hp laptop dv9000 serie dv9363ea Teardown: étape 9, image 2 de 2
    • if every screw and wire is loose then you are ready to remove the grey plastic board (arround the keyboard)

    • slide the spudger arround the case. it's very easy to remove. just hear the clicks.

    • after removing this plastic frame , the main board is visible.

  10. hp laptop dv9000 serie dv9363ea Teardown: étape 10, image 1 de 1
    • now we will remove the power PCB

    • first remove the connectors but be carefull they are very breakable. and remove the screw, than remove the PCB

    • then remove the red circled screw

    • the yellow and 3 blue screws are from the screen henges.

  11. hp laptop dv9000 serie dv9363ea Teardown: étape 11, image 1 de 2 hp laptop dv9000 serie dv9363ea Teardown: étape 11, image 2 de 2
    • remove usb boards and sd card reader.

    • the yellow circkled PCB below is the Bluetooth PCB. watch out for the connector.

    • the blue circkled connector is the connector of the sd card reader PCB; be carefull if you remove.

  12. hp laptop dv9000 serie dv9363ea Teardown: étape 12, image 1 de 1
    • remove the wifi PCB. be carefull for the connectors.

  13. hp laptop dv9000 serie dv9363ea Teardown: étape 13, image 1 de 3 hp laptop dv9000 serie dv9363ea Teardown: étape 13, image 2 de 3 hp laptop dv9000 serie dv9363ea Teardown: étape 13, image 3 de 3
    • remove the PCB for the sound at the side of the frame.

    • remove the loudspeakers and the attached black frame.

  14. hp laptop dv9000 serie dv9363ea Teardown: étape 14, image 1 de 3 hp laptop dv9000 serie dv9363ea Teardown: étape 14, image 2 de 3 hp laptop dv9000 serie dv9363ea Teardown: étape 14, image 3 de 3
    • before we go further with the PCB's , we will remove the screen.

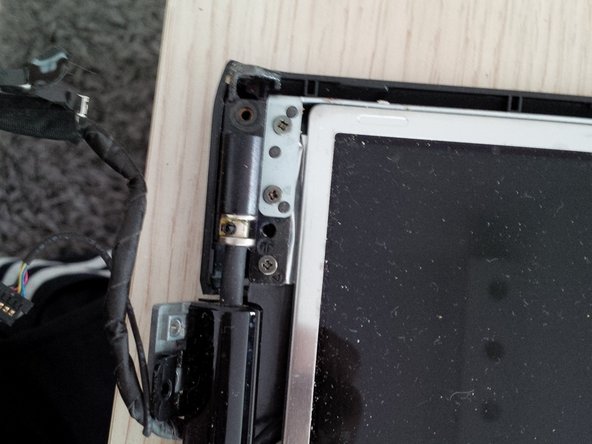
    • remove the screws of the henges at the 2 sides.

    • be carefull with the connectors. i broke the connector of the webcam PCB.

  15. hp laptop dv9000 serie dv9363ea Teardown: étape 15, image 1 de 1
    • remove the second power PCB.

  16. hp laptop dv9000 serie dv9363ea Teardown: étape 16, image 1 de 3 hp laptop dv9000 serie dv9363ea Teardown: étape 16, image 2 de 3 hp laptop dv9000 serie dv9363ea Teardown: étape 16, image 3 de 3
    • remove the DC jack and usb PCB.

    • again be carefull with the connectors.

    • arround the dc jack is a metal frame. remove it before you remove the PCB

  17. hp laptop dv9000 serie dv9363ea Teardown: étape 17, image 1 de 3 hp laptop dv9000 serie dv9363ea Teardown: étape 17, image 2 de 3 hp laptop dv9000 serie dv9363ea Teardown: étape 17, image 3 de 3
    • remove the DVD Drive PCB.

    • 2 screws are hidden under the black tape.

  18. hp laptop dv9000 serie dv9363ea Teardown: étape 18, image 1 de 1
    • now remove the last screws of the mainboard. I dont have a picture of the screws .. mea culpa..

    • remove the main board.

    • there are litlle black screws arround the fan.

  19. hp laptop dv9000 serie dv9363ea Teardown: étape 19, image 1 de 3 hp laptop dv9000 serie dv9363ea Teardown: étape 19, image 2 de 3 hp laptop dv9000 serie dv9363ea Teardown: étape 19, image 3 de 3
    • in this step we will begin at the main board or motherboard..

    • we will remove the fan and cpu cooler.

    • the cpu koeler is in 2 pieces. 1 for the cpu and another chip. than a fan for the Nvidia chip.

  20. hp laptop dv9000 serie dv9363ea Teardown: étape 20, image 1 de 3 hp laptop dv9000 serie dv9363ea Teardown: étape 20, image 2 de 3 hp laptop dv9000 serie dv9363ea Teardown: étape 20, image 3 de 3
    • remove and clean the pcu fan. in this laptop was a lot of cat hear, that caused a blocked fan.

    • also put new cpu cooling paste on the chips. ( and processor)

  21. hp laptop dv9000 serie dv9363ea Teardown: étape 21, image 1 de 3 hp laptop dv9000 serie dv9363ea Teardown: étape 21, image 2 de 3 hp laptop dv9000 serie dv9363ea Teardown: étape 21, image 3 de 3
    • now the lcd screen...

    • i don't have to tell you that you have to be careful...

    • remove the black dots ( the screws are under the black dots)

    • if you removed all the screws than use the spudger or isesamo to open the frame. you will hear the clicks..

  22. hp laptop dv9000 serie dv9363ea Teardown: étape 22, image 1 de 3 hp laptop dv9000 serie dv9363ea Teardown: étape 22, image 2 de 3 hp laptop dv9000 serie dv9363ea Teardown: étape 22, image 3 de 3
    • remove the microphone module and the webcam PCB.

    • remove the wifi antennas.

  23. hp laptop dv9000 serie dv9363ea Teardown: étape 23, image 1 de 3 hp laptop dv9000 serie dv9363ea Teardown: étape 23, image 2 de 3 hp laptop dv9000 serie dv9363ea Teardown: étape 23, image 3 de 3
    • remove all the other screws and henges , so you can remove the lcd screen from the frame.

  24. hp laptop dv9000 serie dv9363ea Teardown: étape 24, image 1 de 1
    • remove the mouse or touchpad module.

Kevin D

Membre depuis le 05/02/14

7 276 Réputation

21 tutoriels rédigés

0 commentaires

Ajouter un commentaire

Nombre de vues :

Dernières 24 heures : 1

7 derniers jours : 8

30 derniers jours : 15

Total : 2,936