Aller au contenu principal

Ce dont vous avez besoin

Cette vue éclatée n'est pas un tutoriel de réparation. Pour réparer votre iPod Shuffle 1st Generation, utilisez notre manuel de réparation.

  1. iPod Shuffle 1st Generation Teardown, Hold Switch: étape 1, image 1 de 1
    • Before opening your iPod, ensure that the hold switch is in the locked position.

  2. iPod Shuffle 1st Generation Teardown: étape 2, image 1 de 1
    • Use a spudger to pry up the white plastic hold switch.

  3. iPod Shuffle 1st Generation Teardown, Casing: étape 3, image 1 de 1
    • If present, remove the cap from the USB port.

  4. iPod Shuffle 1st Generation Teardown: étape 4, image 1 de 1
    • The following step can be challenging and time consuming. Be sure to go slowly and have patience to prevent damaging your iPod.

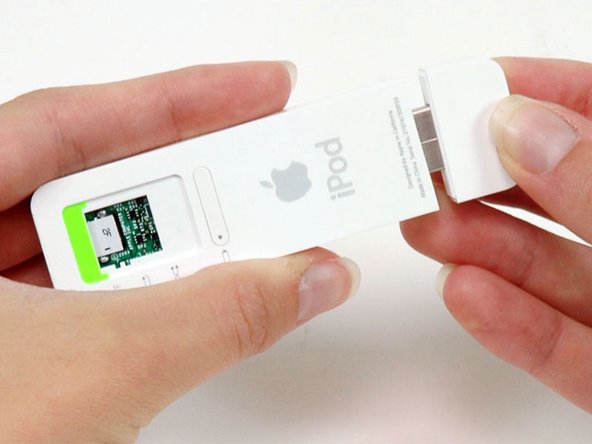
    • Use an Exacto knife to separate the glue holding the USB port on the iPod. Run the knife along the seam between the two sections of the iPod until the glue is separated. Expect to run the knife along this edge 20-30 times before the glue will be entirely freed.

  5. iPod Shuffle 1st Generation Teardown: étape 5, image 1 de 1
    • Continue to run the knife around all four edges of the USB port until the glue is released. You may be able to gently wiggle the knife from side to side to help release the glue.

  6. iPod Shuffle 1st Generation Teardown: étape 6, image 1 de 1
    • Use a spudger to push on the headphone jack and slide the USB port out of its housing.

    • If the USB port doesn't come free, check to make sure all the glue holding the USB port in place has been released. Pulling on the USB port itself is not recommended as there is a fragile ribbon cable that can be ripped if the USB port suddenly comes free.

  7. iPod Shuffle 1st Generation Teardown: étape 7, image 1 de 1
    • After the USB port comes free, carefully slide it out of its housing. Don't pull it out too far because there's still a ribbon cable connecting it to the logic board.

  8. iPod Shuffle 1st Generation Teardown: étape 8, image 1 de 1
    • Continue to slide the iPod out of its casing by using a spudger to push on the logic board near the headphone jack.

  9. iPod Shuffle 1st Generation Teardown: étape 9, image 1 de 1
    • Turn the iPod so that the click wheel is facing up. This will prevent the battery indicator from falling out.

    • If the battery indicator does fall out, don't forget to replace it prior to reassembling the iPod. Getting the battery indicator back in place can be tricky. You'll have to slide it in from the end of the iPod's casing and get it to fall into its slot in the casing.

    • Slide the iPod out of its casing.

  10. iPod Shuffle 1st Generation Teardown, USB Port: étape 10, image 1 de 1
    • Use a spudger to flip up the black plastic tab holding the USB port ribbon in place. The black tab will rotate up 90 degrees, releasing the ribbon cable.

  11. iPod Shuffle 1st Generation Teardown: étape 11, image 1 de 1
    • Carefully peel the yellow USB ribbon up from the battery.

  12. iPod Shuffle 1st Generation Teardown: étape 12, image 1 de 1
    • Slide the USB ribbon out of its connector.

    • Lift the USB port and detached ribbon cable out of the iPod.

  13. iPod Shuffle 1st Generation Teardown, Battery & Logic Board: étape 13, image 1 de 1
    • Gently pull back the white plastic framework to free the left edge of the logic board. Pull up on the logic board slightly to prevent the logic board from falling back into place.

  14. iPod Shuffle 1st Generation Teardown: étape 14, image 1 de 1
    • Repeat the same procedure on the opposite side to free the logic board from the white plastic casing.

  15. iPod Shuffle 1st Generation Teardown: étape 15, image 1 de 1
    • Lift the logic board up to disconnect it from the memory board beneath. Don't remove the logic board from the iPod yet, because it's still connected to the battery.

  16. iPod Shuffle 1st Generation Teardown: étape 16, image 1 de 1
    • Turn the iPod over and use your finger to push the battery through the hole in the casing. The battery is attached to the plastic framework with a mild adhesive.

    • Lift the battery and logic board out of the iPod.

  17. iPod Shuffle 1st Generation Teardown, Memory Board: étape 17, image 1 de 1
    • Peel up the translucent tape securing the memory board to the edge of the white plastic framework. It is only necessary to peel up the tape on one side, as the other side will be freed while removing the memory board.

  18. iPod Shuffle 1st Generation Teardown: étape 18, image 1 de 1
    • Lift the memory board out of the framework and peel the tape off the other side of the framework.

    • The white plastic framework is not very strong. Be careful not to exert too much force on the thin plastic arm when peeling off the tape.

Ashley Ryan

Membre depuis le 03/25/12

5 579 Réputation

3 tutoriels rédigés

Équipe

Master Techs Membre de l'équipe Master Techs

Community

322 membres

2 506 tutoriels rédigés

2 commentaires

hmmmmmmmmmmmmmmmmmmmmmmmmmmmmmmmmmmmmmmmmmmmmmmmmmmmmmmmmmmmmmmmmmmmmmmmmmmmmmm needs more description

Feyrowan - Réponse

Great step-by-step instructions! I’ll probably never teardown my iPod, but it’s good to have the instructions!!

Andy Cheng - Réponse

Ajouter un commentaire

Nombre de vues :

Dernières 24 heures : 3

7 derniers jours : 26

30 derniers jours : 110

Total : 16,552