Introduction
Le cache de la batterie est le rabat en caoutchouc (situé sous le haut-parleur) qui recouvre la batterie Bose SoundLink Mini. Il ne peut être retiré sans passer par plusieurs étapes préalables. Ce tutoriel vous indiquer les étapes faciles à suivre pour retirer le cache de la batterie Bose SoundLink Mini.
Ce dont vous avez besoin
-
-
Retirez le cache batterie en caoutchouc et enlevez les 4 vis de 6,0 mm entourées avec un tournevis Torx T8.
-
Attention : notez que le cache reste fixé dans le coin supérieur à gauche. Ne tentez pas de l'enlever complètement.
-
-
-
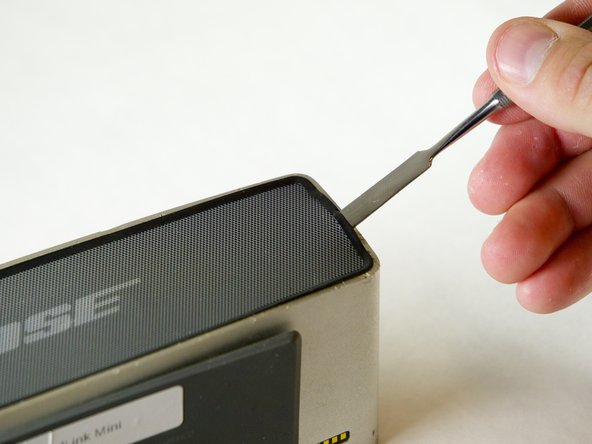
Insérez la spatule (spudger) métallique entre le bord en caoutchouc de la grille et le boîtier en aluminium.
-
-
-
-
Retirez les quatre vis de 15,0 mm sur la gauche et les quatre vis de 9,0 mm sur la droite, à l'aide du tournevis Torx T8.
-


Pour réassembler votre appareil, suivez ces instructions dans l'ordre inverse :-)
Pour réassembler votre appareil, suivez ces instructions dans l'ordre inverse :-)
Annulation : je n'ai pas terminé ce tutoriel.
7 autres ont terminé cette réparation.
Merci à ces traducteurs :
100%


Ces traducteurs nous aident réparer le monde ! Vous voulez contribuer ?
Commencez à traduire ›
Équipe

Cal Poly, Team 1-23, Maness Fall 2015 Membre de l'équipe Cal Poly, Team 1-23, Maness Fall 2015
CPSU-MANESS-F15S1G23
4 membres
21 tutoriels rédigés
3 commentaires
@rajpotus: I had the same problem. If the little rubber tab is not damaged (mine was fine), you should be able to follow these instructions to replace it. But I have these comments on the instructions:
1) You do NOT need to remove the front grill. I have no idea why they suggest you do that here.
2) I think the reason you remove the battery is to make sure the circuit board has zero power on it when you work on it — otherwise a touch of the screwdriver to an unlucky spot on the board might short/burn something out. But I don’t think there’s any mechanical reason to remove it.
3) Once you pop off the back grill cover, you should be able to slide the tab through the slot and coax it up (maybe with a tooth-pick and/or tweezers) on top of the circuit board, but it’s probably better to unscrew the circuit board (as directed here) which makes it easier to push the rubber tab through. Then slide the circuit board back under the tab and screw it back into place.